
![]()
MTX Audio RT8PT Universal Powered Subwoofer Enclosure

With the MTX Audio RT8PT Universal Powered Subwoofer Enclosure, enjoy rich, bass-heavy sound that turns any ride into a musical excursion. This enclosure is sturdy and small, and it fits perfectly with any car’s audio system to provide excellent sound quality.
Introduction MTX Audio RT8PT
Thank you for purchasing an MTX Audio Hi-Performance powered tube. Proper installation matched with MTX speakers and amplifiers provides superior sound and performance for endless hours of waking the neighbours, slammin’ your friends or flat-out stomping wanna-be players. Congrats and enjoy the ultimate audio experience with MTX.
Eigenschaften
- Powered vented enclosure
- Subwoofer: 20cm (8″)
- Amplifier Max Power: 360W
- Amplifier RMS Power: 120W
- EBC remote included
- High and low-level inputs
- Abmessungen: 25x25x54cm
Control Panel on the Amplifier
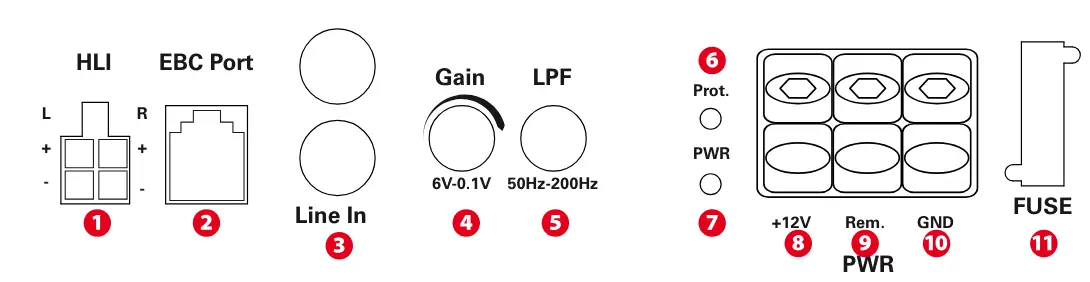
- Speaker-level inputs – This input will allow the amplifier to operate from source units with speaker-level outputs. Output speaker leads from the source unit should be tied directly to the wire harness provided with the amplifier.
Hinweis: When speaker-level inputs are used, a remote turn-on wire must used to switch the amplifier on and off. - EBC Port (External Bass Control) – The Remote Subwoofer Level Control (EBC) plugs directly into this port, while the EBC itself can be placed anywhere in the vehicle for on-demand bass adjustments. EBC is included.
- RCA Inputs – These RCA inputs are used with source units that have RCA or Line level outputs. (Source units need a minimum level of 100mV output for proper operation of the amplifier).
MTX recommends only high-quality twisted pair cables (such as StreetWires) to decrease the possibility of radiated noise entering the system. - Gain Control – The gain control matches the input sensitivity of the amplifier to the source unit being used. The operating range varies from 100mv to 6V.
- Anpassen der Verstärkung
- Turn the gain control on the amplifier all the way down (counterclockwise).
- Turn up the volume control on the source unit to approximately 3⁄4 of the maximum.
- Adjust the gain control on the amplifier until audible distortion occurs.
- Stellen Sie den Gain-Regler nach unten, bis die hörbare Verzerrung verschwindet.
- The amplifier is now calibrated to the output of the source unit.
- Low Pass Cross-Over Frequency Control – Wird verwendet, um die gewünschte Low-Pass (LP) Cross-Over-Frequenz auszuwählen. Die Frequenz ist von 50 Hz bis 200 Hz einstellbar.
- Protection LED – When the amps are in thermal protection, the LED turns red.
- PowerOn LED – The LED illuminates red when the amp is switched on.
- (+12V) Power Terminal – This is the main power input for the amplifier and must be connected directly to the positive terminal of the vehicle’s battery for proper operation. Use caution when installing (+12V) power cables in the vehicle. Avoid running this cable parallel with RCA cables, antennas, or other sensitive equipment due to massive currents that can induce noise into the audio system. It is also very important to have a tight, secure connection for maximum performance. MTX recommends using a minimum of 6mm2 full copper power wire with the MTX RT8PT powered tube.
- Remote Terminal – The powered tube can be turned on by applying 12 volts to this terminal. Typically this voltage is supplied by a wire from the source unit marked “remote” or “power antenna”.
- Ground Terminal – A proper ground is required for your amplifier to operate at peak performance. A short ground cable the same diameter as the power cable should be used to attach the ground terminal directly to the chassis of the vehicle. Always remove paint, dirt or debris to expose bare metal where the ground will be attached.
- Fuses – When the fuse blows, replace it with the same value. The RT8PT uses a 20A fuse.
Caution: Never use a higher-rated fuse.
MTX Audio RT8PT Installation & Mounting
MTX recommends your new RoadTHUNDER powered tube to be installed by an Authorized MTX retailer. Any deviation from specified installation instructions can cause serious damage to the amplifier, speakers and/or vehicle’s electrical system. Damage caused by improper installation is NOT covered under warranty. Please verify all connections prior to turning on your system.
- Das Minuskabel der Fahrzeugbatterie abklemmen.
- Determine the mounting place for your MTX-powered enclosure. Hook it with the provided belts. Keep in mind there should be sufficient airflow for proper cooling.
- Install a positive (+) power cable from the vehicle’s battery through the firewall using a grommet or firewall bushing to avoid cable damage from the sharp edges of the firewall. Run the cable through the interior of the vehicle and connect it to the amplifier’s (+12V) terminal (8). Do Not connect to the battery at this time.
Hinweis: Verwenden Sie sowohl für die positiven als auch für die negativen Anschlüsse nur Kabel mit der richtigen Stärke. - Install a circuit breaker or fuse within 20cm of the battery. This effectively lowers the risk of severe damage to you or your vehicle in case of a short circuit or accident. Make sure the circuitbreaker is switched off or the fuse is taken out of the fuse holder untill all connections are made. Now connect your positive power cable to the positive battery terminal of the battery.
- Grounding – Locate a proper ground point on the vehicle’s chassis and remove all paint, dirt or debris to reveal a bare metal surface. Attach the ground wire to that contact point. Connect the opposite end of the ground wire to the (GND) terminal on the MTX amplifier (10).
- Connect a remote turn-on wire from the source unit to the powered tube remote terminal (9). If the source unit does not have a dedicated Remote Turn-on lead, you may connect to the source unit’s Power Antenna lead.
- Connecting signal cables to the amplifier: There are two ways to supply the signal to your MTX-powered tube.
- To get maximum performance, we suggest connecting a high-quality RCA to the corresponding outputs at the source unit and inputs of the amplifier.
- If a source unit is being used without RCA outputs, use the included high-level amplifier’s speaker terminals (1) using the right gauge speaker wire.
- Überprüfen Sie alle vorherigen Installationsschritte, insbesondere Verkabelung und Komponentenverbindungen. Schließen Sie nach der Überprüfung das negative Batteriekabel des Fahrzeugs wieder an, schalten Sie den Schutzschalter ein oder legen Sie die Sicherung in den Sicherungshalter ein.
Note: Gain Levels on the amplifier should be turned all the way down (counterclockwise) before proceeding with adjustments.
FAQs: MTX Audio RT8PT
Unleash unparalleled bass with our compact, high-performance design.
Absolutely! It’s a universal fit for any car looking to boost its sound system.
Yes, it includes a built-in amplifier to ensure powerful and clear bass output.
Simply connect it to your vehicle’s battery with the included wiring kit.
Compact yet mighty, it features an 8-inch speaker that fits perfectly under seats or in tight spaces.
Installation is a breeze with our straightforward guide and pre-wired setup.
It delivers deep, robust bass that transforms your vehicle into a concert hall.
Genießen Sie die Sicherheit mit einer einjährigen Garantie, die alle Herstellerfehler abdeckt.
Yes, adjust the bass to your preference with the remote bass control.
For optimal sound, place it under the seat or in the trunk, depending on your space and preference.