2021 alliance RV Avenue Refrigerator and Microwave User Manual
The 2021 Alliance RV Avenue’s refrigerator and microwave offer modern conveniences and reliable performance, boosting your RV experience with sophisticated chilling and cooking capabilities on the go.
12-Volt Refrigerator
An optional 12-Volt refrigerator is available in this Alliance 5th wheel. If equipped, this refrigerator uses 12-Volt battery power to power the refrigerator and allows it to be operated when not on shore power. Please refer to your refrigerators user’s manual for full details on this appliance.
- STORAGE OF FLAMMABLE MATERIALS BEHIND OR AROUND THE REFRIGERATOR CREATES A FIRE HAZARD. DO NOT USE THE AREA BEHIND THE REFRIGERATOR TO STORE ANYTHING, ESPECIALLY FLAMMABLE MATERIALS.
- INCORRECT ADJUSTMENT, CHANGE, OR MAINTENANCE OF THIS REFRIGERATOR CAN CAUSE PERSONAL INJURY OR DEATH. ALWAYS USE AN AUTHORIZED TECHNICIAN FOR NEEDED WORK FAILURE TO READ AND UNDERSTAND THE USER’S MANUAL AND ALL ITS WARNINGS AND CAUTIONS COULD RESULT IN PROPERTY DAMAGE, DEATH, OR SERIOUS INJURY.
12-Volt Refrigerator Control Panel
- Touch and release the On/OFF [1] button to turn the refrigerator on.
- If the indicator light, above the button, glows solid blue, it means the refrigerator is operating correctly.
Note: The freezer compartment and cabinet compartment work independently of each other and both must be adjusted to their desired temperature setting. - Touch the FREEZER COMPARTMENT [5] button to set the compartment temperature setting. The blue LED will turn ON.
- Using the + [4] or [2] buttons to adjust the temperature setting
- The mode [3] will display the temperature setting. 1 is the warmest and 5 is the coldest.
Volt Refrigerator Control Panel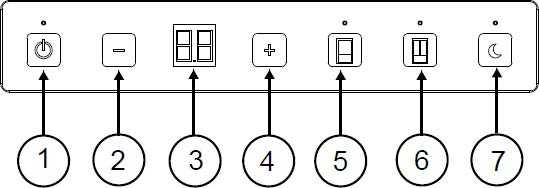
- Touch the CABINET COMPARTMENT [6] button to set the compartment temperature setting.
- Use the + [4] or – [2] buttons to adjust the temperature setting. The mode [3] will display the temperature setting. 1 is the warmest setting and 5 is the coldest setting.
- Press any button to return the control to activate the mode, the mode [3] will illuminate. The display will return to standby mode after 3 seconds.
- Touch the NIGHT MODE [7] button to set the refrigerator to night mode.
- Night mode will turn off automatically after eight hours or if you push the night mode button again to turn the blue indicator light off.
- This 8-hour night mode setting can be changed by pressing the night mode button for 3 seconds. After the 3 seconds, the default 8 hours will be shown in the display. To change this setting, press the “+” or “-“, then press night mode button to make the setting go into effect.
- The new setting is archived in the memory until it is changed.
- To turn on/off the DOOR LED hold the CABINET COMPARTMENT [8] button for 3 seconds
Shut down:
- To shut down the refrigerator, touch and hold the ON/OFF button [1] for 5 seconds and release it.
- Once the refrigerator is turned OFF there is a 5-minute wait cycle before the compressor will turn ON.
Error Codes:
- E1: Cabinet Thermistor Error
- E2: Freezer Thermistor Error
- E3: Low/High voltage cutout
- E4: Cabinet door open (longer than 2 minutes)
- E5: Voltage too low
- E6: Ambient Thermistor Error
- E7: Cabinet Fan Error
- E8: Freezer Condenser fan failure
- E9: Fresh Food Condenser fan failure
Microwave
For your safety, the warnings and cautions outlined in this section must be followed to minimize the risk of fire or explosion or to prevent property damage, death, or personal.
- NEVER ATTEMPT TO OPERATE THIS MICROWAVE WITH THE DOOR OPEN, THIS CAN RESULT IN HARMFUL EXPOSURE TO MICROWAVE ENERGY, NEVER TAMPER WITH THE SAFETY INTERLOCKS DO NOT PLAY ANY OBJECT BETWEEN THE MICROWAVE FRONT FACE AND THE DOOR OR ALLOW SOIL OR CLEANER RESIDUE TO ACCUMULATE ON SEALING SURFACES.
- NEVER OPERATE A DAMAGED MICROWAVE NEVER ADJUST OR REPAIR A MICROWAVE YOURSELF
Microwave Control Panel
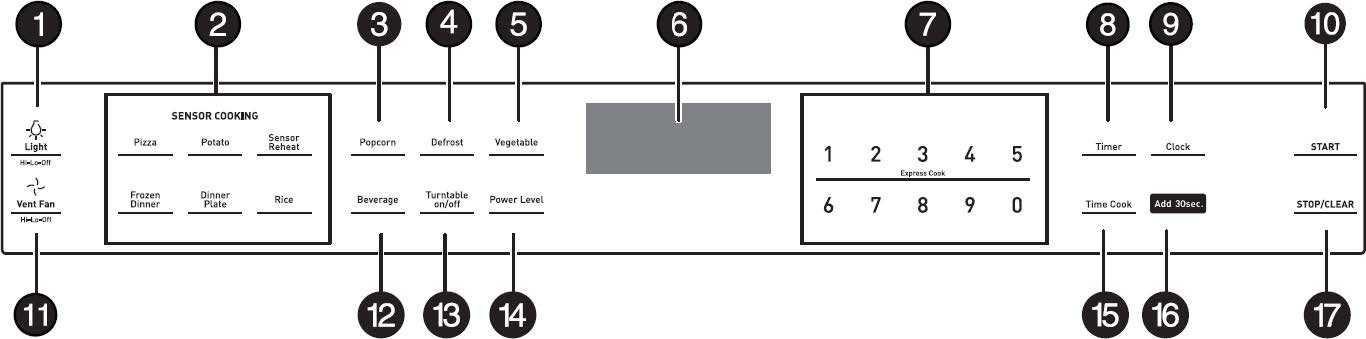
| # | ITEM | DESCRIPTION |
| 1 | Light | Press to turn on/off the light underneath your microwave. |
| 2 | Sensor Cooking | Detects humidity released by your cooking food and adjusts the cooking time based on the type and amount of food cooking. |
| 3 | Popcorn | Press to cook popcorn. |
| 4 | Defrost | Press to defrost frozen food. |
| 5 | Vegetable | Press to cook vegetables. |
| 6 | Display | In standby mode, displays the time. In cooking mode, displays cooking time, weight, and other information. |
| 7 | Number Pad | Press to enter cook time, defrost time, clock time and other information. |
| 8 | Timer | Press this button, then enter the time you want to count down. |
| 9 | Clock | Press to set or check the clock. |
| 10 | Start | In standby mode, press this button to begin cooking. |
| 11 | Vent Fan | Press to turn on/off your vent fan and remove odors from cooking. |
| 12 | Beverage | Press to heat a beverage. |
| 13 | Turntable On/Off | Press to turn your turntable on or off. |
| 14 | Power Level | Press to change your microwave’s power level (1‐10). |
| 15 | Time Cook | Press to enter a cooking time. |
| 16 | Add 30 Sec. | While cooking, press this button to add 30 seconds to your cooking time. |
| 17 | Stop/Clear | Press to stop the cooking process. Press again to cancel the cooking operation. |
Your OTR (Over-the-Range) microwave is equipped with a vent fan and a light underneath the microwave. The fan works as a range hood to filter out smoke and other odors from cooking. Use your range hood anytime you cook, this will help maintain the air quality in your RV. Be sure to read your microwave user’s manual for additional information.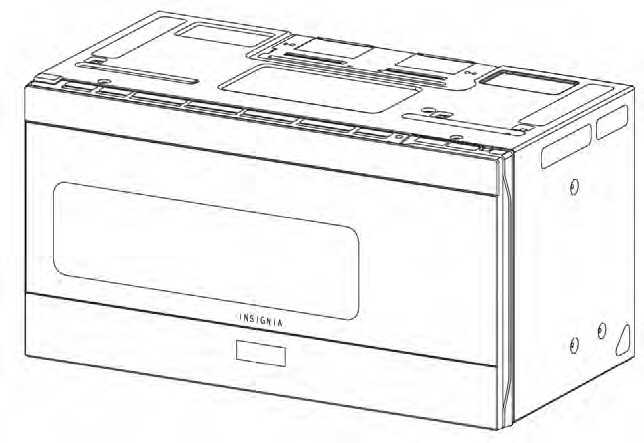
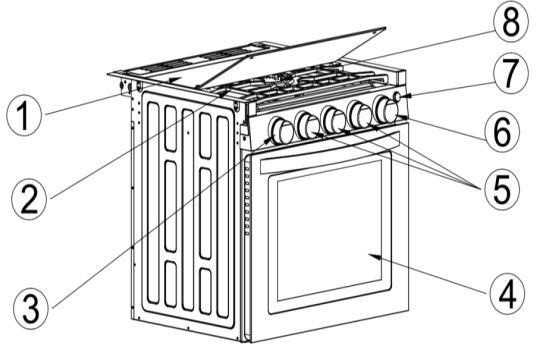
Range/Cooktop
Your Greystone 3-burner residential-style gas range is designed for reliable and trouble-free performance. Some important safety precautions to keep in mind.
WARNING
DO NOT STORE OR USE GASOLINE OR OTHER FLAMMABLE VAPORS AND LIQUIDS IN THE VICINITY OF THIS OR ANY OTHER APPLIANCE.
IF YOU SMELL GAS:
- EXTINGUISH ANY OPEN FLAME
- DO NOT TRY TO LIGHT ANY APPLIANCE
- DO NOT TOUCH ANY ELECTRICAL SWITCH
- IMMEDIATELY CALL YOUR LOCAL EMERGENCY SERVICES
WARNING
READ ALL INSTRUCTIONS IN THE RANGE OWNER’S MANUAL BEFORE USING THIS APPLIANCE NEVER USE THE RANGE AS A SOURCE OF HEAT.
Range Features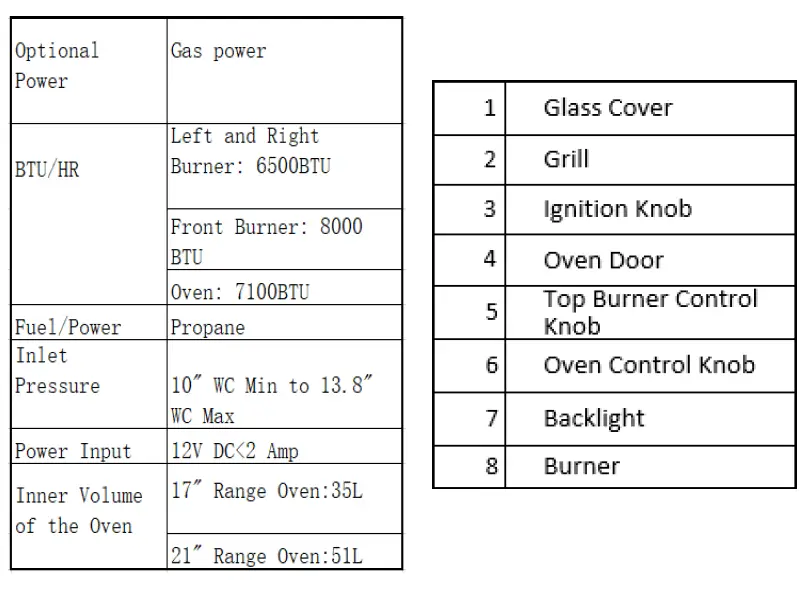
Before Using Your Range
Remove all packaging materials and wipe the surfaces of your range with a damp cloth or sponge. When you turn on a burner or the oven for the first time, smoke and odors may be present. This is normal, make sure the room is well ventilated.
Operation
Match Lighting Oven
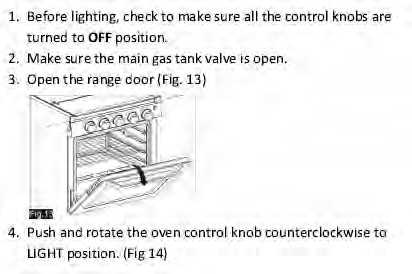
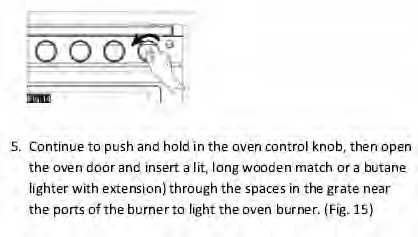
Match Lighting Oven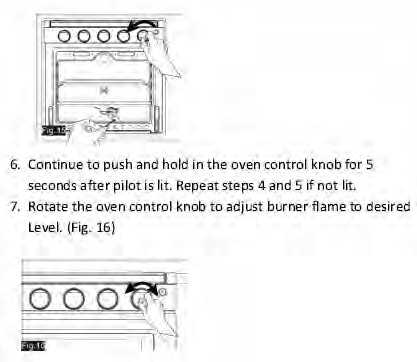
Electronic Ignition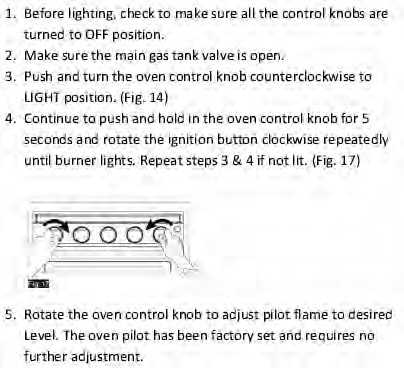
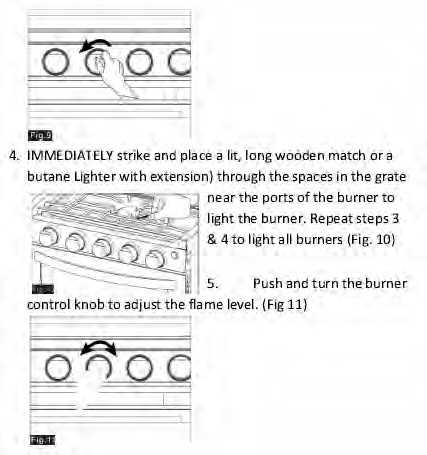
Match Lighting Top Burners
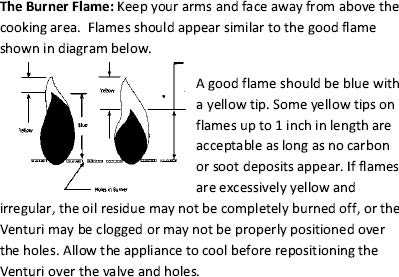
TOP COVER MUST BE OPEN WHEN MAIN BURNER IS IN OPERATION. BASED ON SAFETY CONSIDERATIONS, THE TOP BURNER FLAME SIZE SHOULD BE ADJUSTED SI IT DOES NOT EXTEND BETOND THE EDGE OF THE COOKING UTENSIL.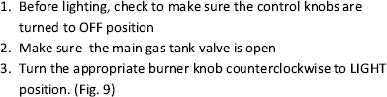
Product Damage hazard
WARNING
WHEN USING THE OVEN, SAND AWAY WHEN OPENING THE OVEN DOOR, ESCAPING HOT AIR OR STEAM CAN BURN YOUR HANDS, FACE, OR EYES.
Troubleshooting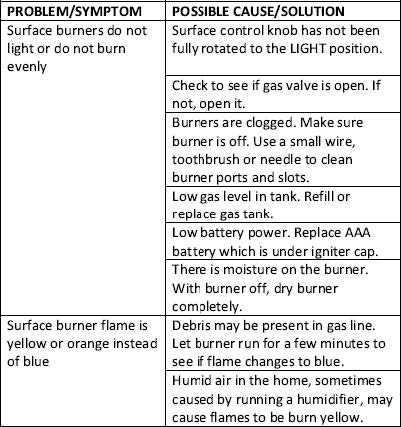
Useful Links:
View Full User Guide: alliance RV Avenue 2021 User Manual
2021 alliance RV Avenue Heating, Cooling and Ventillation User Manual