
![]()
BYD TANG Seats and Seat Belt User Guide
The BYD TANG has large, ergonomic seats made of premium materials and customizable settings for maximum comfort and support. Its seat belt system has modern safety elements like as pretensioners and force limiters, which provide better protection for all passengers throughout flight.
2023 BYD TANG Review, Price, Features and Mileage (Brochure)
BYD Seats Guide
Seat Information
- Adjust the driver’s seat so that the pedals, steering wheel, and dashboard controls are within the driver’s easy control.
- The most effective safeguard while driving is to keep the seatback upright, always resting well on the seatback, and adjusting the seat belt to the right position.
- Rear seats cannot be folded in with the vehicle running.
- Secure your luggage appropriately to prevent it from skidding or moving. Luggage in the vehicle should not be higher than seatbacks.
- The head support can only protect your head when it is in the proper position. Remember to adjust it to the proper position if it has been moved.
WARNING
- Sitting on a folded seatback, in the trunk, or on cargo is prohibited. Improper seating position or improperly fastened seat belts can result in personal injuries in case of emergency braking or a collision.
- Do not place any items under the seats. The driver may lose control of the vehicle because items placed there affect the seat locking mechanism or accidentally push up the seat position adjustment lever, causing the seat to move suddenly.
- When adjusting the seat, do not place your hand under the seat or near its operating parts, to prevent being crushed.
- After adjusting the seatback, lean back to confirm the seatback has been locked. Seatbacks that are not fully locked can cause personal injuries in an accident or emergency braking.
- Do not put the seatback down while driving or riding in the vehicle. This makes the shoulder strap of the seat belt not properly attached to the body. As a result, you and your passengers could hit the strap in an accident, causing serious injury to the neck or other parts; or you and your passenger may slip out of the waist belt, resulting in other serious injuries.
- Do not adjust the driver’s seat while the vehicle is in motion, as unpredictable seat movement can cause the loss of vehicle control.
- Do not drive the vehicle until occupants are seated properly.
CAUTION
- When folding seats, make sure no seat belt is damaged.
- Adjust the seat position before fastening the seat belt.
- While adjusting a seat, do not let it hit against any passenger or the luggage.
Adjusting Front Seats
Adjusting Front Seat with Power
Front seat adjustment includes position adjustment, seatback angle adjustment, lumbar support adjustment, massage adjustment, and leg support adjustment. The front passenger’s seat does not support height adjustment or cushion angle adjustment. Choose the following methods according to the actual configuration of your vehicle.
- Seatback angle adjustment switch
- Move this switch forward or backward to adjust the seatback angle.
- Seat position adjustment switch
Seat position adjustment includes forward/backward adjustment, cushion angle adjustment*, and height adjustment*.- Toggle the seat position adjustment switch back or forth to move the seat backward or forward.
- Move the front end of the switch up or down to change the seat cushion angle.
- Move the rear end of the switch up or down to raise or lower the seat.
- Lumbar support adjustment switch The seatback profile can be adjusted to fit the curvature of the occupant’s lumbar spine. To allow you and your occupants to sit in the seats in a correct and relaxed manner, the seat support should support the occupants’ lumbar spine.
- Press the front or rear portion of the switch to increase or decrease the curvature.
- Press the upper or lower portion of the switch to extend the curvature up or down.
- Seat massage switch
- The massage button is at the center of the lumbar support adjustment button. Press it to start or stop massage. You can also enable or disable the massage function on the infotainment touchscreen.
- Massage cannot be used with lumbar support activated. When the massage is activated, the direction buttons work for massage adjustment; otherwise, they work for lumbar support adjustment. Pressing and holding any of the direction buttons for over two seconds will stop the massage.
- In massage mode, the up and down buttons can be used to switch massage patterns, and the left and right buttons to adjust the massage intensity. Switching massage patterns does not alter massage intensity.
- Your last massage pattern and intensity choices are remembered.
- Press the up button to switch between patterns in sequence of
“wave (default) → pulse → stretching → waist → shoulder → wave”. Press the down button to switch in the reverse order. - The massage comes in three intensity levels: Low, Medium (default) and High. Press the left or right button to switch to High or Low. These levels do not circulate.
- The massage mode automatically ends 15 minutes after the last adjustment. To continue, simply press the seat massage button
or activate the massage via the infotainment touchscreen.
- Leg support adjustment
Pull the lever for the telescopic leg support under the seat, move the leg support longitudinally to a proper position, and then release.
CAUTION
- Releasing the switch stops the seat in this position. Do not place anything under the seat as this may prevent the seat from operating.
Memory System
Memory switch position
The memory system switch is located on the trim of the driver’s door. Two driving positions can be recorded into memory.
Memory setting function
- Memory setting conditions
- The ignition has been switched on and the vehicle speed is zero.
- The driver’s seat, side mirrors and steering wheel have been adjusted to the desired positions.
- The driver’s seat, side mirrors and steering wheel have been adjusted to the desired positions.
- No operation is made on the driver’s seat, side mirrors and steering wheel.
- Memory setting method
- Press and release the “SET” button on the seat memory switch, and press either “1” or “2” within three seconds. Then the positions of the seat, side mirrors and steering wheel will be recorded with a beep, and the memory setting finishes.
- Press and hold the “SET” button on the seat memory switch, and at the same time press either “1” or “2” with a beep to complete the memory setting.
REMINDER
- If the position button on the memory switch has already been set, the position set will be overwritten.
- Seat memory at position “2” can only be set after seat memory at position “1” has been set for at least 3 seconds.
Memory wake-up function
Regular memory wake-up
- With the gearshift lever in the “P” position, pressing the memory system switch enables the driver’s seat memory system to perform memory wake-up, if:
- The anti-theft alarm system has disarmed.
- The vehicle speed is zero.
- Memory switch signals are valid.
- No operation is made on the driver’s seat, side mirrors and steering wheel.
- Interrupt the current memory recall operation by the following methods:
- Press or toggle any of the driver’s seat adjustment switches.
- Press any memory system button: “SET”, “1”, or “2”.
WARNING
- Ensure there are no obstacles around the seat before activating the seat memory recall function.
- Ensure that no part of your body is within the seat’s movement range during the seat memory recall process.
- Do not allow children to operate the memory switches to prevent any injury during seat movement.
Automatic driver seat
- Automatic backward:
- This feature enables the seat (if located in the front section of its full travel) to automatically move back for a certain distance after the driver unlocks the vehicle with the smart key and opens the driver’s door. This makes it easy for the driver to enter.
- For easy exiting, this feature also works when the vehicle power switches from “START” to “STOP” and the driver’s door opens.
- Automatic forward:
- When the vehicle power switches from “STOP” to “START” and the driver’s door is closed, the seat will automatically move forward to the position before the last power-off if no horizontal position adjustment is performed after the auto-back feature is triggered upon the last power-off.
- If no horizontal position adjustment is performed after the auto-back feature is triggered for easy exiting, the seat will automatically move forward after the driver’s door is closed.
- Settings
- To enable or disable automatic driver seat, go to infotainment touchscreen → Vehicle → Comfortable Use.
- The automatic driver seat function can be interrupted by closing the driver’s door while the seat is moving backward or by opening the door while the seat is moving forward.
Heating and Ventilation Systems
The front seats are equipped with seat heating and ventilation systems. To turn on or off the systems, slide down the top status bar on the infotainment touchscreen to display the shortcut page, or go to the A/C operation interface.
Heating adjustment
- Seat heating: On the infotainment touchscreen, tap the seat heating control to set seat heaters to level 1 (low) or 2 (high).
- When the vehicle is just powered on, the driver’s seat is automatically set to the level (off, 1 or 2) the last time the vehicle is powered off. The passenger seat heaters are disabled by default.
- If the heaters are off after the vehicle is powered on, tap the control once on the touchscreen to set the heating level at 2 (high).
- Tap a second time to set the heating level at 1 (low).
- Tap a third time to turn off the seat heaters.
Ventilation adjustment
- Seat ventilation: On the infotainment touchscreen, tap the seat ventilation control to set seat ventilators to level 1 (low) or 2 (high).
- When the vehicle is just powered on, the driver’s seat is automatically set to the level (off, 1 or 2) the last time the vehicle is powered off. The passenger seat ventilators are disabled by default.
- If the ventilators are off after the vehicle is powered on, tap the control once on the touchscreen to set the ventilation level at 2 (high).
- Tap a second time to set the ventilation level at 1 (low).
- Tap a third time to turn off the seat ventilators.
Ventilation and heating functions cannot be turned on at the same time.
- Press the ventilation switch to make the ventilator work; if the heating switch is then pressed, the ventilator will stop and the heater will start to work.
- Press the heating switch to make the heater work; if the ventilation switch is then pressed, the heater will stop and the ventilator will start to work.
Adjusting Second-Row Seats
Adjusting Second-Row Seats Manually
Second-row seats allow manual adjustments for seat position and seatback angle. Choose the following methods according to the actual configuration of your vehicle.
Seat position adjustment
- To move forward or backward, hold and pull up the adjustment lever, slide to the desired position, and release.
- After adjusting the seat, always check that it is securely locked into place (i.e., a locking sound is heard) by attempting to push it forward and backward.

Adjusting the seatback
- Pull up the adjustment handle, and lean back or forward to adjust the seatback angle. Release when you have found the desired position.
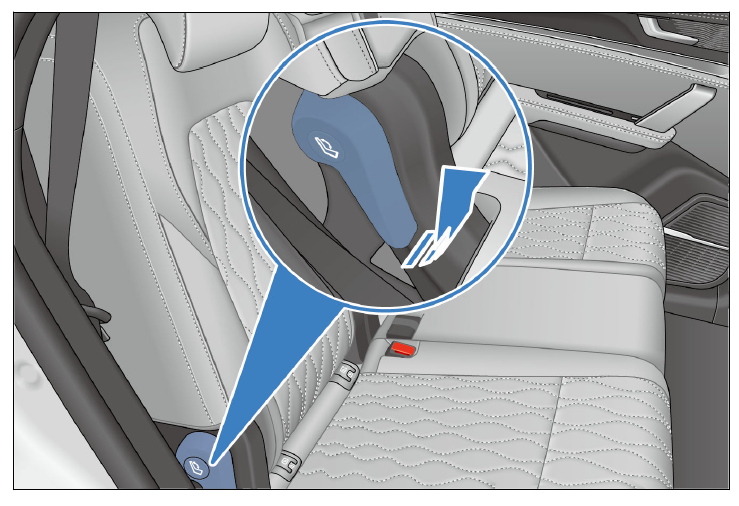
Accessing the third-row seats
- The third row can be accessed from the right side of the second row.
- Pull up the handle as shown to tilt and move the right seat in the second row forward. This makes it easy for passengers to get in or out of the third-row seats.

Folding Rear Seats
- Flipping and lowering the seatback
- Pull the cord to straighten the seatback.
- Push the seatback forward/backward to fold it. You can fold the seatback forward until the back touches the cushion, or you can fold it backward until reaching the locking position (with a locking click).

CAUTION
- Pay attention to the followings when folding the seats:
- Do not fold or unfold the seats with the vehicle running.
- Occupants should be careful when accessing the third-row seats.
- Make sure the second-row seats are fully locked before driving.
- The seatback adjustment handle and folding cord cannot be operated at the same time. Straighten the seatback and reset the cord if there is a mis-operation.
Head Supports
Adjusting Front-Seat Head Supports
Adjusting a front seat four-way head support
The front row head supports are equipped with curved posts for up/down and front/back adjustment.
- Lifting a head support
Lift the head support in the direction of its post until it is in the appropriate position, and then release it until a locking sound is heard. - Lowering a head support
Press and hold the head support adjustment button, lower the head support to a proper position, slightly raise the head support, and release the button after hearing a locking sound.
- Adjusting a head support forward Push the head support forward to the desired position and release it until a locking sound is heard.
- Adjusting a head support backward Press and hold the adjustment button on the left of the head support, push the head support backward to the desired position, and release the button until a locking sound is heard.
Removing a front seat four-way head support
- Lifting a head support
Hold the adjustment button on the left and raises the head support to the topmost position. - Unlocking one post
Keep holding the adjustment button, and use a needle whose diameter is slightly less than 2 mm against the small round hole of plastic trim cover under the head support. Then, pull up one post until the post slot is exposed.
- Unlocking the other post
Repeat step two to unlock the other post. - Removing a head support
Pull the head support upward until it is fully detached from the seatback.
2023 BYD TANG Review, Price, Features and Mileage (Brochure)
Adjusting Rear-Seat Head Supports
Adjusting second-row seat head supports
Head support adjustable in height:
- Lifting a head support
Lift the head support in the direction of its post until it is in the appropriate position, and then release it until a locking sound is heard. - Lowering a head support
Press and hold the head support adjustment button, lower the head support to a proper position, and release the button after hearing a locking sound.

Removing/Installing a head support
- Removing a head support
Press and hold the head support adjustment button, remove the head support, and release the button. - Installing the head support
Insert the head support post into
the bushing with the grooves facing forward. Press and hold the head support adjustment button, push down the head support to a proper position, and release the button after hearing a locking sound.
Adjusting a third-row seat head support
The third-row seat head supports have non-adjustable flanks. The adjustment method is the same as that for the second row.
REMINDER
- Head supports protect vehicle occupants from head and neck injuries. Adjust the head support so that its center aligns with the back of your head for maximum protection. Adjust the head support to the proper position based on your actual height.
- When adjusting head support height, align the occupant’s ear tip line with the center line of the head support.
- After adjusting the head support, ensure that it is locked into position.
- Do not drive the vehicle without head supports.
- Do not attach any object to the head support post.
Seat Belts
Seat Belt Overview
Studies have shown that proper use of seat belts can significantly reduce casualties in emergency braking, sudden steering or collisions. Please read the following information carefully and observe it strictly.
WARNING
- Always have the seat belts fastened while the vehicle is in motion.
- Before driving, make sure all occupants are properly buckled up to prevent serious injury or death in emergency braking or in a collision.
- The seat belts are designed primarily for adults and are not intended for children. Make sure to choose an appropriate child restraint system according to your child’s age and size .
- If a seat belt is damaged or malfunctions, immediately contact a BYD authorized dealer or service provider for confirmation and handling. Until then, do not use the corresponding seat.
- BYD has highly emphasized that all occupants should always fasten their seat belts while in the vehicle. Failure to do so increases the risk of injury in case of an accident.
- The installed seat belts are designed for adults. Appropriate seat belt selections are necessary for different situations.
- It is recommended that children be seated in rear seats and always use seat belts and suitable child restraints. In case of emergency braking or a collision, unprotected children may be seriously injured and their lives may be endangered. Likewise, do not allow children to ride on someone’s lap. This will render the children not adequately protected.
Emergency Locking Retractor Function
- When the driver turns sharply or brakes suddenly, when there is a collision, or when the occupant leans forward too quickly, the seat belt automatically locks to effectively restrain and protect the occupant.
- When the vehicle travels smoothly, seat belts are pulled out and retracted as the occupants move slowly and smoothly, allowing the occupants to move freely.
- If the seat belt locks due to sudden retraction, pull on the seat belt webbing to create retractable slack in order to pull out the seat belt.
Pretensioner and Force Limiter Function*
When a severe front collision occurs and the triggering conditions of the pretensioner are met, the pretensioner quickly retracts part of the seat belt and locks it to improve the protection of the occupant. The force limiter limits the seat-belt restraint force to the occupant’s body to a certain extent so as to avoid injury to the occupant due to an excessive restraint force.
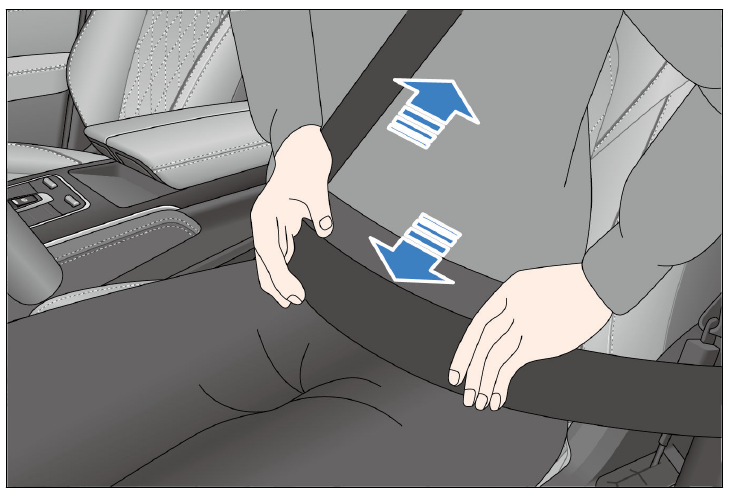
Using Seat Belts
- Adjust the seat position and seatback angle .
- Adjust the position of the three-point seat belt.
- Keeping a proper sitting posture, pull the seat belt out so that it is diagonally across the chest. The belt should not go under the arm or across the back of the neck.
- Keep the lap section of the belt as close as possible to the hips.
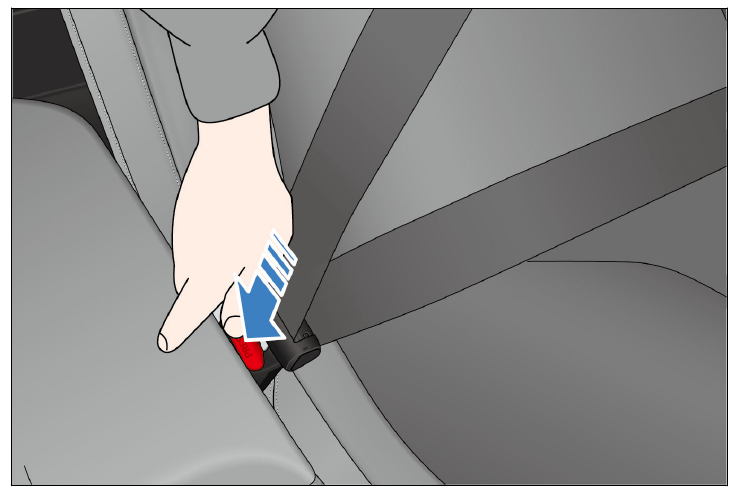
3. Insert the latch into the buckle until it clicks, and then pull it back to make sure it is firmly locked. Do not fasten the belt with any part of the strap twisted.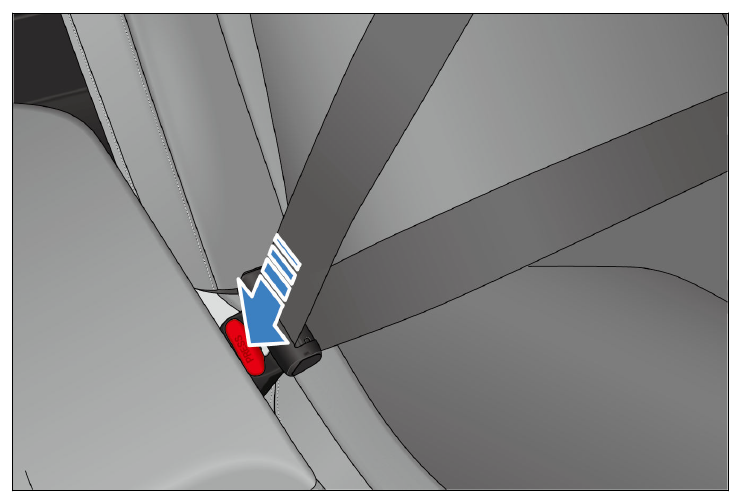
4. Adjust the height of the (front) seat belts for optimum comfort and protection.
- Press the adjuster release button.
- Move the adjuster up or down to the intended position. Release the button to lock the adjuster.
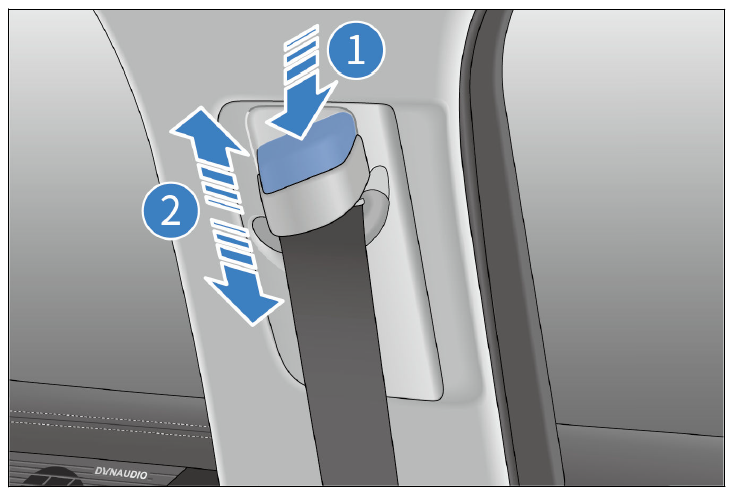
5. Pull the belt firmly to check that the adjuster is locked.
WARNING
- The shoulder belt should cross the center of the shoulder. The seat belt should be far from the neck and not liable to slip from the shoulder; otherwise, it cannot function well in the event of emergency braking or accident, and may even cause severe injury.
- The lap belt should be positioned as low as possible around the hips to avoid serious injury due to the intense lap belt forces against the abdomen in an accident.
- The seat belt should be fitted tight to the body for better protection.
6. Unlock the seat belt.
- Press the red unlock button on the buckle. The latch plate pops out, and the seat belt automatically retracts.
- If the seat belt does not retract smoothly and automatically, pull it out and check whether it is twisted.
WARNING
- One seat belt is for one occupant only. Do not allow multiple occupants (including children) to share one seat belt.
- Avoid traveling with the seatback leaning too far back. The seat belt protection performs best when the seatback is upright.
- Make sure that no seat belt or
its spring bolt/buckle becomes pressed by the door; otherwise, the seat belt may be damaged. - Check the seat belts regularly for cuts, wear, looseness, and other abnormalities. If any problem is found, contact a BYD authorized dealer or service provider for confirmation and handling. Until then, do not use the corresponding seat.
- Do not remove, disassemble or modify the seat belts without permission.
- After an accident, have the seat belts checked at a BYD authorized dealer or service provider. If the pretensioner function is activated, the seat belt must be replaced.
- Use an approved model whenever you replace the seat belt.
- In the event of a serious accident, even if there is no apparent damage, the seat belt should be replaced along with the seat assembly. The airbag system should also be thoroughly inspected.
- Pregnant women should also fasten their seat belt properly. Particularly, be sure to position the lap belt as low across the
hip as possible to prevent serious injury. - The method of wearing a rear seat belt is the same as that for a front seat belt. For normal functioning of the rear seat belt, please ensure that its latch is inserted into the corresponding buckle during use. The driver should ensure that all occupants are wearing seat belts before driving the vehicle.
- Do not insert foreign objects such as coins and clips into the buckle as they prevent proper connection between the latch and buckle.
Seat Belt Reminders
If any occupant has not buckled up after the vehicle is started, visual and audible alarms go off and continue until the corresponding seat belt is properly fastened.
- Seat belt reminder indicator Any unfastened seat belt will trigger this indicator to light up and flash as required.
- Display of unfastened belt’s seat The indicator for the seat with unfastened seat belt lights up and is steady on in case of abnormal conditions in the vehicle.
- Unfastened seat belt reminder If any vehicle occupant has not buckled up after the ignition is switched on, the seat belt reminder indicator and the indicator associated with the corresponding seat light up. If the seat belt remains unfastened while driving, in addition to the reminder indicator, an audible alarm is given to alert the driver and the occupants.
- When the driver and all the passengers fasten their seat belts, the seat belt reminder indicator turns off and all indicators displayed for the corresponding seats turn off.
WARNING
- If the above functions are abnormal or fail, contact a BYD authorized dealer or service provider.
- When driving, make sure all occupants have their seat belts properly fastened to prevent serious injury or death in emergency braking or in a collision.
Useful Links:
2023 BYD TANG Review, Price, Features and Mileage (Brochure)