
![]()
2025 Chrysler Voyager Fuses and Fuse Box User Guide
This Guide covers the 2025 Chrysler Voyager fuses and fuse box, including their locations, functions, and checking or replacing them. This guide keeps your car’s electrical systems running smoothly and safely.
Video: 2025 Chrysler Voyager Fuses
Chrysler FUSES Guide
General Information
WARNING!
- When replacing a blown fuse, always use an appropriate replacement fuse with the same amp rating as the original fuse. Never replace a fuse with another fuse of a higher amp rating. Never replace a blown fuse with metal wires or any other material. Do not place a fuse inside a circuit breaker cavity or vice versa. Failure to use proper fuses may result in serious personal injury, fire and/or property damage.
- Before replacing a fuse, make sure that the ignition is off and that all the other services are switched off and/or disengaged.
- If the replaced fuse blows again, contact an authorized dealer.
- If a general protection fuse for safety systems (air bag system, braking system), power unit systems (engine system, transmission system) or steering system blows, contact an authorized dealer.
The fuses protect electrical systems against excessive current.
When a device does not work, you must check the fuse element inside the blade fuse for a break/melt.
Also, please be aware that using power outlets for extended periods with the engine off may result in vehicle battery discharge.
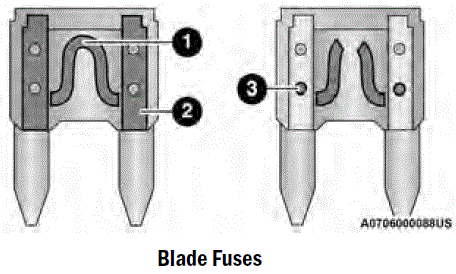
- Fuse Element
- Blade Fuse with a good/functional fuse element
- Blade Fuse with a bad/not functional fuse element (blown fuse)
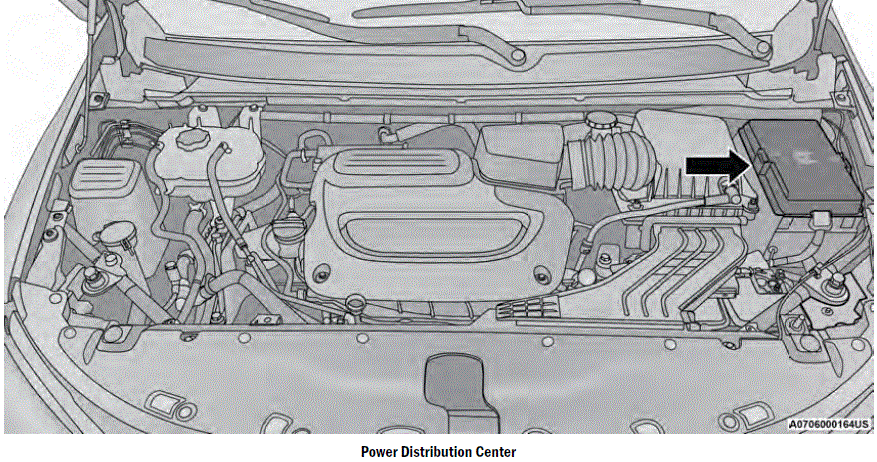
Underhood Fuses
The Power Distribution Center (PDC) is located in the engine compartment near the battery. This center contains cartridge fuses, mini-fuses, micro-fuses, circuit breakers and relays. A label that identifies each component is printed on the inside of the cover.
Before any procedure is done on the PDC, make sure the engine is turned off.
Remove the cover by unlatching the two locks located at each side of the PDC cover, avoid using screwdrivers or any other tool to remove the cover, since they may apply excessive force and result in a broken/damaged part.
After service is done, secure the cover with its two locks.
CAUTION!
When installing the Power Distribution Center cover, it is important to ensure the cover is properly positioned and fully latched. Failure to do so may allow water to get into the Power Distribution Center and possibly result in an electrical system failure.
NOTE:
The function and amperage of the following fuses are different, depending on vehicle trim level and content.
| Cavity | Cartridge Fuse | Blade Fuse | Description |
| * If Equipped | |||
| F06 | – | – | Not Used |
| F07 | – | 25 Amp Clear | Ignition Coil/Fuel Injector |
| F08 | – | – | Not Used |
| F09 | – | 25 Amp Clear | Amplifier/Active Noise Control * |
| F10 | – | – | Not Used |
| F11 | – | – | Not Used |
| F12 | – | 5 Amp Tan | Battery Sensor (IBS) |
| F13 | – | 10 Amp Red | ECM (S)* |
| F14 | – | 10 Amp Red | ECM |
| F15 | 40 Amp Green | – | CBC Feed #3 (Power Locks) |
| F16 | – | 20 Amp Yellow | ECM |
| F17 | 30 Amp Pink | – | Starter |
| F18 | 40 Amp Green | – | CBC Feed #4 (Exterior Lighting #1) |
| F19 | 25 Amp Clear | – | 2nd Row Folding Seats Solenoid LT * |
| F20 | – | 10 Amp Red | A/C Compressor Clutch |
| F21 | 25 Amp Clear | – | 2nd Row Folding Seat Solenoid RT * |
| F22 | – | – | Not Used |
| F23 | – | – | Not used |
| F24 | – | 20 Amp Yellow | RR Wiper |
| F25 | – | 10 Amp Red | Hands-free Door Mod / Active Grill Shutter/ PWR Mirror / VRM |
| F26 | 40 Amp Green | – | Front HVAC Blower Motor |
| F27 | 25 Amp Clear | – | RR Slide Door Module-RT * |
| F28 | – | 10 Amp Red | Diagnostic Port / USB+ (IP) / Video USB Port / Overhead DVD Player (Aftermarket) |
| Cavity | Cartridge Fuse | Blade Fuse | Description |
| * If Equipped | |||
| F29 | – | – | Not Used |
| F30 | – | 15 Amp Blue | Media HUB / PWR Lumbar * |
| F31 | – | – | Not Used |
| F32 | 20 Amp Blue | – | ECM |
| F33 | 30 Amp Pink | – | Power Liftgate * |
| F34 | 25 Amp Clear | – | RR Door Module-LT * |
| F35 | 25 Amp Clear | – | Sunroof * |
| F36 | – | – | Not Used |
| F37 | 40 Amp Green | – | CBC / Exterior Lights |
| F38 | 60 Amp Yellow | – | Vacuum Cleaner * |
| F39 | 25 Amp Clear | – | Rear HVAC Blower Motor |
| F40 | – | – | Not Used |
| F41 | – | – | Not Used |
| F42 | 40 Amp Green | – | Folding Seat Module * |
| F43 | – | 20 Amp Yellow | Fuel Pump Motor |
| F44 | 30 Amp Pink | – | CBC / Interior Lights |
| F45 | 30 Amp Pink | – | Power Inverter * |
| F46 | 30 Amp Pink | – | Driver Door Module |
| F47 | 30 Amp Pink | – | Passenger Door Module |
| F48 | – | – | Not Used |
| F49 | 25 Amp Clear | – | RR Sliding Door Module-LT * |
| F50 | 25 Amp Clear | – | RR Door Module-RT * |
| F51 | 30 Amp Pink | – | Front Wiper |
| F52 | 30 Amp Pink | – | Brake Vacuum Pump |
| F53 | – | – | Not Used |
| Cavity | Cartridge Fuse | Blade Fuse | Description |
| * If Equipped | |||
| F54 | 40 Amp Green | – | ESP-ECU & Valves |
| F55 | – | 15 Amp Blue | RF HUB/ KIN / ESL / DVD |
| F56 | – | 10 Amp Red | Front & Rear HVAC Control / OCM / ESL / ESP / ESC |
| F57 | – | – | Not Used |
| F58 | – | 10 Amp Red | Drivetrain Control Mod / Power Transfer Unit * |
| F59 | 30 Amp Pink | – | Trailer Tow Receptacle * |
| F60 | – | 20 Amp Yellow | Rear Cargo APO |
| F61 | – | 20 Amp Yellow | Trailer Tow Right Stop/Turn * |
| F62 | – | 20 Amp Yellow | Power Transfer Unit * |
| F63 | – | 20 Amp Yellow | Trailer Tow Left Stop/Turn * |
| F64 | – | 15 Amp Blue | RT HID Headlamp * |
| F65 | – | – | Not Used |
| F66 | – | 15 Amp Blue | Cluster |
| F67 | – | 10 Amp Red | DASM / Parktronic / HALF |
| F68 | – | – | Not Used |
| F69 | – | – | Not Used |
| F70 | – | – | Not Used |
| F71 | – | 20 Amp Yellow | Horn |
| F72 | – | 10 Amp Red | Heated Mirrors * |
| F73 | 30 Amp Pink | – | Rear Defroster (EBL) |
| F74 | 20 Amp Blue | – | Trailer Tow Back-up Lights * |
| F75 | – | 5 Amp Tan | Overhead Console / RR ISC |
| F76 | – | 20 Amp Yellow | Uconnect / Center Display / Telematics |
| Cavity | Cartridge Fuse | Blade Fuse | Description |
| * If Equipped | |||
| F77 | – | 10 Amp Red | RR Entertainment / Media Hub / USB (S)
/ Rain Sensor / Sunroof / RR View Mirror / Overhead DVD Player / Int Monitoring Camera / Wireless Charging Pad |
| F78 | – | 15 Amp Blue | TCM (ZF) / E-Shifter / Cluster |
| F79 | – | 10 Amp Red | ICS / HVAC / EPB SW / Strg Column Cntrl |
| F80 | – | – | Not Used |
| F81 | – | – | Not Used |
| F82 | – | – | Not Used |
| F83 | 20 Amp Blue | – | TT Park Lights * |
| 30 Amp Pink | – | Headlamp Washer Pump * | |
| F84 | 30 Amp Pink | – | Drivetrain Control MOD * |
| F85 | – | 20 Amp Yellow | Cigar Lighter |
| F86 | – | – | Not Used |
| F87 | – | – | Not Used |
| F88 | – | 20 Amp Yellow | Front Heated Seats * |
| F89 | – | 20 Amp Yellow | Rear Heated Seats * |
| F90 | – | – | Not Used |
| F91 | – | 15 Amp Blue | Front Ventilated Seats / Heated Steering Wheel * |
| F92 | – | 5 Amp Tan | Security Gateway |
| F93 | – | – | Not Used |
| F94 | 40 Amp Green | – | ESC Motor Pump |
| F95A | – | 10 Amp Red | USB IP (Run/ACC) |
| F95B | – | 10 Amp Red | Selectable Fuse Location – USB IP (Direct B+) |
| F96 | – | 10 Amp Red | Airbag |
| Cavity | Cartridge Fuse | Blade Fuse | Description |
| * If Equipped | |||
| F97 | – | 10 Amp Red | Airbag |
| F98 | – | 15 Amp Blue | Left HID Headlamp * |
| F99 | 30 Amp Pink | – | Trailer Tow Electric Brake Mod * |
| F100 | – | 10 Amp Red | Headlamp Level / RR Camera / Blindspot / Humidity Snsr / In Car Temp Snsr / Headlamp SW * |
| Circuit Breakers | |||
| CB1 | 25 Amp | Power Seats (Driver) | |
| CB2 | 25 Amp ** | Power Seats (Pass) | |
| CB3 | 25 Amp | FRT PWR Window W/O Door Nodes + RR PWR Window Lockout | |
How to replace a fuse of 2025 Chrysler Voyager
Materials:
- The new fuse of the correct amperage.
- Fuse puller or needle-nose pliers.
Instructions:
- Find the fuse box:
- In a 2025 Chrysler Voyager, the fuse box is usually under the dashboard on the driver’s side or in the engine area.
- Find the Blown Fuse:
- Once you’ve found the fuse box, you need to find the fuse that needs to be changed.
- Turn Off the Vehicle:
- `Before you start working on the fuse, turn off the engine and any other electrical parts of the car that are using the fuse.
- Take out the blown fuse:
- Carefully take the blown fuse out of its hole using a fuse puller tool or a pair of needle-nose pliers. Stick to a strong but gentle grip on the fuse to keep it and the fuse box from getting damaged.
- Put in the New Fuse:
- Find a new fuse with the same amperage rating and put it in the fuse box’s empty spot. Make sure it fits well.
- Replace the Fuse Box Cover:
- If you took off the cover for the fuse box, put it back on firmly.
- Test the Circuit:
- After replacing the fuse, turn the key back on in the car and test the part to make sure it’s working right. If the fuse blows again right away or soon after being replaced, there may be an electrical problem that needs to be fixed.
- Get Rid of the Blown Fuse:
- Get rid of the blown fuse in a safe way. If you don’t know how to do this, check your local laws to see how to properly get rid of it.
Useful Links:
2023 Chrysler Pacifica Specs, Price, Features, Mileage and Review
2025 Chrysler Voyager Fuses and Fuse Box User Guide
2025 Chrysler Voyager Warning Lights and Indicator User Guide