
![]()
2026 GMC Terrain Fuse Box Diagram & Location User Guide
Find the precise position and full fuse box schematic for the 2026 GMC Terrain. This guide makes it simple to fix and maintain the electrical system of your car by helping you locate fuses fast. Keep yourself updated and maintain the functionality of your Terrain!
Video: 2026 GMC Terrain Fuse
Electrical System
Electrical System Overload
The vehicle has fuses and circuit breakers to protect against an electrical system overload. When the current electrical load is too heavy, the circuit breaker opens and closes, protecting the circuit until the current load returns to normal or the problem is fixed. This greatly reduces the chance of circuit overload and fire caused by electrical problems. Fuses and circuit breakers protect power devices in the vehicle.
If there is a problem on the road and a fuse needs to be replaced, the same amperage fuse can be borrowed. Choose some feature of the vehicle that is not needed to use and replace it as soon as possible.
To check a fuse, look at the band inside the fuse. If the band is broken or melted, replace the fuse. Be sure to replace a bad fuse with a fuse of the identical size and rating.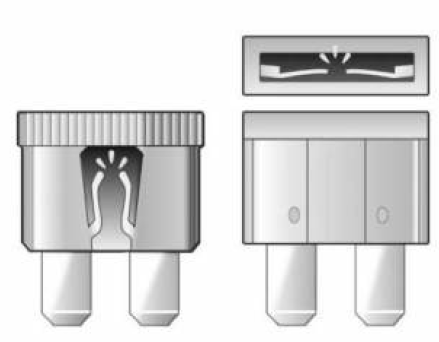

Replacing a Blown Fuse
- Turn off the vehicle.
- Locate the fuse puller in the engine compartment fuse block.
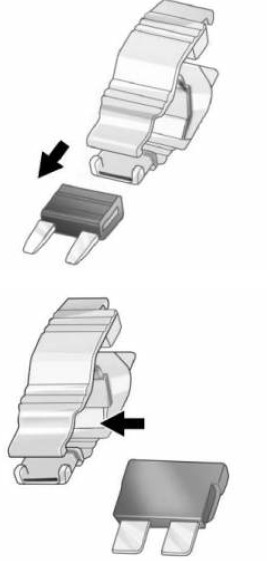
- Use the fuse puller to remove the fuse from the top or side, as shown above.
- If the fuse must be replaced immediately, borrow a replacement fuse with the same amperage from the fuse block. Choose a vehicle feature that is not needed to safely operate the vehicle. Repeat Steps 2-3.
- Insert the replacement fuse into the empty slot of the blown fuse.
At the next opportunity, see your dealer to replace the blown fuse.
Headlamp Wiring
An electrical overload may cause the lamps to go on and off, or in some cases to remain off. Have the headlamp wiring checked right away if the lamps go on and off or remain off.
Windshield Wipers
If the wiper motor overheats due to heavy snow or ice, the windshield wipers will stop until the motor cools and will then restart. Although the circuit is protected from electrical overload, overload due to heavy snow or ice may cause wiper linkage damage. Always clear ice and heavy snow from the windshield before using the windshield wipers.
If the overload is caused by an electrical problem and not snow or ice, be sure to get it fixed.
Fuses and Circuit Breakers
The wiring circuits in the vehicle are protected from short circuits by a combination of fuses and circuit breakers. This greatly reduces the chance of damage caused by electrical problems.
Danger
Fuses and circuit breakers are marked with their ampere rating. Do not exceed the specified amperage rating when replacing fuses and circuit breakers. Use of an oversized fuse or circuit breaker can result in a vehicle fire. You and others could be seriously injured or killed.
Warning
Installation or use of fuses that do not meet GM’s original fuse specifications is dangerous. The fuses could fail, and result in a fire. You or others could be injured or killed, and the vehicle could be damaged.
See Accessories and Modifications 3 223 and General Information. To check or replace a blown fuse, see Electrical System Overload.
Engine Compartment Fuse Block

There are two clips on the side of the fuse block cover. 
To remove the fuse block cover, squeeze the clips on the cover and lift it straight up.
Caution
Spilling liquid on any electrical component on the vehicle may damage it. Always keep the covers on any electrical component.
The vehicle may not be equipped with all of the fuses, relays, and features shown.
| Fuses | Usage |
| F01 | – |
| F02 | – |
| F03 | – |
| F04 | – |
| F05 | – |
| F06 | ACEC – Air Conditioning Electric Compressor |
| F07 | ESSCP – Energy Storage System Coolant Pump |
| F08 | – |
| F09 | PECP – Power Electric Cooling Pump |
| F10 | – |
| F11 | – |
| F12 | – |
| F13 | TRLR_HD –Trailer Headlights |
| F14 | – |
| F15 | VLM – Vehicle Levelling Module Spare |
| F16 | – |
| F17 | ELM 1 – Exterior lighting Module 1 |
| F18 | SADS – Semi-Active Damping System TAIL LMP LT – Left Tail Light |
| F19 | IECL 2 – Left Internal Electrical Centre 2 |
| F20 | – |
| F21 | – |
| F22 | IRM_ACM – Integrated Refrigerant Module and Air Conditioning Module |
| F23 | TAIL LMP RT – Right Tail Light VICMS –Vehicle Integrated Control Module |
| F24 | – |
| F25 | – |
| F26 | – |
| F27 | PKLPS_TRLR – Trailer Park Lights |
| F28 | – |
| F29 | Spare |
| F30 | PUMP_ONE |
| F31 | – |
| F32 | – |
| F33 | Spare TRLR REV LMPS – Reverse Trailer Lights |
| F34 | TIM1 – Trailer Interface Module 1 |
| F35 | Spare |
| F36 | TPIM1_BAT2 |
| F37 | – |
| F38 | TRLR_STP_TRN_LT –Trailer Stop |
| F39 | TRLR_STP_TRN_RT |
| F40 | VLM_M |
| F41 | – |
| F42 | – |
| F43 | – |
| F44 | Spare |
| F45 | Spare |
| F46 | Spare |
| F47 | Spare |
| F48 | Spare |
| F49 | TBPM – Trailer Brake Power Module |
| F50 | Spare |
| F51 | MIDGATE MOTOR RIGHT |
| F52 | – |
| F53 | Spare |
| F54 | PFCM |
| F55 | REAR DEFOG |
| F56 | – |
| F57 | MINOR ENDGATE HIGH |
| F58 | FRNT WIPER |
| F59 | TIM2 |
| F60 | PKLPS_ID |
| F61 | Spare |
| F62 | ELM 3 |
| F63 | GLASS BREAK |
| F64 | – |
| F65 | ELM 4 |
| F66 | – |
| F67 | EMB/GRILL LIGHT |
| F68 | HDLP_LT |
| F69 | MIDGATE LEFT MOTOR |
| F70 | EBCM 1 |
| F71 | DC/AC INV |
| F72 | Spare |
| F73 | – |
| F74 | – |
| F75 | Spare |
| F76 | HDLP_RT |
| F77 | – |
| F78 | MIDGATE CROSS BAR MOTOR 2 MIDGATE CROSS BAR MOTOR 1 |
| F79 | PCV_PEEV_ALD FR RADAR/VIRTUAL KEY |
| F80 | IECR 2 |
| F81 | IECL 1 |
| F82 | – |
| F83 | – |
| F84 | V2LIM |
| F85 | Spare HVS (HIGH VOLTAGE SERVICE DISCONNECT) |
| F86 | HORN |
| F87 | FRT WSHR PMP |
| F88 | – |
| F89 | – |
| F90 | – |
| F91 | – |
Instrument Panel Fuse Block
The instrument panel fuse block is under the instrument panel above the driver side footrest. The vehicle may not be equipped with all of the fuses and relays shown.
| Fuses | Usage |
| F01 | FRT BLWR MTR – Front Blower Motor |
| F02 | CPM |
| F03 | VDM |
| F04 | SPARE |
| F05 | BCM 2 – Body Control Module 2 |
| F06 | BCM 4 – Body Control Module 4 |
| F07 | COIL CLOCK SPRING |
| F08 | TBCS/EPB – Trailer Brake Control Switch/Electric Park Brake |
| F09 | ESM SPARE |
| F10 | Displays SPARE |
| F11 | CGM – Central Gateway Module SPARE |
| F12 | Steering Column Lock |
| F13 | SPARE DLC – Data Link Connection |
| F14 | BODY MISC BODY MISC 1 |
| F15 | MISC_IP 1 |
| F16 | SPARE |
| F17 | SPARE |
| F18 | BDY 1 HDLNR |
| F19 | VICM TPIM IGN – Vehicle Integration Control Module/Traction Power Inverter Module/Ignition |
| F20 | OHC HUD ETC |
| F21 | VCU VCU 2 |
| F22 | SPARE |
| F23 | SPARE |
| F24 | FCM_RLH_UGDO |
| F25 | USB_ROW 2 |
| F26 | SPARE |
| F27 | USB |
| F28 | SPARE |
| F29 | FRT_HVAC_DIS |
| F30 | SPARE |
| F31 | BCM 3 – Body Control Module 3 |
| F32 | HSWM – Heating Steering Wheel Module |
| F33 | SPARE |
| F34 | SPARE |
| F35 | SPARE |
| F36 | SPARE |
| F37 | SPARE |
| F38 | SPARE |
| F39 | SPARE |
| F40 | SPARE |
| Circuit Breakers | Usage |
| CB01 | APO – Auxiliary Power Outlet Center Console |
| CB02 | SPARE |
How to replace the Fuse of the 2026 GMC Terrain
Replacing a fuse in a 2026 GMC Terrain is a relatively straightforward process. Here’s a general guide:
Materials:
- The new fuse of the correct amperage.
- Fuse puller or needle-nose pliers.
Steps to Replace the Fuses:
- Turn Off the Vehicle:
- Before working on any electrical components, ensure the vehicle is turned off to avoid electrical shock or accidental activation.
- Locate the Fuse Box:
- The 2026 GMC Terrain has two main fuse boxes:
- Interior Fuse Box: Typically located under the dashboard, on the driver’s side near the knee bolster area or the center console.
- Engine Compartment Fuse Box: Located near the battery in the engine bay.
- The 2026 GMC Terrain has two main fuse boxes:
- Access the Fuse Box:
- Open the fuse box cover by either unclipping it or removing screws (depending on the box). Some fuse boxes have a diagram on the cover to help identify each fuse’s function.
- Identify the Blown Fuse:
- Check the fuse box diagram to find the fuse related to the malfunctioning system (e.g., lights, AC, etc.).
- Inspect the fuses. A blown fuse will often have a broken or melted filament inside. If you’re unsure, use a fuse tester to check.
- Remove the Blown Fuse:
- Use a fuse puller (if available) or needle-nose pliers to gently pull the blown fuse from its slot. Be careful not to damage the surrounding wiring.
- Install the New Fuse:
- Select a replacement fuse with the same amperage rating as the blown one (this is important to avoid damaging the electrical system).
- Insert the new fuse into the correct slot and press down gently to ensure it is seated properly.
- Test the System:
- Once the new fuse is installed, turn on the vehicle and test the system (lights, radio, etc.) to make sure the issue is resolved.
- Close the Fuse Box:
- Once the fuse is replaced and the system is functioning properly, close the fuse box cover and secure it in place.
Tips:
- Always use a fuse with the correct amperage rating to prevent electrical issues or damage to the vehicle.
Useful Links:
2023 – 2024 GMC TERRAIN Review, Price, Features and Mileage (Brochure)
2026 GMC Terrain Cluster Display & Dashboard Warning Indicators User Guide