
Fuse Diagram: 2019 Hyundai Accent Replacing Fuses Guide
Greetings and welcome to the in-depth guide on Fuses and Fuse Boxes for the 2019 Hyundai Accent. This guide will give you important information about the parts that are crucial for protecting the electrical systems in your car. It’s essential to know where the fuses are located in the fuse box in order to troubleshoot electrical problems, maintain peak performance, and guarantee the safety of your Hyundai Accent.
Fuse maintenance is essential to keeping your car operating properly because it guard against electrical overloads and protect important parts. This guide will give you step-by-step instructions on how to replace fuses when needed in addition to a thorough overview of the fuse box layout. Give yourself the knowledge you need to maintain the smooth operation of your Hyundai Accent and let’s investigate the world of fuses together.
2023 Hyundai Santa Fe Specs, Price, Features, Milage (Brochure)
Fuse
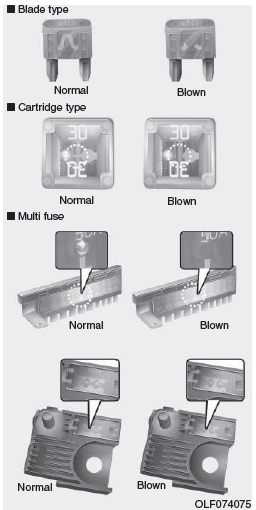
A vehicle’s electrical system is protected from electrical overload dam-age by fuses.
This vehicle has 2 (or 3) fuse panels, one located in the driver’s side panel bolster, the other in the engine compartment near the battery.
If any of your vehicle’s lights, accessories, or controls do not work, check the appropriate circuit fuse. If a fuse has blown, the element inside the fuse will be melted or broken.
If the electrical system does not work, first check the driver’s side fuse panel. Before replacing a blown fuse, turn the engine and all switches off, and then disconnect the negative battery cable. Always replace a blown fuse with one of the same rating.
If the replacement fuse blows, this indicates an electrical problem. Avoid using the system involved and immediately consult an authorized HYUNDAI dealer.
WARNING
NEVER replace a fuse with any-thing but another fuse of the same rating.
- A higher capacity fuse could cause damage and possibly cause a fire.
- Do not install a wire or aluminum foil instead of the proper fuse – even as a temporary repair. It may cause extensive wiring damage and possibly a fire.
NOTICE
Do not use a screwdriver or any other metal object to remove fuses because it may cause a short circuit and damage the system.
Instrument Panel Fuse Replacement
Power connector
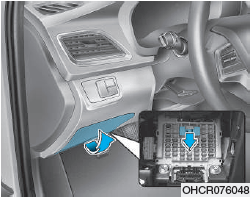
If your vehicle is to be parked for more than a month you need to do as follows previously in order to prevent battery discharge.
- Turn off the engine.
- Turn off the headlamps and taillamps.
- Open the inner fuse panel cover and pull out the power connector.
Inner panel fuse replacement
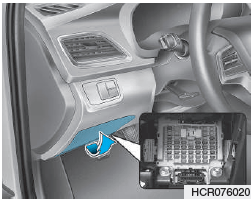
- Turn the engine off.
- Turn all other switches OFF.
- Open the fuse panel cover.
- Refer to the label on the inside of the fuse panel cover to locate the suspected fuse location.
-
Pull the suspected fuse straight out. Use the removal tool provided in the engine compartment fuse panel.
-
Check the removed fuse; replace it if it is blown. Spare fuses are provided in the instrument panel fuse panels (or in the engine compartment fuse panel).
-
Push in a new fuse of the same rating, and make sure it fits tightly in the clips. If it fits loosely, consult an authorized HYUNDAI dealer.
Information
If you do not have a spare, use a fuse of the same rating from a circuit you may not need for operating the vehicle, such as the cigar lighter fuse.
If the headlights or other electrical components do not work and the fuses are OK, check the fuse block in the engine compartment. If a fuse is blown, it must be replaced with the same rating.
In an emergency, if you do not have a spare fuse, use a fuse of the same rating from a circuit you may not need for operating the vehicle.
If the headlamps or other electrical components do not work and the fuses are undamaged, check the fuse panel in the engine compartment. If a fuse is blown, it must be replaced with the same rating.
Engine Compartment Panel Fuse Replacement

- Turn the engine off.
- Turn all other switches OFF.
- Remove the fuse panel cover by pressing the tap and pulling up.
- Check the removed fuse; replace it if it is blown. To remove or insert the fuse, use the fuse puller in the engine compartment fuse panel.
- Push in a new fuse of the same rating, and make sure it fits tightly in the clips. If it fits loosely, consult an authorized HYUNDAI dealer.
CAUTION
After checking the fuse box in the engine compartment secure-ly close the fuse box cover inside the engine compartment, until it clicks.
If the fuse box is not closed properly, water may leak in side, possibly causing a malfunction with the electrical system.
Main fuse
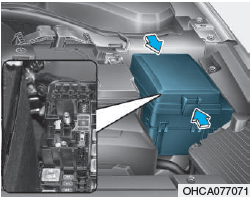 If the main fuse is blown, it must be removed as follows
- Turn off the engine.
- Disconnect the negative battery cable.
- Remove the fuse panel cover by pressing the tab and pulling it up.
- Remove the nuts shown in the picture above.
- Replace the fuse with a new one of the same rating.
- Reinstall in the reverse order of removal.
Information
If the main fuse is blown, consult an authorized HYUNDAI dealer.
Multi fuse

If the multi fuse is blown, it must be removed as follows
- Turn off the engine.
- Disconnect the negative battery cable.
- Remove the fuse panel cover by pressing the tab and pulling it up.
- Remove the nuts shown in the picture above.
- Replace the fuse with a new one of the same rating.
- Reinstall in the reverse order of removal.
Information
If the multi fuse is blown, consult an authorized HYUNDAI dealer.
Fuse/Relay Panel Description
Instrument panel fuse panel
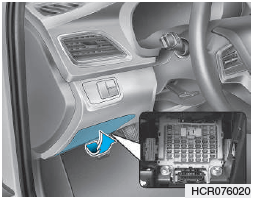
Inside the fuse/relay box cover, you can find the fuse/relay label describing fuse/relay names and ratings.
Information
Not all fuse panel descriptions in this manual may be applicable to your vehicle; the information is accurate at the time of printing. When you inspect the fuse box on your vehicle, refer to the fuse box label.

| Fuse Name | Fuse Rating | Circuit Protected |
| DOOR LOCK | 20A | I/P Junction Block (Tail Gate Unlock Relay, Door Lock/Unlock Relay, Two Turn Unlock Relay) |
| POWER OUTLET | 20A | Power Outlet |
| SAFETY P/WINDOW | 25A | Driver Safety Power Window Module |
| STOP LAMP | 15A | I/P Junction Block(Stop Signal Electronic Module) |
| T/SIGNAL LAMP | 15A | BCM, SLM |
| C/LIGHTER | 20A | Cigarette Lighter |
| HEATED MIRROR | 10A | Driver Power Outside Mirror, Passenger Power Outside Mirror, A/C Control Module |
| DRL | 10A | BCM |
| P/WINDOW RH | 25A | Power Window Main Switch, Passenger Power Window Switch |
| S/HEATER | 20A | Front Seat Warmer Control Module |
| SPARE1 | 10A | – |
| START | 7.5A | With Smart Key : ECM/PCM, E/R Junction Block(Start Relay), Smart Key Control Module, Transaxle Range Switch, Ignition Lock & Clutch Switch
W/O Smart Key : Burglar Alarm Relay, Transaxle Range Switch, Ignition Lock & Clutch Switch |
| Fuse Name | Fuse Rating | Circuit Protected |
| TAIL LAMP RH | 7.5A | Head Lamp RH, Rear Combination Lamp (OUT) RH, License Lamp RH, Rear Combination Lamp (IN) RH, ILL (+) |
| MODULE2 | 10A | FCA Module, Crash Pad Switch |
| TCU | 15A | E/R Junction Block(Fuse – B/UP LAMP), A/T Shift Lever, Transaxle Range Switch, Stop Lamp Switch |
| P/WINDOW LH | 25A | Power Window Main Switch |
| SPARE2 | 25A | Spare |
| FOG LAMP REAR | 10A | – |
| HEATED STEERING | 15A | Clock Spring |
| TAIL LAMP LH | 7.5A | Head Lamp LH, License Lamp LH, Rear Combination Lamp (OUT) LH, Rear Combination Lamp (IN) LH |
| MODULE3 | 7.5A | Front Seat Warmer Control Module, Audio, Electro Chromic Mirror, A/C Control Module, Clock Spring, A/T Shift Lever Indicator |
| ABS3 | 7.5A | E/R Junction Block(Multipurpose Check Connector), ESC Module |
| BRAKE SWITCH | 10A | Smart Key Control Module, Stop Lamp Switch |
| BCM | 10A | BCM |
| Fuse Name | Fuse Rating | Circuit Protected |
| FOG LAMP FRONT | 15A | I/P Junction Block(Front Fog Lamp Relay) |
| A/C1 | 7.5A | E/R Junction Block(Blower Relay), A/C Control Module |
| MODULE5 | 10A | Sunroof Motor, Front Seat Warmer Control Module |
| MODULE7 | 10A | TPMS Unit |
| ECU | 10A | ECM/PCM, Immobilizer Module, Smart Key Control Module |
| SUNROOF | 15A | Sunroof Motor |
| IMMO. | 10A | Immobilizer Module |
| MODULE6 | 10A | Key Solenoid |
| SPARE4 | 10A | Spare |
| MODULE4 | 7.5A | SLM, BCM, Smart Key Control Module |
| SPARE5 | 10A | Spare |
| AIR BAG | 10A | SRS Control Module, Occupant Detection Sensor |
| Fuse Name | Fuse Rating | Circuit Protected |
| MODULE1 | 7.5A | BCM, SLM, Key Interlock |
| SMART KEY | 25A | Smart Key Control Module |
| A/C2 | 7.5A | – |
| WIPER RR | 15A | Multifunction Switch, Rear Wiper Motor, Rear Wiper Relay |
| WIPER FRT | 25A | Multifunction Switch, Front Wiper Motor, E/R Junction Block(Wiper Lo Relay) |
| ACC | 10A | I/P Junction Block(Power Outlet Relay), BCM, SLM, Audio,
Key Interlock Power Outside Mirror Switch, Smart Key Control Module, USB Charging Connect |
| SPARE3 | 20A | Spare |
| A/BAG IND | 7.5A | Instrument Cluster, A/C Control Module |
| CLUSTER | 7.5A | Instrument Cluster |
| MDPS2 | 7.5A | MDPS Unit |
| AUDIO | 20A | Audio |
| ROOM LP | 10A | I/P Junction Block(Room Lamp Relay), Overhead Console Lamp , A/C Control Module, SLM, BCM, Auto Light & Photo Sensor, TPMS Unit , Instrument Cluster, Data Link Connector, Room Lamp, Trunk Room Lamp, Electro Chromic Mirror |
Engine compartment fuse panel

Inside the fuse/relay box cover, you can find the fuse/relay label describing fuse/relay names and ratings.
![]() Information
Information
Not all fuse panel descriptions in this manual may be applicable to your vehicle; the information is accurate at the time of printing. When you inspect the fuse panel in your vehicle, refer to the fuse panel label.

| Type | Relay NO. | Relay Name |
| MICRO | AC | A/C Relay |
| E81 | Start Relay | |
| E82 | Blower Relay | |
| E83 | Fuel Pump Relay | |
| E84 | Cooling Fan1 Relay | |
| E85 | Wiper HI Relay | |
| E86 | Wiper LO Relay | |
| E87 | H/Lamp HI Relay | |
| E88 | Head Lamp Relay | |
| E89 | Cooling Fan2 Relay | |
| E90 | Horn Relay | |
| E91 | B/Alarm Horn Relay | |
| MINI | E93 | Horn Relay |
| Fuse Name | Fuse Rating | Circuit Protected |
| MDPS | 80A | MDPS Unit |
| ALT | 150A | E/R Junction Block (Fuse – ABS1, ABS2, BLOWER, REAR HEATED) |
| REAR HEATED | 40A | I/P Junction Block (Rear Defogger Relay) |
| ABS1 | 40A | ESC Module, Multipurpose Check Connector |
| ABS2 | 40A | ESC Module |
| BLOWER | 40A | E/R Junction Block (Blower Relay) |
| WIPER | 10A | Front Wiper Motor, Multifunction Switch, E/R Junction Block (Wiper LO Relay) |
| ECU4 | 15A | ECM/PCM |
| SENSOR1 | 10A | Oil Control Valve #1/#2, E/R Junction Block (Cooling Fan1/2 Relay),
Oxygen Sensor (Up), Oxygen Sensor (Down), Variable Intake Solenoid Valve, Sub Relay Block (A/C Relay) Purge Control Solenoid Valve, Canister Close Valve |
| ECU2 | 15A | ECM/PCM |
| ECU3 | 20A | ECM/PCM |
| HEAD LAMP RH | 10A | Head Lamp RH |
| Fuse Name | Fuse Rating | Circuit Protected |
| HEAD LAMP LH | 10A | Head Lamp LH |
| IGN COIL | 20A | Ignition Coil #1~#4, Condenser |
| ECU5 | 15A | ECM/PCM, E/R Junction Block (Fuel Pump Relay) |
| B/UP LAMP | 10A | Reverse lamp switch |
| B+1 | 40A | I/P Junction Block (Fuse – DRL, FOGLAMP FRONT,
STOP LAMP, MODULE6, Power Connector (AUDIO, ROOM LAMP)) |
| B+2 | 50A | I/P Junction Block (Fuse – IMMO, SMART KEY1, BRAKE SWITCH,
BCM, SAFETY P/WINDOW, S/HEATER, SUNROOF, Power Window Relay) |
| IG2 | 40A | Ignition Switch, PDM Relay Box (IG2 Relay), E/R Junction Block (Start Relay) |
| COOLING FAN | 40A | E/R Junction Block (Cooling Fan1/2 Relay) |
| ECU1 | 30A | E/R Junction Block (Fuse – ECU3, ECU4, Main Relay) |
| B/ALARM HORN | 10A | B/Alarm Horn Relay |
| HEAD LAMP | 20A | E/R Junction Block (Head Lamp Relay) |
| H/LAMP HI | 20A | W/O DRL : E/R Junction Block (H/Lamp HI Relay) With DRL : SLM, BCM |
| Fuse Name | Fuse Rating | Circuit Protected |
| FUEL PUMP | 20A | E/R Junction Block (Fuel Pump Relay) |
| HORN | 10A | E/R Junction Block (Horn Relay) |
| A/C | 10A | Sub Relay Block (A/C Relay) |
| AMS | 10A | Battery Sensor |
| B+3 | 40A | I/P Junction Block (Fuse – T/SIGNAL LAMP, DOOR LOCK, Tail Lamp Relay) |
| IG1 | 40A | Ignition Switch, PDM Relay Box (IG1 Relay, ACC Relay) |
| POWER OUTLET | 40A | I/P Junction Block (Power Outlet Relay) |
Engine compartment fuse panel (Battery terminal cover)
Inside the fuse/relay box cover, you can find the fuse/relay label describing fuse/relay names and ratings.
Information
Not all fuse panel descriptions in this manual may be applicable to your vehicle; the information is accurate at the time of printing. When you inspect the fuse panel in your vehicle, refer to the fuse panel label.

NOTICE
After checking the fuse panel in the engine compartment, securely install the cover. If it is not securely latched, electrical failure may occur from water contact.
FAQs
In a 2019 Hyundai Accent, the fuse box is normally found in the driver’s side engine compartment.
Locate the fuse box cover by opening the hood. To access the fuses, remove the cover.
Fuses prevent overloading in electrical circuits by cutting the circuit when an excessive current is present.
Seek out a fuse that has a broken wire or that appears to be clearly burned. The internal metal strip may also be separated.
Standard blade-type fuses are usually used in 2019 Hyundai Accents.
To find a diagram showing the amperage for each fuse, consult your owner’s manual or the fuse box cover.
The electrical system may not be safe from harm if a higher amperage fuse is used. Use the designated amperage at all times.
To replace the blown fuse with a new one of the same amperage, use the fuse puller that comes with the fuse box.
Spare fuses for some models might be kept in the fuse box. To find their location, look at the diagram.
Carefully grasp and remove the fuse with a pair of needle-nose pliers.
Replacement fuses are usually available at hardware stores, auto parts stores, and internet merchants.
Inspect the matching electrical part, wiring, or attachment for any indications of wear and tear or malfunction.
It is not advised because the impacted system might not operate correctly. Before you drive, change the fuse.
For a comprehensive inspection, speak with your Hyundai dealer or a certified mechanic.
Fuses can blow for a number of reasons, but if they blow frequently, there may be an underlying electrical problem that needs to be fixed.
Useful Links
View Full PDF: Hyundai Accent 2019 User Manual| Auto User Guide
2023 Hyundai Santa Fe Specs, Price, Features, Milage (Brochure)

