
2023 Jeep Renegade Fuses and Fuse Box Diagram User Guide
This tutorial covers the 2023 Jeep Renegade fuse box diagram and fuses. Troubleshooting electrical issues and maintaining your vehicle is easier when you know where and how each fuse works.
2023 JEEP RENEGADE Specs, Price, Features, Mileage (Brochure)
Video: 2023 Jeep Renegade Fuses
FUSES
General Information WARNING!
- When replacing a blown fuse, always use an appropriate replacement fuse with the same amp rating as the original fuse.
- Never replace a fuse with another fuse of higher amp rating. Never replace a blown fuse with metal wires or any other material. Failure to use proper fuses may result in serious personal injury, fire and/or property damage.
- Before replacing a fuse, make sure that the ignition is off and that all the other services are switched off and/or disengaged.
- If the replaced fuse blows again, contact an authorized dealer.
- If a general protection fuse for safety systems (air bag system, braking system), power unit systems (engine system, gearbox system) or steering system blows, contact an authorized dealer.
The fuses protect electrical systems against excessive current. When a device does not work, you must check the electrical circuit inside the fuse for a break/melt. Also please be aware that using power outlets for extended periods of time with the engine off may result in vehicle battery discharge. 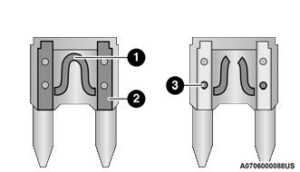 Blade Fuses
- Fuse Element
- Blade Fuse with a good/functional fuse element
- Blade fuse with a bad/not functional fuse element (blown fuse)
Access To The Fuses The fuses are grouped into four controllers located in the engine compartment, under the instrument panel and on the inside of the left side cargo trim panel.
Engine Compartment Fuses/Distribution Unit
The engine compartment fuse panel is located on the left side of the engine compartment.

Removing Fuse Cover and Locking Screw

- Mounting Screw
- Fuse Cover
Proceed as follows:
-
Slowly turn the screw counterclockwise.
-
Slowly release the screw.
-
Remove the fuse cover by sliding it upward.
Mounting Fuse Cover and Locking Screw Proceed as follows:
-
Properly secure the fuse cover to the box, slide completely from top to bottom.
-
Press downward on the screw, using the special screwdriver supplied.
-
Slowly turn the screw clockwise.
-
Release the screw.
| Cavity | Maxi Fuse | Cartridge Fuse | Micro Fuse | Description |
| * If Equipped | ||||
| F01 | 70 Amp Tan | – | – | Module Body Computer |
| F02 | 70 Amp Tan | – | – | Module Body Computer, Rear Distribution Unit |
| F03 | – | 20 Amp Blue | – | Controller Power Supply Body Computer |
| F04 | – | 30 Amp Pink | – | Brake Control Electronics Module |
| F05 | 70 Amp Tan | – | – | Electric Power-Assisted Steering |
| F06 | 70 Amp Tan | – | – | Engine Cooling Fan |
| F08 | – | 30 Amp Pink | – | Automatic Transmission, GSM |
| F09 | – | – | 5 Amp Tan | Control Module Engine |
| F10 | – | – | 15 Amp Blue | Horn |
| Cavity | Maxi Fuse | Cartridge Fuse | Micro Fuse | Description |
| If Equipped | ||||
| F11 | – | – | 5 Amp Tan | Supply Secondary Loads |
| F14 | – | – | 15 Amp Blue | WCAC Pump/Active Grille Shutters |
| F15 | 40 Amp Orange | – | – | Brake Control Module Pump |
| F16 | – | – | 5 Amp Tan | Engine Control Module Power, Automatic Transmission |
| F17 | – | – | 30 Amp Green | Supply Primary Loads |
| F18 | – | – | 5 Amp Tan | Intelligent Battery Sensor |
| F19 | – | – | 7.5 Amp Brown | Air Conditioner 1.3L Compressor |
| F20 | – | – | 5 Amp Tan | Electronic Power Four-Wheel Drive |
| F21 | – | – | 15 Amp Blue | Fuel Pump |
| F22 | – | – | 10 Amp Red | Power Control Module Engine |
| F23 | – | – | 30 Amp Green | Heated Windshield * |
| F24 | – | – | 15 Amp Blue | Electronic Unit Supply Automatic Transmission |
| F82 | – | 20 Amp Yellow | – | Power Control Module Engine |
| F83 | – | 40 Amp Green | – | Air Conditioning Fan |
| F84 | – | – | 30 Amp Green | Power Supply All Wheel Drive |
| F87 | – | – | 5 Amp Tan | Gear Selector Automatic Transmission |
| F88 | – | – | 7.5 Amp Brown | Heated Outside Mirrors |
| F89 | – | 30 Amp Green | – | Heated Rear Window |
Body Controller Fuse Center
The controller is located at the left side of the steering column at the bottom of the instrument panel. For the fuse replacement see an authorized dealer.

| Cavity | Mini Fuse | Description |
| F31 | 7.5 Amp Brown | Flashes/Electrical Movement Front Seats/Fan Air Conditioning |
| F33 | 20 Amp Yellow | Power Window Front (Passenger Side) |
| F34 | 20 Amp Yellow | Power Window Front (Driver Side) |
| F36 | 15 Amp Blue | Supply Uconnect System, Air Conditioning, USB Port, Rear Ceiling Lights (With Sunroof), E-Call |
| F37 | 10 Amp Red | System Power Forward Collision Warning Plus, All Wheel Drive (AWD), IPC, Brake Pedal Switch (NC) |
| F38 | 20 Amp Yellow | Central Locking |
| F42 | 7.5 Amp Brown | Power Under Lock and Key, Brake Control Electronics Module, Electric Power-Assisted Steering |
| F43 | 20 Amp Yellow | Bi-directional Pump Washer |
| F47 | 20 Amp Yellow | Power Rear Window (Driver Side) |
| F48 | 20 Amp Yellow | Power Rear Window (Passenger Side) |
| F49 | 7.5 Amp Brown | Supply ParkSense, Mirror, Heated Front Seats, Stabilizer Battery, ESC System, S&S Inhibition Command, Blind Spot, Rain/Light Sensor, Humidity Sensor |
| Cavity | Mini Fuse | Description |
| F50 | 7.5 Amp Brown | Supply Air Bag |
| F51 | 7.5 Amp Brown | Air Conditioning, Lane Departure Warning, Terrain Selector, Trailer Tow Module, Compass Module, Rear View Camera |
| F53 | 7.5 Amp Brown | Supply IPC/Starter Device/System Keyless Enter ‘n Go™ |
| F94 | 15 Amp Blue | Power Socket |
Rear Cargo Fuse/Relay Distribution Unit
To access the fuses, remove the access door from the left rear panel of the rear cargo area.  Rear Fuse Access Door The fuses may be contained in two units. Fuse Holder No. 1 and Fuse Holder No. 2 (if equipped with trailer towing) are located closest to the rear of the vehicle.
  Rear Cargo Fuse Cavities
- Fuse Holder No.
- Fuse Holder No. 1
Fuse Holder No. 2
| Cavity | Mini Fuse | Description |
| F5 | 15 Amp Blue | Controller Exterior Lighting Lights (Drivers Side) |
| F6 | 15 Amp Blue | Controller Exterior Lighting Lights (Passenger Side) |
Fuse Holder No. 2
| Cavity | Mini Fuse | Description |
| F1 | 20 Amp Yellow | Sun Visor (Retractable Roof) Or External Fuse |
| F2 | 20 Amp Yellow | HIFI Audio System |
| F3 | 20 Amp Yellow | MY SKY |
| F5 | 30 Amp Green | Power Seat (Driver Side) |
| F6 | 7.5 Amp Brown | Lumbar Adjustment Front Seat (Driver Side) |
| F8 | 20 Amp Yellow | Heating Front Seats |
Useful Links
View Full PDF : 2023 Jeep Renegade Owner’s Manual| Auto User Guide
2023 Jeep Renegade Keys and Smart Key Operations
2023 JEEP RENEGADE Specs, Price, Features, Mileage (Brochure)