
2022 Toyota Corolla Cross Display Setting Screen | Features Guide
When the 2022 Toyota Corolla Cross Display Setting Screen comes out, it shows off a high-tech interface that combines advanced features with easy-to-use settings. This dynamic display system is the brains of the car’s technology. It has a wide range of settings that can be changed and functions that are easy to understand. From choosing how to navigate to setting up the sound, drivers can easily make their driving experience fit their tastes. The Display Setting Screen shows Toyota’s dedication to new ideas and user-centered design with its sleek look and easy-to-understand layout, making driving more enjoyable and convenient. This Features Guide is a complete companion that helps drivers get the most out of the Corolla Cross’s cutting-edge technology and make the most of their driving surroundings.
2023 – 2024 Toyota Corolla Cross Review, Price, Features, And Mileage (Brochure)
Gauges and meters (7-inch display)
Meter display
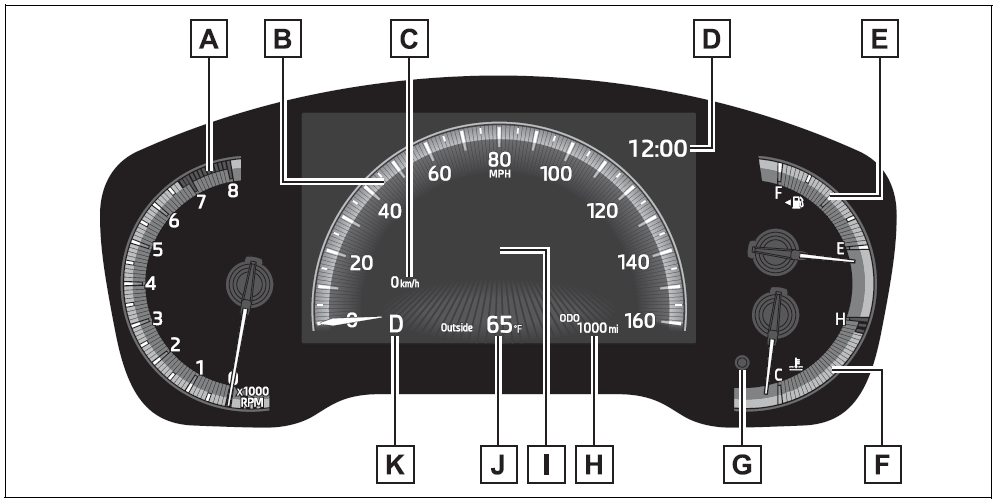
- Locations of gauges and meters
- Analog speedometer
- Analog speedometer
The units of measure may differ depending on the intended destination of the vehicle.
- Tachometer
Displays the engine speed in revolutions per minute - Speedometer
- Sub speedometer
- Clock
- Fuel gauge
Displays the quantity of fuel remaining in the tank - The engine coolant temperature gauge Displays the engine coolant temperature
- Display change button
- The odometer and trip meter display
- Multi-information display
Presents the driver with a variety of vehicle data
Displays warning messages if a malfunction occurs - Outside temperature
Displays the outside temperature within the range of -40°F (-40°C) to 140°F - Shift position indicator
Digital speedometer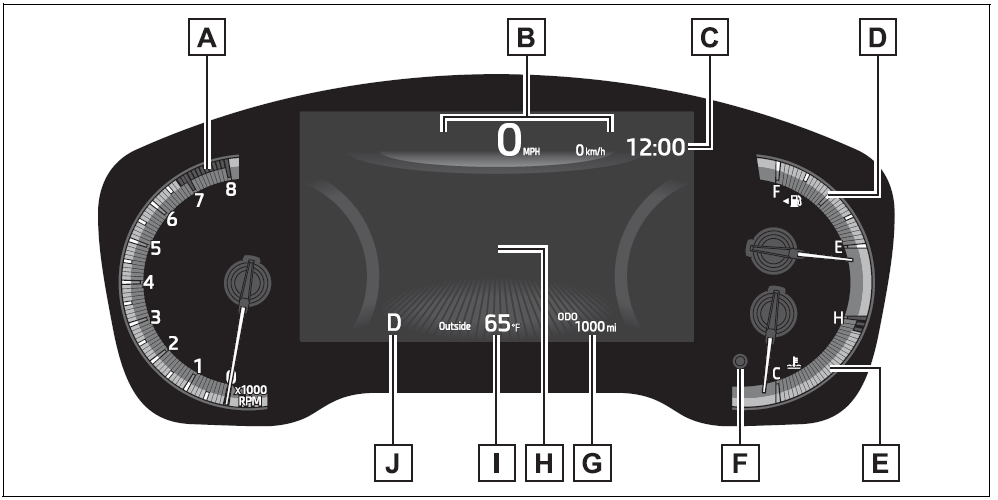
The units of measure may differ depending on the intended destination of the vehicle.
- Tachometer
Displays the engine speed in revolutions per minute - Speedometer
- Clock
- Fuel gauge
Displays the quantity of fuel remaining in the tank - The engine coolant temperature gauge Displays the engine coolant temperature
- Display change button
- The odometer and trip meter display
- Multi-information display
Presents the driver with a variety of vehicle data
Displays warning messages if a malfunction occurs - Outside temperature
Displays the outside temperature within the range of -40°F (-40°C) to 140°F (60°C) - Shift position indicator
Outside temperature display
- In the following situations, the correct outside temperature may not be displayed, or the display may take longer than normal to change:
- When stopped, or driving at low speeds (less than 16 mph [25 km/h])
- When the outside temperature has changed suddenly (at the entrance/exit of a garage, tunnel, etc.)
- When “–” or “E” is displayed, the system may be malfunctioning. Take your vehicle to your Toyota dealer.
Liquid crystal display
Customization
The gauges and meters can be cus-
WARNING
The information displayed at low temperatures
Allow the interior of the vehicle to warm up before using the liquid crystal information display. At extremely low temperatures, the information display monitor may respond slowly, and display changes may be delayed.
For example, there is a lag between the driver’s shifting and the new gear number appearing on the display. This lag could cause the driver to downshift again, causing rapid and excessive engine braking and possibly an accident resulting in death or injury.
NOTICE
To prevent damage to the engine and its components
- Do not let the indicator needle of the tachometer enter the red zone, which indicates the maximum engine speed.
- The engine may be overheating if the engine coolant temperature gauge is in the red zone (H). In this case, immediately stop the vehicle in a safe place, and check the engine after it has cooled completely.
The odometer and trip meter display
- Changing the display
Press the display change button until the desired item is displayed.
- Display items
- Odometer
Displays the total distance the vehicle has been driven. - Trip meter A/Trip meter B
Displays the distance the vehicle has been driven since the meter was last reset. Trip meters A and B can be used to record and display different distances independently.
To reset, display the desired trip meter and press and hold the display change button.
- Odometer
Changing the instrument panel light brightness
The brightness of the instrument panel lights can be adjusted.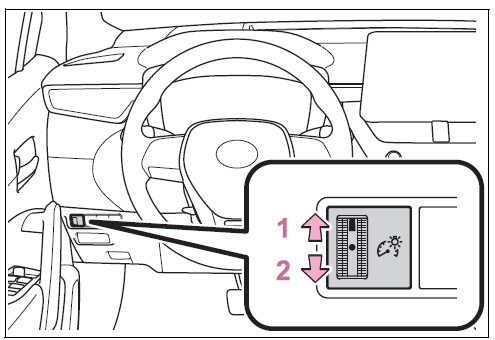
- Brighter
- Darker
Instrument panel light brightness adjustment
The brightness of the instrument panel lights can be adjusted separately for when the tail lights are on and off.
Adjusting the clock
Clock adjustment
The clocks on the following can be adjusted on the audio system screen.
- Multi-information display
- Audio system screen
Setting the clock to be adjusted automatically by GPS (Audio [for
U.S.A.]/Audio Plus)
- Press the “MENU” button.
- Select “Setup” on the “Menu” screen.
- Select “General” on the “Setup” screen.
- Select “Clock”.
- Select “Auto Adjust by GPS”
Adjusting the clock manually
Audio (except for U.S.A.)
- Press the “MENU” button.
- Select “Setup” on the “Menu” screen.
- Select “General” on the “Setup” screen.
- Select “Clock”.
- Adjust the displayed time.
- Hour: Select “-” or “+” of “Hours” to adjust the hour.
- Minute: Select “-” or “+” of “Minutes” to adjust the min-ute.
- “:00”: Select to set the clock to the beginning of the nearest hour. e.g.
1:00 to 1:29 1:00 1:30 to 1:59 2:00
Audio (for U.S.A.)/Audio Plus 1 Press the “MENU” button.
- Select “Setup” on the “Menu”
screen. - Select “General” on the
“Setup” screen. - Select “Clock”.
- Select “Auto Adjust by GPS”
to set to off.
- Adjust the displayed time.
- Hour: Select “-” or “+” of “Hours” to adjust the hour.
- “:00”: Select to set the clock to the beginning of the nearest hour.
e.g.
1:00 to 1:29 1:00 1:30 to 1:59 2:00
Setting the time zone (Audio [for U.S.A.]/Audio Plus)
- Press the “MENU” button.
- Select “Setup” on the “Menu” screen.
- Select “General” on the “Setup” screen.
- Select “Clock”.
- Select “Time Zone”. Select the desired time zone.
Setting daylight saving time (Audio [for U.S.A.]/Audio Plus)
- Press the “MENU” button.
- Select “Setup” on the “Menu” screen.
- “Setup” screen.
- Select “Clock”.
- Select “Daylight Saving Time” then on/off.
Changing the clock between 12-hour/24-hour format
- Press the “MENU” button.
- Select “Setup” on the “Menu” screen.
- Select “General” on the “Setup” screen.
- Select “Clock”.
- Select “24-Hour Time For-
When set to off, the clock is displayed in a 12-hour time format.
Clock settings screen (Audio [for U.S.A.]/Audio Plus)
If “Clock: 00” is displayed when
is selected on the multi-information display, the system may be malfunctioning. Have the vehicle inspected by your Toyota dealer.
Multi-information display
Display and menu icons
Display
- 4.2-inch display

- Driving support system status display area
Displays an image when the following systems are operating and a menu icon other than selected:- LTA (Lane Tracing Assist)
- Dynamic radar cruise control with full-speed range
- RSA (Road Sign Assist) (if equipped)
- Content display area
By selecting menu icons on the multi-information display, a variety of driving-related information can be displayed. The multi-information display can also be used to change display settings and other vehicle settings.
Warning or advice pop-up displays are also displayed in certain situations.
- Driving support system status display area
- 7-inch display

- Driving support system status display area
Displays an image when the following systems are operating and a menu icon other than selected:- LTA (Lane Tracing Assist)
- Dynamic radar cruise control with full-speed range
- RSA (Road Sign Assist) (if equipped) (P.213)
- Content display area
By selecting menu icons on the multi-information display, a variety of driving-related information can be displayed. The multi-information display can also be used to change display settings and other vehicle settings.
Warning or advice pop-up displays are also displayed in certain situations.
- Driving support system status display area
Menu icons
The menu icons will be displayed by pressing the meter control switch.
Liquid crystal display
Small spots or light spots may appear on the display. This phenomenon is characteristic of liquid crystal displays, and there is no problem continuing to use the display.
WARNING
Caution for use while driving
- When operating the multi-infor-mation display while driving, pay extra attention to the safety of the area around the vehicle.
- Do not look continuously at the multi-information display while driving as you may fail to see pedestrians, objects on the road, etc. ahead of the vehicle.
The information displayed at low temperatures
Changing the meter display
The multi-information display is operated using the meter control switches.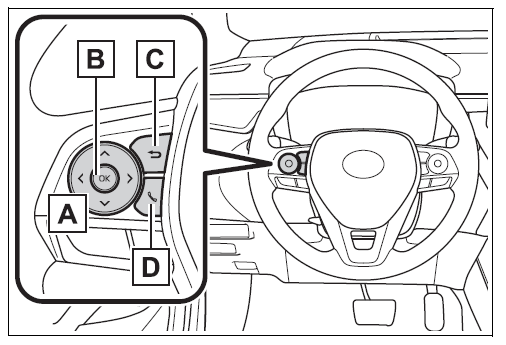
: Select menu icons /: Change displayed content, scroll up/down the screen, and move the cursor up/down
Press: Enter/Set
Press and hold: Reset/Dis-play customizable items
Return to the previous screen
Call sending/receiving and history display Linked with the hands-free system, sending or receiving calls are displayed. For details regarding the hands-free system, refer to the
“MULTIMEDIA OWNER’S MANUAL”.
Content of driving information
Display items
- Speedometer display/Driving range (4.2-inch display)
- Fuel economy
- Eco Driving Indicator/Driving range
Speedometer display/Driving range (4.2-inch display)
- Speedometer display
- Driving range
Displays driving range with the remaining fuel. Use the displayed values as a reference only.
This distance is computed based on your average fuel consumption. As a result, the actual distance that can be driven may differ from that displayed.
When only a small amount of fuel is added to the tank, the display may not be updated.
When refueling, turn the engine switch off. If the vehicle is refueled without turning the engine switch off, the display may not be updated.
Fuel economy
Use the displayed values as a reference only.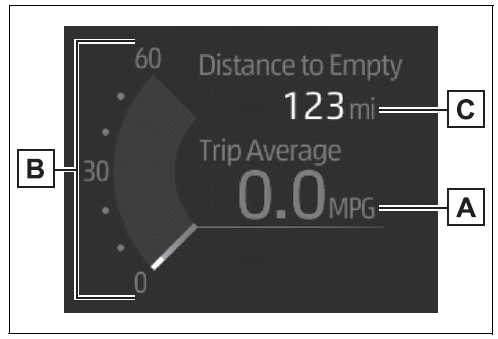
- Average fuel economy (after reset)
To reset the average fuel economy display, press, and hold the meter control switch. - Current fuel consumption
Displays instantaneous current fuel consumption. - Driving range
Displays driving range with the remaining fuel.
This distance is computed based on your average fuel consumption. As a result, the actual distance that can be driven may differ from that displayed.
When only a small amount of fuel is added to the tank, the display may not be updated.
When refueling, turn the engine switch off. If the vehicle is refueled without turning the engine switch off, the display may not be updated.
The average fuel economy dis- play can be changed in - Average fuel economy (after start)
Displays the average fuel consumption since engine start. - Average fuel economy (after refueling)
Displays the average fuel consumption since the vehicle was refueled.
Eco Driving Indicator/Driving range
- Eco Driving Indicator
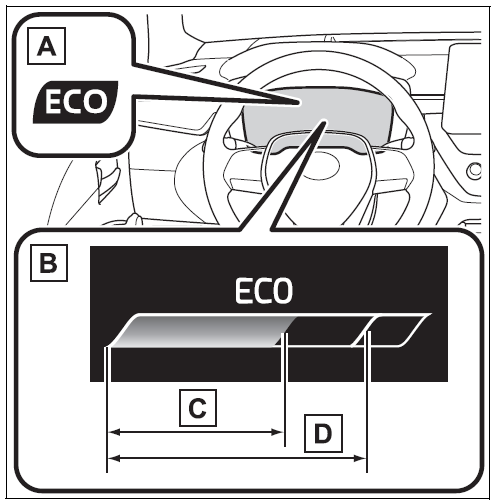
- Eco Driving Indicator Light
During Eco-friendly acceleration (Eco-driving), the Eco-driving Indicator Light will turn on. When the acceleration exceeds the Zone of Eco driving, or when the vehicle is stopped, the light turns off. - Eco Driving Indicator Zone Display
Suggests the Zone of Eco-driving with the current Eco-driving ratio based on acceleration. - Eco-driving ratio based on acceleration
If the acceleration exceeds the Zone of Eco driving, the right side of the Eco Driving Indicator Zone Display will illuminate.
At this time, the Eco Driving Indicator Light will turn off. - Zone of eco-driving
- Eco Driving Indicator Light
- Driving range
Displays driving range with the remaining fuel. Use the displayed values as a reference only.
This distance is computed based on your average fuel consumption. As a result, the actual distance that can be driven may differ from that displayed.
When only a small amount of fuel is added to the tank, the display may not be updated.
When refueling, turn the engine switch off. If the vehicle is refueled without turning the engine switch off, the display may not be updated.
2023 – 2024 Toyota Corolla Cross Review, Price, Features, And Mileage (Brochure)
Eco Driving Indicator
Eco Driving Indicator will not operate under the following conditions:
- The shift lever is in any position other than D.
- The vehicle speed is approximately 80 mph (130 km/h) or higher.
Driving support system information display
- Driving support system information
Select to display the operational status of the following systems:- LTA (Lane Tracing Assist)
- Dynamic radar cruise control with full-speed range
- RSA (Road Sign Assist) (if equipped)
Audio system-linked dis-play
Select to enable the selection of an audio source or track on the meter using the meter control switches.
This menu icon can be set to be displayed/not displayed.
Vehicle information display
- Drive information
Displays drive information such as the following: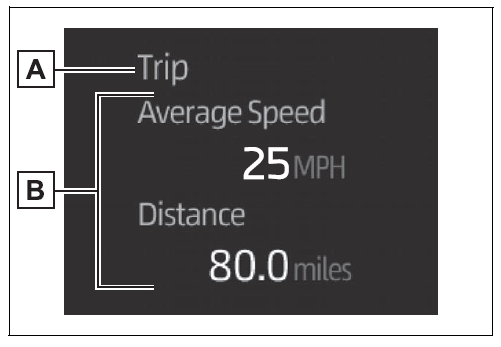
- Drive information type
- Drive information items
Displays the following depending on which drive information type and drive information items were selected in
- Distance: Displays the distance driven since engine start
- Elapsed time: Displays the elapsed time since the engine start
- Average vehicle speed: Displays the average vehicle speed since engine start
- After reset
- Distance: Displays the distance driven since the display was reset*
- Elapsed time: Displays the elapsed time since the display was reset*
- Average vehicle speed: Displays the average vehicle speed since the display was reset*
To reset, display the desired item and press and hold the meter control switch.
Tire pressure
AWD Control (if equipped)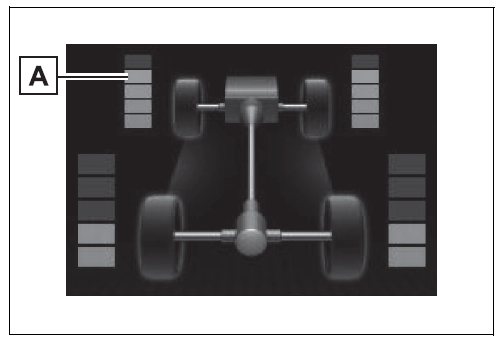
- Torque distribution display
Displays the drive status of each wheel in 6 steps from 0 to 5.
Settings display
Meter display settings that can be changed
- Language
Select to change the language displayed. - Units
Select to change the units of measure displayed. - Speedometer display (7-inch display) Select to set the display of the speedometer to analog/digital.
- Eco Driving Indicator Light
Select to enable/disable the Eco Driving Indicator Light.
Fuel economy display
Select to change the average fuel consumption display between after start/after reset.
Select to display/not display the audio system-linked display.
Select to change the displayed content of the following:- Drive information type
Select to change the drive informa-tion type display between after start/after reset. - Drive information items
Select to set the first and second items of the drive information display to any of the following: average vehicle
speed/distance/elapsed time.
- Drive information type
- Pop-up display
Select to enable/disable pop-up displays for each relevant system. - Multi-information display off
Select to turn the multi-information display off.
To turn the multi-information display on again, press any of the following meter control switches
Default setting
Select to reset the meter display settings to the default setting.
Vehicle functions and settings that can be changed
Suspension of the settings display
- Some settings cannot be changed while driving. When changing settings, park the vehicle in a safe place.
- If a warning message is displayed, the operation of the settings display will be suspended.
WARNING
Cautions during setting up the display
If the engine is running when changing the display settings, ensure that the vehicle is parked in a place with adequate ventilation. In a closed area such as a garage, exhaust gases including harmful carbon monoxide (CO) may collect and enter the vehicle. This may lead to death or a serious health hazard.
NOTICE
While setting up the display
To prevent battery discharge, ensure that the engine is running while setting up the display features.
Stop & Start system information
- Stop & Start system operation time (after start)/status notification Displays the current amount of time the engine has been stopped by the operation of the Stop & Start system.
Also shows the status of the Stop & Start system with a pop-up display. (P.230) - Stop & Start system settings The length of time the Stop & Start system will operate when the “A/C” switch of the air conditioning system is on can be set to 2 different- motion displays. (P.230)
Suggestion function
Displays suggestions to the driver in the following situations. To select a response to a displayed suggestion, use the meter control switches.
Suggestion to enable the power back door (if equipped)
If the power back door system is
disabled (setting on set to off) and the power back door switch on the instrument panel is operated, a suggestion message will be displayed asking if you wish to enable the power back door system.
To enable the power back door system, select “Yes”.
After enabling the power back door system, press the power back door switch again to open or close the power back door.
Suggestion to turn off the headlights (if equipped)
If the headlights are left on for a certain amount of time after the engine switch has been turned off, if the headlight switch is in the “AUTO” position, a suggestion message will be displayed asking if you wish to turn the headlights off.
To turn the headlights off, select “Yes”.
If the driver’s door is opened after the engine switch is turned off, this suggestion message will not be displayed.
Customization
Some functions can be customized. (P.563)
Fuel consumption information
Fuel consumption informa-tion can be displayed on the audio system screen.
System components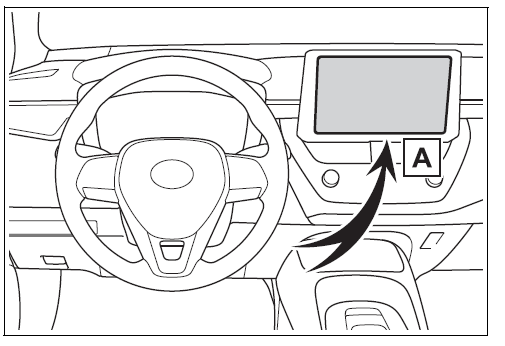
Audio system screen
Consumption
Trip information
Without DCM
- Press the “MENU” button.
- Select “Info” on the “Menu” screen.
If a screen other than “Trip Informa-tion” is displayed, select “Trip Information”.
With DCM
- Press the “MENU” button.
- Select “Info” on the “Menu” screen.
- Select “ECO” on the “Infor
If a screen other than “Trip Informa-tion” is displayed, select “Trip Infor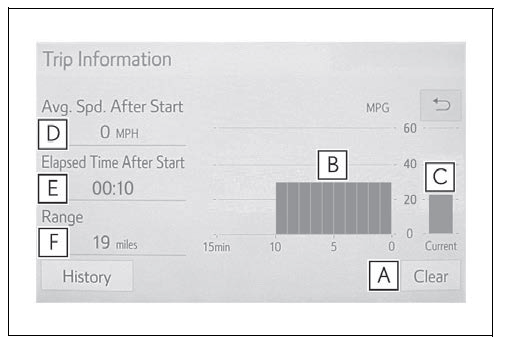
- Resetting the consumption data
- Fuel consumption in the past 15 minutes
- Current fuel consumption
- Average vehicle speed since the engine was started.
- Elapsed time since the engine was started.
- Cruising range
Average fuel consumption for the past 15 minutes is divided by color into past averages and averages attained since the engine switch was last turned to ON. Use the displayed average fuel consumption as a reference.
The image is an example only and may vary slightly from actual conditions.
History
Without DCM
- Press the “MENU” button.
- Select “Info” on the “Menu” screen.
If a screen other than “History” is displayed, select “History”.
With DCM
- Press the “MENU” button.
- Select “Info” on the “Menu” screen.
- Select “ECO” on the “Information” screen.
If a screen other than “History” is displayed, select “History”.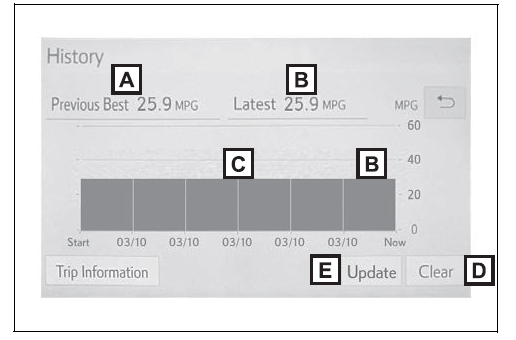
- Best-recorded fuel consumption
- Latest fuel consumption
- Previous fuel consumption record
- Resetting the history data
- Updating the latest fuel consumption data
The average fuel consumption history is divided by color into past averages and the average fuel consumption since the last update. Use the displayed average fuel consumption as a reference.
The image is an example only and may vary slightly from actual conditions.
Updating the history data
Update the latest fuel consumption by selecting “Update” to measure the current fuel consumption again.
Resetting the data
The fuel consumption data can be deleted by selecting “Clear”.
Cruising range
Displays the estimated maximum distance that can be driven with the quantity of fuel remaining.
This distance is computed based on your average fuel consumption. As a result, the actual distance that can be driven may differ from that displayed.
FAQs
The 2022 Toyota Corolla Cross offers a variety of display settings, including brightness, contrast, and color adjustments.
You can access the display settings through the infotainment system’s menu. Simply navigate to the settings menu and select the display option.
Yes, you can customize the layout of the display by selecting from different themes or arranging widgets to your preference.
Yes, the Corolla Cross offers a night mode option to reduce glare and eye strain during nighttime driving.
Yes, you can adjust the font size to make it more comfortable for you to read.
Yes, you can access advanced settings such as screen calibration and auto-dimming features.
Yes, the display supports multiple languages for ease of use.
Yes, you can set up shortcuts or quick access buttons to your favorite features or functions.
Yes, the Corolla Cross display supports smartphone integration through Apple CarPlay and Android Auto.
Yes, you can adjust the screen orientation and aspect ratio to fit your preferences.
Yes, the display offers accessibility features such as voice command controls and text-to-speech functionality.
Yes, you can customize the background image to personalize your driving experience.
Yes, the Corolla Cross display offers real-time traffic updates and navigation features to help you navigate efficiently.
Some settings may be accessible while driving, but it’s recommended to adjust them when the vehicle is parked for safety reasons.
Useful Links
View full PDF: Toyota Corolla Cross 2022 User Guide | Auto User Guide
2023 – 2024 Toyota Corolla Cross Review, Price, Features, And Mileage (Brochure)
Replacing A Blown Fuse: 2022 Toyota Corolla Cross Fuse Diagrams