
![]()
2023 Volkswagen Caddy Displays User Guide
The 2023 Volkswagen Caddy has innovative digital displays, including a 10-inch touchscreen infotainment system with easy controls, voice command, and seamless communication with We Connect. In select hybrid models, optional upgrades include a customized Digital Cockpit and a 15-inch display.
Video: 2023 Volkswagen Caddy Dashboard Warning Indicators
Digital Fuel Gauge Guide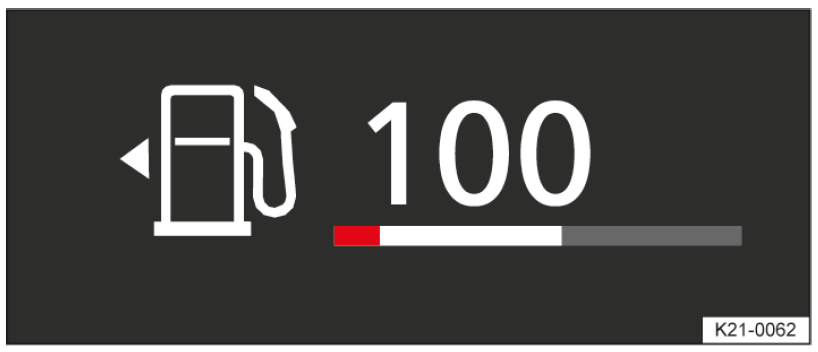
Fig. 1 Fuel gauge in the digital instrument cluster (illustration).
The small arrow next to the petrol pump symbol in the fuel gauge shows you the side of the vehicle on which the tank flap is located.
Analogue fuel gauge
Fig. 1 Fuel gauge in the analogue instrument cluster (illustration).
The small arrow next to the petrol pump symbol in the fuel gauge shows you the side of the vehicle on which the tank flap is located.
Troubleshooting
Fuel tank almost empty
The indicator lamp lights up yellow. The reserve volume( red marking) is being consumed .
- Refuel at the next opportunity . Depending on equipment: when the indicator lamp lights up, the auxiliary heater and the fuel-powered supplementary heater switch off automatically
WARNING
Driving when the fuel level is too low can lead to the vehicle coming to a standstill in traffic, potentially causing accidents and serious injuries.
- When the fuel level is too low, the fuel supply to the engine could be irregular, especially when driving up or down hills and inclines.
- The steering, all driver assist systems and brake support systems will not function if the engine “sputters” or
stops completely due to a lack of fuel or irregular fuel supply. - Refuel when the fuel tank is still 1/4 full in order to avoid breaking down due to lack of fuel.
NOTICE
Never run the fuel tank completely dry. Irregular fuel supply can cause misfiring and allow unburnt fuel to enter the exhaust system.
Fuel tank almost empty
The indicator lamp lights up yellow. The natural gas fuel tank is almost empty
- Refuel with natural gas at the next opportunity
Vehicle in natural gas mode
The indicator lamp lights up green. The vehicle is operating in natural gas mode. The green indicator lamp will go out when the natural gas supply has been used up.
- Refuel with natural gas at the next opportunity.
Things to note for vehicles with natural gas engine
If the vehicle is left parked for an extended period directly after refuelling, it is possible that the needle of the natural gas fuel gauge will not show exactly the same fuel level as immediately after refuelling when the vehicle is started again. This does not indicate a leak in the system, but is a technically related reduction in pressure in the natural gas fuel tanks after a cooling phase directly after refuelling.
On vehicles with natural gas engine, the fuel gauge of the petrol fuel tank may display the correct filling quantity only after a delay, depending on the amount of fuel that has been filled into the tank.
Digital coolant temperature display
Depending on equipment, the coolant temperature can be displayed in the secondary displays in the digital instrument cluster .
If the indicator lamp flashes, the coolant temperature is too high or the coolant level is too low .
Analogue coolant temperature display
Fig. 1 Coolant temperature display in the analogue instrument cluster (schematic diagram).
- Cold range. The engine has not yet reached operating temperature. Avoid high engine revs and heavy engine loads until the engine is warm.
- Normal range.
- Warning range. The temperature may also rise to the hot area when the engine is working hard, especially at high ambient temperatures.
If the flashes, the coolant temperature is too high or the coolant level is too low .
Driving data display
The multifunction display shows travel and fuel consumption data. There are several options available for showing driving data in the secondary display area (→ Digital instrument cluster) . Different driving data can be selected depending on the vehicle equipment level. The displayed driving data depends on the current driving behaviour, the vehicle condition, e.g. particulate filter regeneration, and the current driving situation, e.g. urban traffic. The driving data is calculated as an average value over stretches of varying length. Consequently, the value currently displayed may differ from the actual average value.
Resetting multifunction displays in the digital instrument cluster
- Press the or button.
- Use the arrow buttons or to select the corresponding secondary display in the configuration menu. An arrow after the entry in the configuration menu links to a submenu.
- In the submenu, select Reset data and press the button to confirm.
The memory will automatically be reset to Since start if the journey is interrupted for more than 2 hours. The Since refuelling memory is reset after refuelling. The Long-term memory is not reset automatically.
The memory records driving data for up to 19 hours and 59 minutes or 99 hours and 59 minutes of driving time or 1999.9 km (mi) or 9999.9 km (mi) distance covered.
The memory is deleted if one of these maximum values is exceeded. The maximum values vary depending on the instrument cluster version.
Switching between the displays in the analogue instrument cluster
- Vehicles with multifunction steering wheel: Press the
 button.
 - Vehicles without multifunction steering wheel: Press the
 rocker switch on the wiper lever.
Switching between memories in the analogue instrument cluster
- Vehicles with multifunction steering wheel: Press the
 button.
 - Vehicles without multifunction steering wheel: Press the
 button on the wiper lever.
Since start memory
The memory collects travel and consumption data from the moment the ignition is switched on until it is switched off. The memory will be deleted if the journey is interrupted for more than two hours.
Since refuelling memory
Display and storage of the collected driving and consumption values. The memory is deleted when the tank is refilled.
Long-term memory
The memory records driving data for up to 19 hours and 59 minutes or 99 hours and 59 minutes of driving time or 1999.9 km (mi) or 9999 km (mi) distance covered. The memory is deleted if one of these maximum values is exceeded. The maximum values vary depending on the instrument cluster version
Deleting driving data memories in the analogue instrument cluster
- Select the memory that you wish to delete.
- Vehicles with multifunction steering wheel:
Press and hold thebutton for approximately 2 seconds.
1. Select the memory that you wish to delete.
2. Vehicles without multifunction steering wheel:
Press and hold the button in the wiper lever for approximately 2 seconds
Adjusting the speed warning in the analogue instrument cluster
- Vehicles with multifunction steering wheel:
Select the display Warning at — km/h or Warning at — mph. - Press the button on the multifunction steering wheel to save the current speed and activate the warning.
- Set the speed within approximately 5 seconds using the and buttons on the multifunction steering wheel.
- Press the button on the multifunction steering wheel or wait for a few seconds.
The speed is now saved and the warning is activated. - To deactivate, press the button on the multifunction steering wheel again.
The stored speed will be deleted.
- Vehicles without multifunction steering wheel:
Select the display Warning at — km/h or Warning at — mph. - Press the button on the wiper lever to save the current speed and activate the warning.
- Within approximately 5 seconds, set the speed using the rocker switch
 on the wiper lever.
 - Press the button on the wiper lever again or wait for a few seconds.
The speed is now saved and the warning is activated. - To deactivate, press the button on the wiper lever again. The stored speed will be deleted.
The warning can be set for speeds from 30 km/h (18 mph) to 250 km/h (155 mph). In some countries, a single acoustic warning is given at speeds above 80 km/h( around 50 mph) and a continuous warning tone sounds above 120 km/h (around 75 mph). This warning is a legal requirement and cannot be changed.
Selecting displays in the analogue instrument cluster
You can select which driving data you want to display in the vehicle settings in the Infotainment system
Average speed display
The average speed is displayed after around 100 m (around 328 ft). The display will show dashes until this point.
Consumption display
The average fuel consumption is displayed after around 300 m( around 984 ft). The display will show dashes until this point.
Fuel range display
Approximate calculation of the distance that the vehicle can still travel in km( miles) if the same driving style is maintained.
SCR range or Range display
Approximate calculation of the distance in km (miles) that the vehicle can still travel with the current AdBlue® level if the same driving style is maintained. Depending on the equipment, the display only appears when the remaining range is around 2,000 km (approximately 1,243 miles) and cannot be deselected.
Convenience consumers
List of active convenience systems which can increase energy consumption, e.g. the air conditioning. The display shows the guide values of the respective consumer
Service menu
Settings can be made in the Service menu depending on the vehicle equipment.
Opening the Service menu in the digital instrument cluster
- Select the Driving time/distance information profile in the secondary displays.
- Depending on the selected secondary display area, press and hold the
 button on the multifunction steering wheel for approx. 6 seconds.
Opening the Service menu in the analogue instrument cluster
- Select the Range information profile on the analogue instrument cluster (→ Analogue instrument cluster) .
- Press and hold the button on the multifunction steering wheel for approximately 5 seconds.
- Use the buttons on the multifunction steering wheel to navigate through the menu.
Opening the service interval status
- Select the Service menu in the service menu.
An overview of the remaining distance and days until the next inspection or next oil change service is shown in
the instrument cluster display.
Resetting inspection
- Select the Reset inspection menu.
- Follow the instructions on the instrument cluster display.
Resetting oil change service
- Select the Reset oil service menu.
- Follow the instructions on the instrument cluster display
Displaying the engine code
- Select the Engine code menu.
The engine code (EC ) is shown on the instrument cluster display.
Setting the time
- Select the Time menu.
- Set the correct time with the arrow buttons and .
Accessing copyright information
- Select the Copyright menu.
Service interval display
Service events are displayed on the instrument cluster and in the Infotainment system. Versions and displays can vary as different versions of the instrument cluster and Infotainment system are available. The service takes place at predefined intervals for vehicles with a fixed oil change service interval. The service intervals are calculated on an individual basis for vehicles with flexible oil change service interval. An oil change service must only be carried out when required by the vehicle. The individual conditions in which the vehicle
is used and the driver’s personal driving style are taken into account. The service reminder is displayed 30 days before the service is due. The distance is rounded to the nearest 100 km and the remaining time is rounded to full days.
Service alert
If an oil change service or inspection is due soon, a service alert will appear the next time the ignition is switched on. The mileage or time shown corresponds to the maximum mileage or time that can still be driven before the next service.
Service event
For a scheduled service or a scheduled inspection, an acoustic signal will be given when the ignition is switched on and a spanner symbol may be displayed on the instrument cluster display for several seconds together with one of the following displays:
- Inspection now!
- Oil service now!
- Oil service and inspection now!
Accessing service schedules
You can access the current service schedule when the ignition is switched on, the engine is not running, and the vehicle is stationary:
- Tap the
 Vehicle function button.
 - Select the
 Status menu item and tap the
  Service function button to display the service information.
Resetting the service interval display
If the service interval display was not reset after a service or inspection, it can be reset as follows: The service interval display can only be reset via the Service menu (→ Service menu) . Do not reset the service interval display between service intervals, otherwise incorrect data may be shown. If the oil change service interval was reset manually, the service interval display then also changes to a fixed service interval in vehicles with flexible oil change service.
- The service message will go out after a few seconds when the engine is running or you can press the button on the multifunction steering wheel.
- If the 12-volt vehicle battery was disconnected for long periods in vehicles with flexible service, the system cannot calculate the time at which the next service is due. The information shown in the service interval display may therefore be incorrect. If this is the case, then please observe the maximum service intervals.
Time and date
Setting the time via the digital instrument cluster
- Open the Service menu (→ Service menu) .
- Select the Time menu.
- Set the time with the arrow button .
Setting the time via the analogue instrument cluster
- Select the Range information profile.
- Press and hold the button on the multifunction steering wheel for 5 seconds. The service menu is shown on the instrument cluster display.
- Select the Time menu.
- Set the correct time with the button.
Setting the time and date on the Infotainment system
- Tap the
 function button
 - Select
 menu option to set the time and date.
 - Select the time source
- Automatic.
- Manual.
The date is displayed only on the Infotainment system.
Exit menu
You can use the Exit Vehicle menu to adjust some function settings before leaving the vehicle. The Exit menu appears on the Infotainment system when you switch off the ignition and open the driver door.
The options shown depend on the equipment and may only be available under certain conditions. The adjustable functions might include:
- Auxiliary heater and ventilation.
- Interior monitoring.
- Vehicle status display.
Hiding the menu
The Exit menu is hidden automatically when you leave the vehicle.
- To manually hide the Exit menu, tap .
The Exit menu can be opened again by switching the ignition on and then immediately switching it back off again.
Setting
You can select the entries individually and arrange their order.
- Tap .
- Select the desired entries and rearrange the order if required.
- must be tapped again.
Vehicle settings menu
The Infotainment system combines key vehicle systems in a central operating unit, e.g. menu settings, radio or navigation system. You can switch individual functions and systems on and off and make settings in the vehicle settings of the Infotainment system.
Depending on the equipment, the menu navigation to the vehicle settings may differ.
General information on operating the unit
The following section contains relevant information on the settings that can be adjusted in theV ehicle menu. The activated functions are highlighted in colour.
Open the Vehicle settings menu
- Switch on the ignition.
- Switch on Infotainment system if necessary.
- Tap the
 function button, if available in your version.
Or: Press the button.
 - Tap the corresponding function buttons to open additional submenus in theV ehicle settings menu or to adjust settings in the menu options.
- Call up the desired menu and make the desired setting.
- Tap the button to return to the home screen. Or: Press the button
Useful Links:
2023 – 2024 Volkswagen Jetta Specs, Price, Features, Mileage and Review
2023 Volkswagen Caddy Displays User Guide
2023 Volkswagen Caddy Warning and Indicator Lights Guide