
2025 Volkswagen Taigo Fuses and Fuse Box User Guide
The 2025 Volkswagen Taigo includes a sophisticated fuse and fuse box system to protect the vehicle’s electrical components. Understanding the fuse architecture and operations facilitates troubleshooting and maintenance, hence improving vehicle safety and electrical system reliability.
Video: 2025 Volkswagen Taigo Fuses
Volkswagen Introduction to the topic Guide
At the time of publication we are unable to provide an complete overview of the locations of the fuses for the electrical consumers.
This is because the vehicle is under constant development, because fuses are assigned differently depending on the vehicle equipment
level and because several electrical consumers may use a single fuse. You can obtain more information about the fuse assignment from
a suitably qualified workshop. Volkswagen recommends using an authorised repairer.
Several electrical consumers can share a single fuse. Conversely, a single consumer could have more than one fuse. Therefore fuses should only be replaced when the cause of the fault has been rectified.
- If a new fuse blows again shortly after fitting, have the electrical system checked by a suitably qualified workshop. Volkswagen
recommends using an authorised repairer.
WARNING
The high voltage in the electrical system can cause electric shocks and serious burns. Contact with the electrical wiring of the ignition system can cause serious or fatal injuries.
- Never touch the electrical wiring of the ignition system.
WARNING
Using unsuitable fuses, repairing fuses and bridging an electrical circuit without fuses can cause serious damage or a fire in the vehicle. This can result in serious or fatal injuries.
- Replace fuses only with fuses with the same rating and size. Make sure that the colour and markings are identical to the defective
fuse. - Never repair fuses.
- Never use a metal strip, paper clip or similar objects to replace a fuse.
NOTICE
If a fuse is replaced when the ignition is switched on, the engine is running, lights are switched on or when other electrical consumers are switched on, this can damage the electrical system.
- Switch off the engine and switch off the lights and other electrical consumers.
- Make sure that the engine cannot be started when changing a fuse.
NOTICE
Damage can also be caused at other locations in the electrical system if a fuse is replaced with a fuse that has a higher rating.
- Never replace a fuse with a fuse that has a higher rating.
NOTICE
Dirt and moisture in the fuse boxes can damage the electrical system.
- Protect open fuse boxes against the ingress of dirt and moisture.
- Avoid causing short circuits in the electrical system.
- Check that the covers of the fuse boxes are closed tight again and are not damaged.
There are also other fuses in the vehicle. These should be changed only by a suitably qualified workshop. Volkswagen recommends using an authorised repairer.
Fuses in the bonnet space
Opening the fuse box in the bonnet space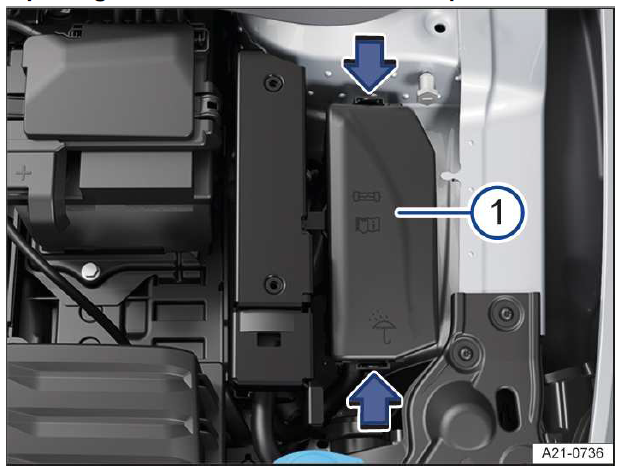 Fig. 1 In the bonnet space: fuse box (illustration).
Fuse box cover.
In some vehicles, a pair of plastic grippers for removing fuses is located on the inside of the cover of the fuse box or on the fuse carrier.
Removing the cover
- Open the bonnet.
- To unlock the fuse box cover, push the catches in the direction of the arrow .
- Lift off the cover.
Installing the cover
- Place the cover on the fuse box.
- Press the cover down until the cover audibly engages into position on both sides.
Fuse overview of the fuses in the bonnet space
The overview shows the fuse locations of the electrical consumers relevant for the driver. The first column in the overview contains the
location. The other columns contain the amp rating, the fuse type and the electrical consumer protected by the fuse. Depending on country and on the equipment of your vehicle, the fuse numbers and positions may differ to those given in the overview. If necessary, ask a suitably qualified workshop for the exact fuse layout. Volkswagen recommends using an authorised Volkswagen repairer.
Fuse assignment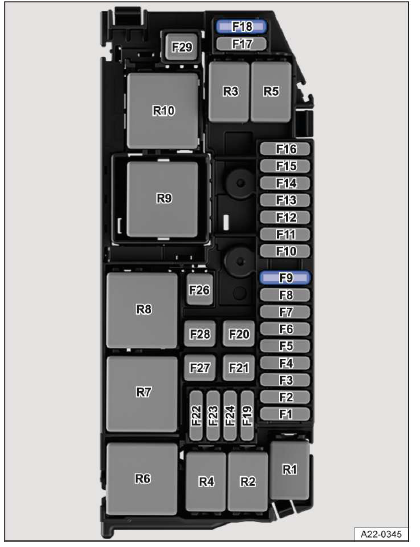
Fig. 1 In the bonnet space: fuse locations.
Fuse location
| F9 | 7.5 amps, ATO®, brake light sensor. |
| F18 | 30 amps, ATO®, front wipers. |
Fuses in the dash panel
Opening the fuse box in the dash panel (left-hand drive vehicle)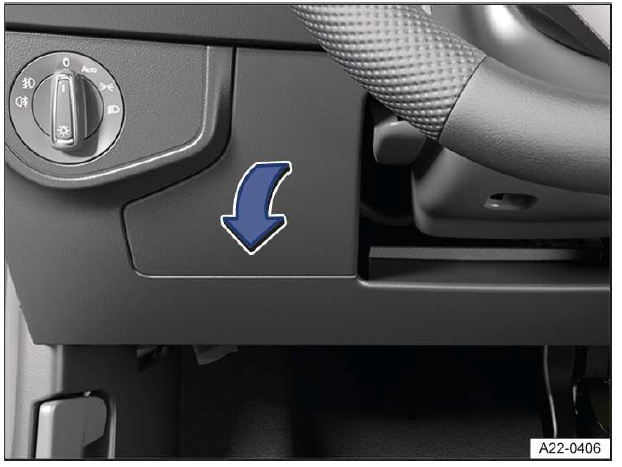
Fig. 1 On the driver side: fuse box cover in the dash panel (lefthand
drive vehicle)
Removing the cover
- Reach behind the cover and pull off in the direction of the arrow .
Installing the cover
- Align the cover on the opposite side and fold it closed in the opposite direction to the arrow until it audibly engages .
Opening the fuse box in the dash panel (right-hand drive vehicle)
Fig. 2 In the dash panel on the front passenger side: fuse box cover
in the dash panel (right-hand drive vehicle)
- Restrictor.
- Catches.
Removing the cover
- Open the glove box and empty if necessary.
- Push restrictor upwards into the opening of the holder and pull out to the side in the direction of the arrow .
- Press the stop pin in the direction of the arrow and at the same time open the glove box further .
Installing the cover
- Move glove box into position.
- Insert the restrictor into the opening in the holder and slide upwards in the opposite direction to the arrow until it engages .
- Carefully push the glove box forwards past the resistance of the catches .
Fuse overview of the fuses in the dash panel
The overview shows the fuse locations of the electrical consumers relevant for the driver. The first column in the overview contains the
location. The other columns contain the amp rating, the fuse type and the electrical consumer protected by the fuse. Depending on country and on the equipment of your vehicle, the fuse numbers and positions may differ to those given in the overview. If necessary, ask a suitably qualified workshop for the exact fuse layout. Volkswagen recommends using an authorised Volkswagen repairer.
Fuse assignment
Fig. 1 In the dash panel: fuse locations.
Fuse location
| F4 | 10 amps, ATO®, light switch. |
| F5 | 30 amps, ATO®, electric glass roof. |
| F6 | 40 amps, ATO®, central locking. |
| F8 | 30 amps, ATO®, blower regulator. |
| F19 | 25 amps, ATO®, Infotainment system. |
| F20 | 30 amps, ATO®, rear window heating. |
| F28 | 7.5 amps, ATO®, anti-theft alarm. |
| F29 | 7.5 amps, ATO®, anti-theft alarm. |
| F31 | 7.5 amps, MINI®, air conditioning block. |
| F36 | 20 amps, ATO®, horn. |
| F43 | 15 amps, MINI®, rear window wiper. |
| F49 | 15 amps, MINI®, exterior lighting, front left. |
| F50 | 15 amps, MINI®, exterior lighting, front right. |
| F52 | 7.5 amps, MINI®, exterior lighting, rear left. |
| F54 | 7.5 amps, MINI®, exterior lighting, rear right. |
| F55 | 20 amps, ATO®, cigarette lighter, sockets. |
Fuse locations for vehicles with factory-fitted towing bracket:
| F1 | 20 amps, JCASE® cartridge fuse, trailer control unit. |
| F10 | 20 amps, ATO®, trailer charging cable. |
| F60 | 30 amps, JCASE® cartridge fuse, trailer control unit, right. |
| F61 | 30 amps, JCASE® cartridge fuse, trailer control unit, left. |
Electric windows and electrically adjustable seats may be protected by circuit breakers or control units which switch on again automatically a few seconds after the overload, e.g. frozen windows, has been rectified.
Changing blown fuses
Preparations
- Switch off the ignition, the lights and all electrical consumers.
Detecting a blown fuse Fig. 1 Blown fuse (illustration).
- If a flat blade fuse (ATO®, MINI®) has blown, this can be recognised from the top and side through the transparent housing due to the melted metal strip .
- If a cartridge fuse (JCASE®) has blown, this can be recognised from the top through the transparent housing due to the melted metal strip .
Fuse types
- Standard flat blade fuse (ATO®).
- Small flat blade fuse (MINI®).
- Cartridge fuse (JCASE®).
Colour coding of fuses
Fuses (ATO® – MINI®).
| Colour | Amp rating |
| Black | 1 amps |
| Purple | 3 amps |
| light brown | 5 amps |
| Brown | 7.5 amps |
| Red | 10 amps |
| Blue | 15 amps |
| Yellow | 20 amps |
| White or transparent | 25 amps |
| Green | 30 amps |
| Orange | 40 amps |
| Red | 50 amps |
Changing fuses
Fig. 2 Plastic grippers for pulling out and inserting a fuse (illustration).
- If present, take the plastic grippers out of the fuse box or the cover of the respective fuse box .
- Push the plastic grippers clip suitable for the fuse type onto the fuse from the top or the side .
- Remove the fuse.
- If the fuse has blown, replace it with a new fuse with the same rating (same colour and same markings) and same size.
- Once the new fuse has been inserted, put the plastic grippers back in the cover.
- Insert the cover again or close the fuse box cover.
NOTICE
You can damage another location in the electrical system by using a fuse with a higher amp rating.
- Never replace a fuse with a fuse that has a higher rating.
How to Replace the Fuses of the 2025 Volkswagen Polo
To replace the fuses in a 2025 Volkswagen Polo, follow these steps:
Materials:
- The new fuse of the correct amperage.
- Fuse puller or needle-nose pliers.
Step-by-Step Instructions:
-
Turn Off the Vehicle: Ensure the ignition is off and the key is removed to prevent any electrical mishaps.
-
Access the Appropriate Fuse Box: Depending on the malfunctioning component, identify and open the relevant fuse box.
-
Locate the Faulty Fuse: Using the fuse diagram, pinpoint the fuse associated with the malfunctioning component.
-
Inspect the Fuse: A blown fuse will have a broken filament or appear blackened.
-
Remove the Faulty Fuse: Use a fuse puller or a pair of needle-nose pliers to gently extract the damaged fuse.
-
Insert a New Fuse: Replace it with a fuse of the same amperage rating. Using a fuse with a higher rating can cause electrical damage.
-
Test the Component: Turn on the vehicle and check if the component is functioning correctly.
- Tips:
Always replace fuses with one of the same amperage to prevent electrical issues.
Useful Links:
2023 – 2024 Volkswagen Golf GTI Specs, Price, Features, Mileage and Review
2025 Volkswagen Taigo Warning and Indicator Lights User Guide