
2015 Alfa Romeo MiTo Display Instruction
The 2015 Alfa Romeo MiTo’s display system has a high-tech but easy-to-use dashboard that combines cutting-edge technology with a beautiful look. This high-resolution screen is where all the vehicle’s functions, entertainment features, and important driving information are controlled. With its easy-to-use touch settings and stylish layout, the display not only makes driving more enjoyable, but also shows Alfa Romeo’s dedication to making the MiTo’s interior a perfect mix of technology and style.
DISPLAY
The car may be provided with a multifunction or reconfigurable multifunction display that shows useful information to the driver, according to the previous settings, when driving.
With the ignition key removed, the display lights up and shows the time and total odometer reading (in km or miles) for a few seconds when a door is opened/closed.
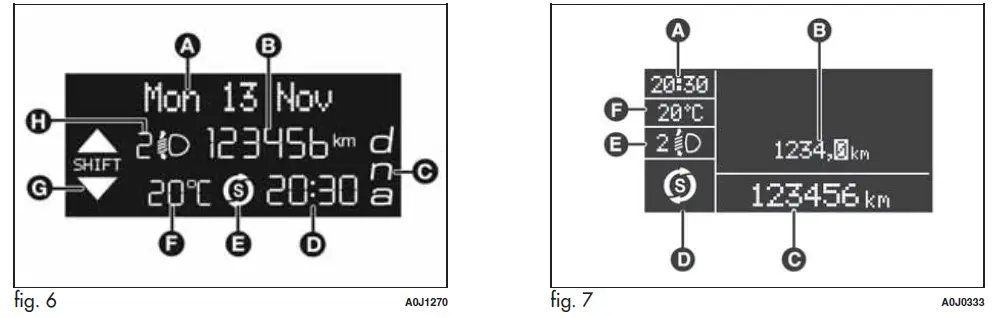
MULTIFUNCTION DISPLAY “STANDARD” SCREEN
The following information appears on the display fig. 6:
- A Date
- B Milometer (distance covered in km or miles)
- C Driving mode selected via “Alfa DNA” (dynamic car control system) (for versions/markets, where provided): d = Dynamic; n = Natural; a = All Weather
- D Time (always displayed, even with the key removed and doors closed)
- E Start&Stop function indicator (for versions/markets where provided)
- F Outside temperature
- G Gear Shift Indicator (for versions/markets, where provided)
- H Headlamp alignment position (only with dipped headlamps on)
RECONFIGURABLE MULTIFUNCTION DISPLAY “STANDARD” SCREEN
The following information appears on the display fig. 7:
- A Time
- B Trip mileage (in km or miles)
- C Milometer (distance covered in km or miles)
- D Car status indications (e.g. doors open, possible ice on the road, etc.)/Start&Stop function indicator (for versions/markets, where provided)/Gear Shift Indicator (for versions/markets, where provided)
- E Headlamp alignment position (only with dipped headlamps on)
- F Outside temperature
On some versions, selecting “DYNAMIC” driving mode (see “Alfa DNA system” paragraph in this section) causes the display to show the turbine pressure Fig. 8.
The instrument is calibrated for engines with higher supercharging pressures. Therefore, on some versions, it is normal for the end of the scale to be reached.
GEAR SHIFT INDICATOR (for versions/markets, where provided)
The “GSI” (Gear Shift Indicator) system advises the driver to change gear through a special indication on the display fig. 9.
Through the GSI, the driver is notified that changing gear will allow a reduction in fuel consumption.
Therefore, for driving oriented towards reducing fuel consumption, it is recommended to stick to “Natural” or “All Weather” mode and to follow the suggestions of the Gear Shift Indicator, where the traffic conditions allow it.
When the SHIFT UP icon ( ![]() SHIFT) is shown on the display, the GSI advises the driver to engage a higher gear, when the SHIFT DOWN (
SHIFT) is shown on the display, the GSI advises the driver to engage a higher gear, when the SHIFT DOWN ( ![]() SHIFT) icon is displayed, it advises the driver to engage a lower gear.
SHIFT) icon is displayed, it advises the driver to engage a lower gear.
Note: The indication in the instrument panel remains on until the driver shifts gear or the driving conditions go back to a situation where gearshifting is not required to improve consumption.

WELCOME MOVEMENT
On some versions, when the key is turned to MAR-ON, the following occurs:
- quick movement (up and down) of the speedometer and rpm gauge;
- the lighting of graphic symbols/display;
- displaying an animated graphic representation of the vehicle profile.
Gauge movement
- If the key is removed from the ignition switch whilst the gauges are moving, they immediately go back to their initial position.
- Once they have reached the full-scale values, the gauges rest on the value indicated by the vehicle.
- The movement of the gauges stops when the engine is started.
Lighting of graphic symbols/display
A few seconds after the key is inserted, the gauges, graphic symbols and display light up in sequence.
Display of graphic animation
When the key is removed from the ignition switch (with the doors closed), the display remains lit up and shows a graphic animation.
The display lighting is then dimmed gradually until it goes out completely.
CONTROL BUTTONS
“+” or ![]()
![]() (versions with Start&Stop system): to scroll upwards through the screen and the related options or to increase the displayed value Fig. 10.
(versions with Start&Stop system): to scroll upwards through the screen and the related options or to increase the displayed value Fig. 10.
SET/ ![]() : press briefly to access the menu and/or go to the next screen or confirm the selection. Hold down to go back to the standard screen.
: press briefly to access the menu and/or go to the next screen or confirm the selection. Hold down to go back to the standard screen.
“–” or ![]()
![]() (versions with Start&Stop system): to scroll downwards through the screen and the related options or to decrease the displayed value.
(versions with Start&Stop system): to scroll downwards through the screen and the related options or to decrease the displayed value.
IMPORTANT: The “+” and “–” buttons (or ![]()
![]() and
and ![]()
![]() for versions with the Start&Stop system) activate different functions according to the following situations:
for versions with the Start&Stop system) activate different functions according to the following situations:
- within the menu, they allow you to scroll up or down;
- during settings operations, they increase or decrease values.

SETUP MENU
The menu comprises a series of options that can be selected using the “+” and “–” buttons (or ![]()
![]() and
and ![]()
![]() for versions with the Start&Stop system) to access the different selection and setting operations (Setup) indicated below.
for versions with the Start&Stop system) to access the different selection and setting operations (Setup) indicated below.
Some options have a submenu. The menu can be activated by briefly pressing the SET/ ![]() button.
button.
The menu comprises the following options:
- MENU
- SPEED BEEP
- LIGHT SENSOR (for versions/markets where provided)
- RAIN SENSOR (for versions/markets, where provided)
- TRIP B ACTIVATION/DATA
- SET TIME
- SET DATE
- FIRST PAGE (for versions/markets where provided)
- SEE RADIO
- AUTOCLOSE
- MEASUREMENT UNIT
- LANGUAGE
- BUZZER VOLUME
- BUTTON VOLUME
- SEAT BELT BEEP/BUZZ
- SERVICE
- AIRBAG/PASSENGER BAG
- DAYTIME RUNNING LIGHTS
- COURTESY LIGHTS
- MENU EXIT
Selecting an option from the main menu without a submenu:
- Press the SET/
 0button briefly to select the main menu setting you wish to change;
 - Press the “+” or “–” buttons (with single presses) to select the new setting;
- Press the SET/ button briefly to save the new setting and go back to the previous main menu option.
Selecting an option from the main menu with a submenu:
- briefly press the SET/ button to display the first submenu option;
- Press the “+” or “–” buttons (with single presses) to scroll through all the submenu options;
- briefly press the SET/ button to select the displayed submenu option and to open the relevant settings menu;
- Press the “+” or “–” buttons (with single presses) to select the new setting for this submenu option;
- Press the SET/ button briefly to save the new setting and go back to the previous submenu option.
MENU ITEMS
IMPORTANT: With the Uconnect™ 5″ radio system (for versions/markets where provided), or Uconnect™ 5″ Radio Nav system (for versions/markets, where provided), some Menu items are displayed and managed on the system display and not on the instrument panel display (refer to the dedicated supplements).
Menu
This item allows you to access the Setup Menu.
Press the “+” or “−” button to select the various Menu options. Hold down the SET/![]() button to return to the standard screen.
button to return to the standard screen.
Speed Beep (Speed limit)
With this function it is possible to set the car speed limit (km/h or mph); when this limit is exceeded the driver is alerted.
To set the desired speed limit, proceed as follows:
- briefly press the SET/ button: the display will show the wording “Speed Beep”;
- Press the “−” or “+” button to select speed limit activation (“On”) or deactivation (“Off”);
- if the function is On, press the “+” or “−” button to select the required speed limit and then press the SET/ button to confirm.
IMPORTANT: Setting is possible between 30 and 200 km/h, or 20 and 125 mph, according to the previously set unit. See the “Unit of Measurement” paragraph described below. The setting will increase/decrease by five units each time button +/– is pressed. Hold down the +/– button for fast automatic increase/decrease. Complete the adjustment with a single press of the button when you approach the desired value.
Briefly press the SET/![]() button to go back to the menu screen or hold the button down to go back to the standard screen without saving.
button to go back to the menu screen or hold the button down to go back to the standard screen without saving.
To cancel the setting, proceed as follows:
- briefly press the SET/ button, “On” will flash in the display;
- Press the − button, the display flashes (“Off”);
- briefly press the SET/ button to go back to the menu screen or hold the button down to go back to the standard screen without saving.
Headlight sensor (Automatic headlight/dusk sensor sensitivity adjustment)
This function enables the headlights to come on or go off depending on external lighting conditions. The dusk sensor sensitivity can be adjusted according to 3 levels (level 1=minimum sensitivity, level 2=average sensitivity, level 3=maximum sensitivity). The higher the sensitivity set, the lesser the external light variation needed to switch the lights on (e.g. with a setting on level 3 at sunset the headlights come on in advance in relation to levels 1 and 2).
Proceed as follows to set the desired adjustment:
- Press the SET/ button briefly to make the display flash the previously set level;
- Press the “+” or “−” button to select;
- briefly press the SET/ button to go back to the menu screen or hold the button down to go back to the standard screen without saving.
Rain sensor (Rain sensor sensitivity adjustment)
This function allows you to adjust the rain sensor sensitivity to 4 levels.
To set the required sensitivity level proceed as follows:
- briefly press the SET/ button, the previously set sensitivity level will flash on the display;
- Press the “+” or “−” button to adjust;
- briefly press the SET/ button to go back to the menu screen or hold the button down to go back to the standard screen without saving.
Activation/Trip B data (Trip B enablement)
This function may be used to activate (On) or deactivate (Off) the Trip B (partial trip). For further information see “Trip computer”.
Proceed as follows to switch the function on and off:
- Press the SET/ button briefly to make the display flash “On” or “Off” according to what was previously set;
- Press the “+” or “−” button to select;
- briefly press the SET/ button to go back to the menu screen or hold the button down to go back to the standard screen without saving.
Time adjustment (Clock adjustment)
This function enables setting the clock through two submenus: “Time” and “Format”.
To carry out the adjustment, proceed as follows:
- briefly press the SET/ button and two submenus (“Time” and “Format”) will be displayed;
- Press the “+” or “–” button to move between the two submenus;
- once you have selected a sub-menu to be modified, press SET/ briefly;
- when the “Time” submenu is entered, by briefly pressing SET/ the hours flash on the display;
- Press the “+” or “−” button to adjust;
- briefly press the SET/ button, which makes the display flash the “minutes”;
- press the “+” or “−” button to adjust.
IMPORTANT: Each press on the “+” or “−” buttons causes an increase or decrease of one unit. Hold down the button to increase/decrease the setting rapidly and automatically. Complete the adjustment with a single press of the button when you approach the desired value.
- When you select “Format”: briefly pressing the SET/ button makes the display mode flash on the display;
- Press “+” or “–” to select “24h” or “12h”.
When you have made the required settings, briefly press the SET/![]() button to go back to the submenu screen or hold the button down to go back to the main menu screen without saving the new settings.
button to go back to the submenu screen or hold the button down to go back to the main menu screen without saving the new settings.
Hold the SET/![]() button down again to return to the standard screen or to the main menu according to where you are in the menu.
button down again to return to the standard screen or to the main menu according to where you are in the menu.
Set date (Setting the date)
Using this function it is possible to change the date (day – month –year).
Proceed as follows to start the update:
- briefly press the SET/ button: the “year” starts flashing on the display;
- Press the “+” or “−” button to adjust;
- briefly press the SET/ button: the “month” will flash on the display;
- Press the “+” or “−” button to adjust;
- briefly press the SET/ button: the “day” will flash on the display;
- press the “+” or “−” button to adjust.
IMPORTANT: Each press on the “+” or “−” buttons causes an increase or decrease of one unit. Hold the button down to increase/decrease the setting rapidly and automatically. Complete the adjustment with a single press of the button when you approach the desired value.
Briefly press the SET/![]() button to go back to the menu screen or hold the button down to go back to the standard screen without saving.
button to go back to the menu screen or hold the button down to go back to the standard screen without saving.
First page (Display of information on the main screen)
This function allows you to choose the information you would like to see on the main screen. You can view the date or the trip distance. To make your choice, proceed as follows:
- briefly press the SET/ button: “Initial page” will be displayed;
- Press the SET/ button again briefly to display the “date” and “engine info” options;
- Press “+” or “−” to select the desired view on the main screen of the display;
- briefly press the SET/ button to go back to the menu screen or hold the button down to go back to the standard screen without saving.
When the key is turned to MAR-ON and the initial check stage is over, the display will show the information selected via the “First-page” menu function.
See radio (audio information display)
This function is used to display radio information.
- Radio: selected radio station frequency or RDS message, automatic tuning activation, or AutoSTore;
- CD audio/CD MP3: track number.
To show the radio information on the display (“On”) or clear it (“Off”), proceed as follows:
- briefly press the SET/ button, the display will show “On” or “Off” flashing depending on the previous setting;
- Press the “+” or “−” button to select;
- briefly press the SET/ button to go back to the menu screen or hold the button down to go back to the standard screen without saving.
Autoclose (Automatic door lock operation with car running)
When activated (On), this function locks the doors automatically when the vehicle speed exceeds 20 km/h.
Proceed as follows to activate or deactivate this function:
- Press the SET/ button briefly to display a submenu;
- Press the SET/ button briefly to make the display flash “On” or “Off” according to what was previously set;
- Press the “+” or “−” button to select;
- Press the SET/ button briefly to return to the submenu screen or hold the button down to return to the main menu screen without saving;
- hold the SET/ button down again to return to the standard screen or to the main menu according to where you are in the menu.
Unit of measurement (Setting the unit of measurement)
With this function, it is possible to set the measurement units through three sub-menus: “Distance”, “Consumption” and “Temperature”.
To set the desired measurement unit, proceed as follows:
- briefly press the SET/ button to display the three sub-menus;
- Press the “+” or “−” button to move between the three submenus;
- once the submenu to be modified has been selected, briefly press the SET/ button;
- when the “Distance” submenu is entered: briefly pressing SET/ displays “km” or “mi” depending on the previous setting;
- Press the “+” or “−” button to select;
- when the “Consumption” submenu is entered, pressing SET/ displays km/l, l/100 km, or mpg depending on the previous setting;
If the set distance unit is “km”, the fuel consumption unit will be displayed in km/l or l/100 km.
If the distance unit set is “mi” the fuel consumption unit will be displayed in “mpg”.
- Press the “+” or “−” button to select;
- when the “Temperature” submenu is entered, pressing SET/ displays “°C” or “°F” depending on the previous setting;
- Press the “+” or “−” button to select;
- When you have made the required settings, briefly press the SET/ button to go back to the submenu screen or hold the button down to go back to the main menu screen without saving the new settings.
- Hold the SET/ button down again to return to the standard screen or to the main menu according to where you are in the menu.
Language (Language selection)
Display messages can be shown in different languages: Italian, English, German, Portuguese, Spanish, French, Dutch, Turkish and Brazilian.
To set the desired language proceed as follows:
- briefly press the SET/ button: the previously set “language” starts flashing on the display;
- Press the “+” or “−” button to select;
- briefly press the SET/ button to go back to the menu screen or hold the button down to go back to the standard screen without saving.
Warnings volume (Adjusting the alert/warning acoustic signal volume)
With this function, it is possible to adjust (to eight levels) the volume of the acoustic signal which sounds in the event of alerts and warnings.
To set the desired volume proceed as follows:
- Press the SET/ button briefly, making the display flash the previously set volume “level”;
- Press the “+” or “−” button to adjust;
- briefly press the SET/ button to go back to the menu screen or hold the button down to go back to the standard screen without saving.
Button volume (Button volume adjustment)
With this function, it is possible to adjust (to eight levels) the volume of the acoustic signal when the SET/ button is held down to exit a submenu and return to the standard menu. To set the desired volume proceed as follows:
- briefly press the SET/ button, the previously set volume “level” will be displayed;
- Press the “+” or “−” button to adjust the volume; an acoustic signal equal to the volume level being selected is emitted during this adjustment;
- briefly press the SET/ button to go back to the previous screen or hold the button down to go back to the standard screen without saving.
On versions with reconfigurable multifunction display, the volume level is represented by bars.
Belt reminder (Reactivation of SBR buzzer)
This function will only be displayed after the SBR system has been deactivated by Alfa Romeo Authorised Services (see “SBR system” in the “Safety” chapter). To reactivate this function, proceed as follows:
- briefly press the SET/ button, and the display shows “OFF” flashing. Press the “+” or “−” button and “On” will be displayed;
- briefly press the SET/ button to go back to the previous screen or hold the button down to go back to the standard screen without saving.
Service (Scheduled servicing)
This function allows you to display the information about km/mileage intervals or, for versions/markets, where provided, time intervals for car servicing. To consult this information, proceed as follows:
- briefly press the SET/ button: the display shows when servicing is due in km/mi or days (where provided) or mi or days (where provided) according to the previous setting (see paragraph “Units of measurement”);
- briefly press the SET/ button to go back to the menu screen or hold the button down to go back to the standard screen.
IMPORTANT: The “Scheduled Servicing Plan” includes car maintenance at fixed intervals (refer to the “Maintenance and Care” chapter). This is displayed automatically, with the ignition key at MAR-ON, 2000 km (or equivalent value in miles) before servicing or, where provided, 30 days before servicing. It is also displayed each time the key is turned to MAR-ON or, for versions/markets, where provided, every 200 km (or equivalent value in miles). Below this threshold servicing indications are more frequent. The display will be in km or miles according to the unit of measurement set. When the next scheduled service is approaching, the word “Service” will appear on the display, followed by the number of kilometers/miles or days (where provided) left, when the key is turned to MAR-ON. Contact Alfa Romeo Authorised Services where the “Scheduled Servicing Plan” operations will be performed and the message will be reset. When the service interval is reached and for about 1000 km/600 mi or 30 days, a service due message is displayed.
Passenger airbag/side bag (front passenger side airbag and side bag for pelvis, chest, and shoulder protection – Side bag – activation/deactivation)
This function is used to activate/deactivate the passenger-side airbag.
Proceed as follows:
- Press the SET/ button and, after the message (Bag pass: Off)(to deactivate) or (Bag pass: On) (to activate) is displayed by pressing buttons “+” or “−”, press the SET/ button again;
- a confirmation request message will appear on the display;
- by pressing the “+” or “−” buttons select “Yes” (to confirm the activation/deactivation) or “No” (to quit);
- Press the SET/ button briefly, a message confirming the selection will be displayed and you will return to the menu screen, or, pressing
- the button for longer, you will return to the standard screen without memorizing.
Daytime running lights (DRL)
With this function is possible to turn the daytime running lights on and off.
Proceed as follows to activate or deactivate this function:
- Press the SET/ button briefly to display a submenu;
- Press the SET/ button briefly to make the display flash “On” or “Off” according to what was previously set;
- Press the “+” or “−” button to select;
- Press the SET/ button briefly to return to the submenu screen or hold the button down to return to the main menu screen without saving;
- hold the SET/ button down again to return to the standard screen or to the main menu according to where you are in the menu.
FAQ’s
Answer: Simply press the power button on the display or start the car, and it should automatically activate.
Answer: Yes, you can adjust the display brightness through the settings menu. Access the “Display” or “Brightness” options to make the necessary adjustments.
Answer: To pair your smartphone, go to the “Bluetooth” or “Device Connectivity” menu in the settings and follow the on-screen prompts to add your device.
Answer: The navigation system provides turn-by-turn directions. To use it, input your destination address or follow the voice prompts after selecting your destination.
Answer: You can access the audio system through the “Media” or “Audio” menu on the display. From there, you can select your preferred audio source and adjust volume and track controls.
Answer: Yes, you can activate voice commands by pressing the designated button or saying a specific keyword, and then you can give vocal instructions for various functions.
Answer: Yes, the display settings menu allows you to customize the layout, shortcuts, and widgets to better suit your preferences and needs.
Answer: Access the “Phone” or “Bluetooth” menu to pair your phone and use the hands-free calling feature. You can also manage your contacts and call history through the display.
Answer: Some models may offer screen mirroring capabilities. Check the infotainment system’s manual for specific instructions on how to use this feature.
Answer: Navigation map updates can be performed through the manufacturer’s website or by following the instructions provided in the owner’s manual.
Answer: To access real-time traffic information, go to the navigation system and enable the traffic feature. The system will then display traffic conditions along your route.
Answer: Depending on the model, you may be able to access and adjust climate control settings through the display. Check the settings or climate control menu for this feature.
Answer: In the event of a frozen display, try a system reset by holding down the power button for several seconds. If the issue persists, consult the owner’s manual for further troubleshooting steps.
Answer: Access the “Vehicle Info” or “Diagnostics” section in the display menu to view information about your vehicle’s status, including maintenance reminders and diagnostics.
Answer: Depending on the model, there may be a screen lock feature available in the settings menu, which can help protect your personal information and settings from unauthorized access.
Useful Link
View Full PDF: 2015 Alfa Romeo MiTo User Manual | Auto User Guide