2024 Kia Telluride Seats Owner’s Manual
The 2024 Kia Telluride sets new standards for comfort and versatility in the SUV class with its impressive improvements. Careful attention to detail went into making the Telluride’s seats, which are both luxurious and useful. Because they are made of high-quality materials, they provide great support for both short and long trips. With lots of legroom and features that can be adjusted, people can make their seats exactly how they want them, making sure they are as comfortable as possible during the ride. The Telluride’s seats make the driving experience better by providing a place to relax, whether you’re driving on city streets or rough country. Every seat in the 2024 Kia Telluride shows the brand’s dedication to comfort, style, and new ideas, from the driver’s leadership position to the roomy back rows.
2024 KIA Telluride Specs, Price, Features, Mileage And Review
Seat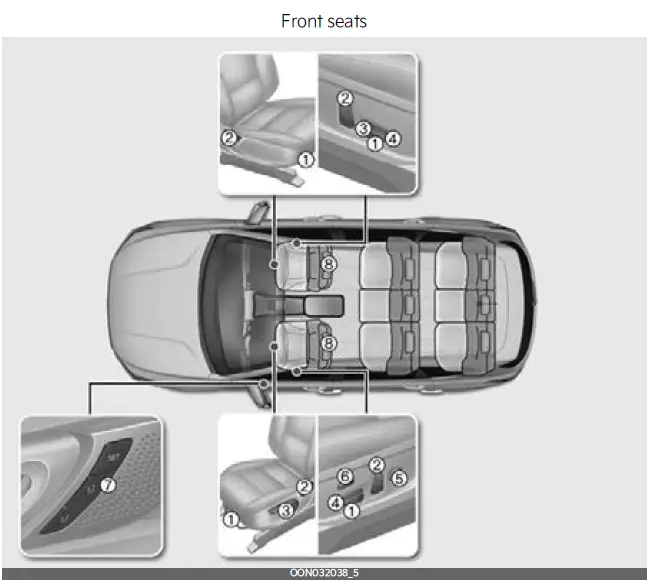
Front seat
- Forward and backward
- Seatback angle
- Seat cushion height*
- Seat cushion tilt*
- Lumbar support (Driver’s seat)*
- Cushion extension (Driver’s seat)*
- Driver position memory system*
- Headrest
*: if equipped
 * There is no centre seat on the rear 2nd row for a vehicle with 7 seats.
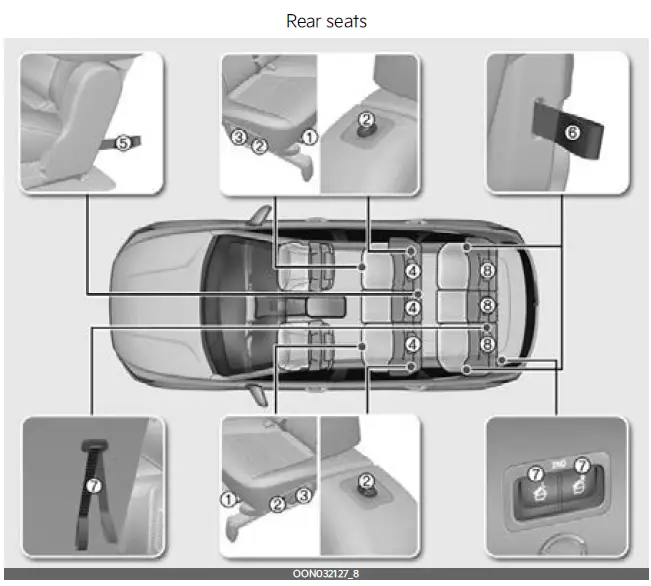
2nd-row seat
- Forward and backward
- Walk-in switch
- Seatback angle
- Headrest
- Walk-in strap for emergency
3rd-row seat - Seatback angle strap
- 2nd row seat remote folding strap/button
- Headrest
*: if equipped
WARNING
Loose objects
Do not place anything in the driver’s footwell or under the front seats. Loose objects in the driver’s foot area could interfere with the operation of the foot pedals.
WARNING
Uprighting seat
Do not press the release lever on a manual seatback without holding and controlling the seatback. The seatback will spring upright possibly impacting you or other passengers.
WARNING
Driver responsibility for passengers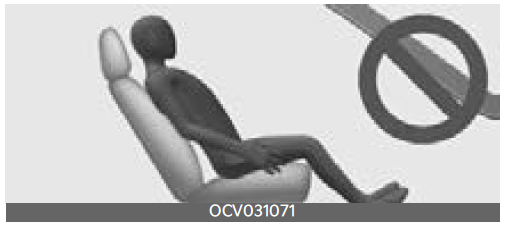
The driver must advise the passengers to keep the seatback in an upright position whenever the vehicle is in motion. If a seat is reclined during an accident, the restraint system’s ability to restrain will be greatly reduced.
WARNING
Seat cushion
Occupants should never sit on aftermarket seat cushions or sitting cushions. The passenger Occupant Detection System may not operate properly, or the passenger’s hips may slide under the lap position of the seat belt during an accident or a sudden stop.
WARNING
Driver’s seat
- Never attempt to adjust the seat while the vehicle is moving. This could result in loss of control of your vehicle.
- Do not allow anything to interfere with the normal position of the seatback. Storing items against the seatback could result in serious or fatal injury in a sudden stop or collision.
- Sit as far back as possible from the steering wheel while still maintaining comfortable control of your vehi-cle. A distance of at least 10 inches (25 cm) from your chest to the steering wheel is recommended. Failure to do so can result in air bag inflation injuries to the driver.
WARNING
Rear seatbacks
Always lock the rear seatback before driving. Failure to do so could result in passengers or objects being thrown forward injuring vehicle occupants.
WARNING
Unexpected Seat Movement
After adjusting a manual seat, always check that it is locked by shifting your weight to the front and back. Sudden or unexpected movement of the driver’s seat could cause you to lose control of the vehicle.
WARNING
Seat adjustment
- Do not adjust the seat while wearing seat belts. Moving the seat forward will cause strong pressure on the abdomen.
- Do not place your hand near the seat bottom or seat track while adjusting the seat. Your hand could get caught in the seat mechanism.
WARNING
Luggage and Cargo
Do not stockpile or stack luggage higher than the seatback in the cargo area. In an accident, the cargo could strike and injure a passenger. If objects are large, heavy or must be piled, they must be secured in the cargo area.
WARNING
Cargo Area
Do not allow passengers to ride in the cargo area under any circumstance. The cargo area is solely to transport luggage or cargo.
WARNING
Small Objects
Use extreme caution when picking up small objects trapped under the seats or between the seat and the centre console. Your hands might be cut or injured by the sharp edges of the seat mechanism.
Feature of Seat Leather
- Our car seats are upholstered with a combination of artificial and genuine leather. Genuine leather is made from the outer skin of an animal, which goes through a special process to be available for use. Since it is a natural substance, each part differs in thickness or density.
Also, wrinkles could appear depending on the temperature and humidity. - Wrinkles may appear as a natural result of stretching and shrinking depending on the temperature and humidity.
- The seat cover is made of stretchable material to improve the comfort of passengers.
- The parts contacting the body are curved and the side supporting area is high which provides driving comfort and stability.
CAUTION
- Belts with metallic accessories, zippers or keys inside the back pocket may damage the seat fabric.
- Make sure not to wet the seat. It may change the nature of leather.
- Jeans or clothes which contain bleach may contaminate the surface of the seat covering fabric.
NOTICE
Wrinkles or abrasions may appear naturally from usage. It is not the fault of the product. Wrinkles or abrasions are not covered by warranty.
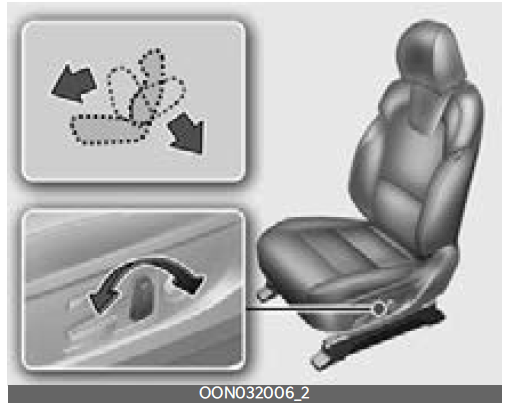
Front seat adjustment for manual seat
The front seat can be adjusted by using the control levers located on the outside of the seat cushion.
Moving forward and backward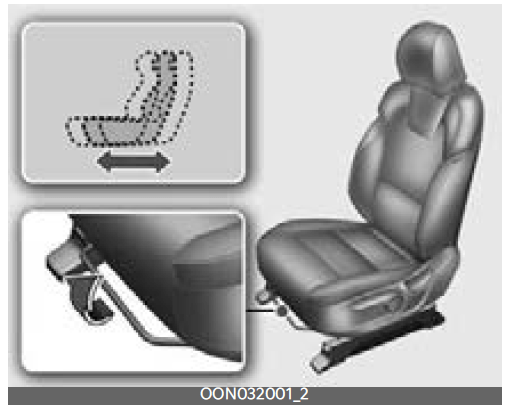
Adjust the seat before driving, and make sure the seat is locked securely by trying to move forward and backwards without using the lever. If the seat moves, it is not locked properly.
To move the seat forward or backwards:
- Pull the seat slide adjustment lever up and hold it.
- Slide the seat to the position you desire.
- Release the lever and make sure the seat is locked in place.
Reclining seatback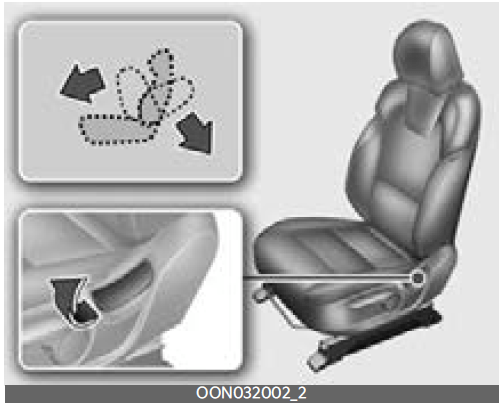
To recline the seatback:
- Lean forward slightly and lift up the seatback recline lever.
- Carefully lean back on the seat and adjust the seatback of the seat to the position you desire.
- Release the lever and make sure the seatback is locked in place. (The lever MUST return to its original position for the seatback to lock.)
WARNING
Reclining seatback
Sitting in a reclined position when the vehicle is in motion can be dangerous. Even when buckled up, the protection of your restraint system (seat belts and/or airbags) is greatly reduced by reclining your seatback.
Seat belts must be snug against your hips and chest to work properly. When the seatback is reclined, the shoulder belt cannot do its job because it will not be snug against your chest. Instead, it will be in front of you. During an acci-dent, you could be thrown into the seat belt, causing neck or other injuries. The more the seatback is reclined, the greater the chance the passenger’s hips will slide under the lap belt or the passenger’s neck will strike the shoulder belt.
Changing seat cushion height (if equipped)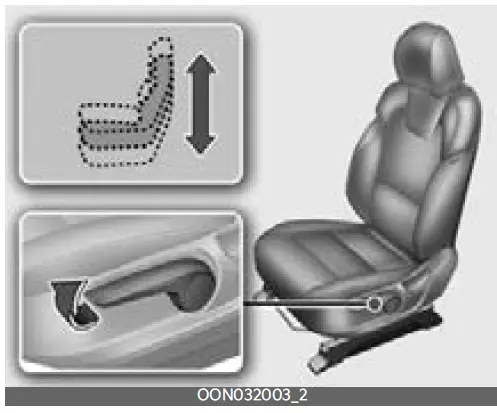
To change the height of the seat cushion, push the lever upwards or downwards.
- To lower the seat cushion, push down the lever several times.
- To raise the seat cushion, pull up the lever several times.
Front seat adjustment for power seat (if equipped)
The front seat can be adjusted by using the control switches located on the outside of the seat cushion. Before driving, adjust the seat to the proper position so you can easily control the steering wheel, pedals and switches on the instrument panel.
CAUTION
Power seating adjustments
- The power seating controls function by an electronic motor. Excessive opera-tion may cause damage to the electrical equipment.
- Do not operate two or more power seat control switches at the same time. Doing so may damage the power seat motor or electrical components.
Moving forward and backward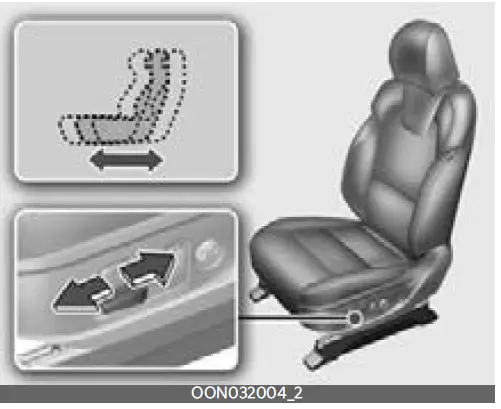
To move the seat forward or backwards:
- Push the control switch forward or backwards to move the seat to the desired position.
- Release the switch once the seat reaches the desired position.
Reclining seatback
To recline the seatback:
- Push the control switch forward or backward to move the seatback to the desired angle
- Release the switch once the seat reaches the desired position.
Changing seat cushion tilt and height
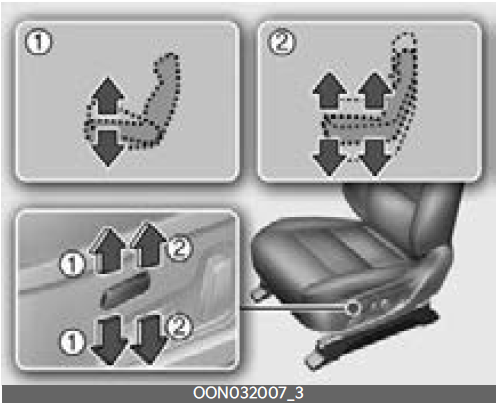
To change the height of the seat:
- Pull the front portion (1) of the control switch up to raise or press down to lower the front part of the seat cushion.
- Pull the rear portion (2) of the control switch up to raise or press down to lower the seat cushion.
- Release the switch once the seat reaches the desired position.
Adjusting 2-way lumbar support for front seats (if equipped)
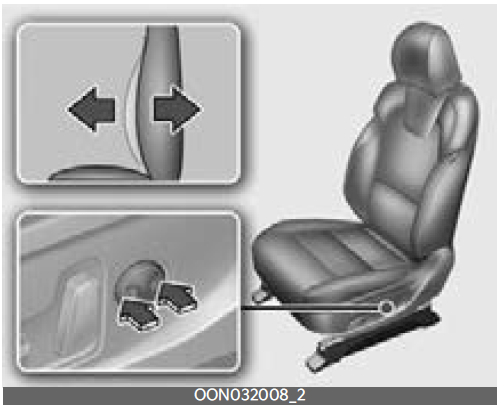
The lumbar support can be adjusted by pressing the lumbar support switch on the side of the seat.
- Press the front portion of the switch to increase support, or the rear portion of the switch, to decrease support.
- Release the switch once it reaches the desired position.
Adjusting 4-way lumbar support for driver’s seat (if equipped)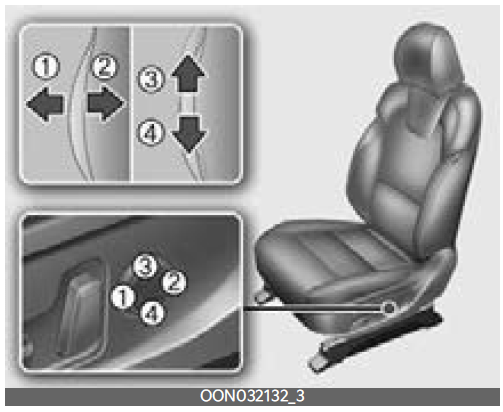
The lumbar support can be adjusted by pressing the lumbar support switch on the side of the seat.
- Press the front portion (1) of the switch to increase the support, or the rear portion (2) of the switch, to decrease the support.
- Press the upper portion (3) of the switch to raise the support, or the lower portion (4) of the switch, to lower the support.
- Release the switch once it reaches the desired position.
Adjusting cushion extension for driver’s seat (if equipped)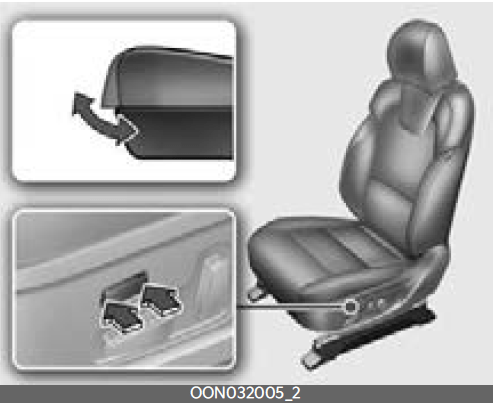
- Press the front portion of the switch to raise the cushion extension, or the rear portion of the switch to lower it.
- Release the switch once the cushion extension reaches the desired position.
Lumbar Stabilization System
The front driver seat can select the feature to activate after 30 or 60 minutes of driving. Lumbar support will automati-cally adjust through the full range of positions, then return to the initial position.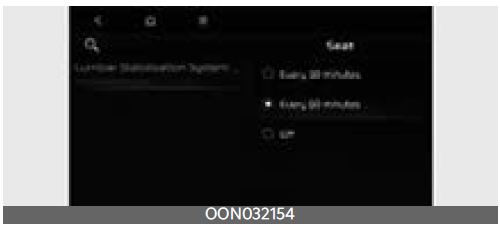
A: Seat
- Lumbar Stabilization System while driving
- Every 30 minutes
- Every 60 minutes
- Off
Headrest for front seat
The driver’s and front passenger’s seats are equipped with a headrest for the occupant’s safety and comfort.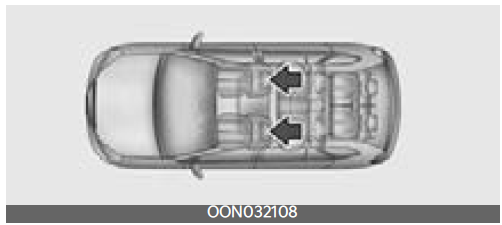
The headrest not only provides comfort for the driver and front passenger but also helps protect the head and neck in the event of a collision. For maximum effectiveness in case of an accident, the headrest should be adjusted so the middle of the headrest is as high as the centre of gravity of an occupant’s head. Generally, the centre of gravity of most people’s heads is similar to the height of the top of their eyes. Also, adjust the headrest as close to your head as possible. For this reason, the use of a cushion that holds the body away from the seatback is not recommended.
WARNING
Headrest removal/adjustment
- Do not operate the vehicle with the headrests removed. Headrests can provide critical neck and head support in a crash.
- Do not adjust the headrest height while the vehicle is in motion. The driver may lose control of the vehicle.
CAUTION
Excessive pulling or pushing may damage the headrest.
Adjusting the height up and down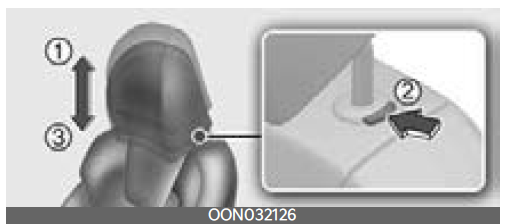
To adjust the headrest:
- Pull it up to the desired position (1).
- To lower the headrest, push and hold the release button (2) on the headrest support.
- Lower the headrest to the desired position (3).
NOTICE
If you recline the seatback towards the front with the headrest and seat cushion raised, the headrest may come in contact with the sun visor or other parts of the vehicle.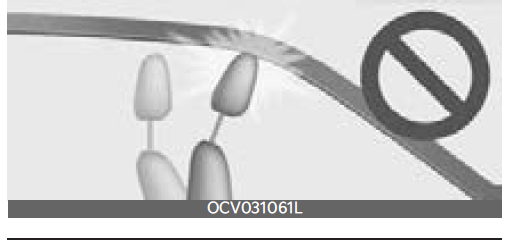
Removing headrest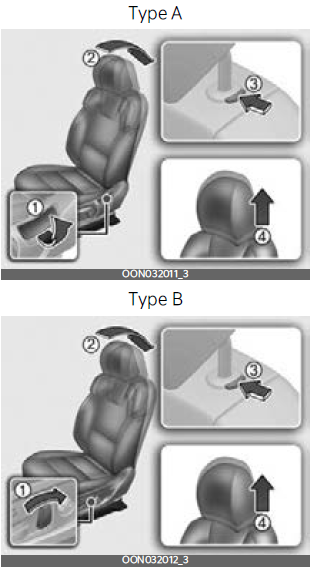
To remove the headrest:
- Recline the seatback (2) with the recline lever or switch (1).
- Raise the headrest as far as it can go.
- Press the headrest release button (3) while pulling the headrest up (4).
WARNING
Removing headrest
NEVER allow anyone to ride in a seat with the headrest removed or reversed. Headrests can provide critical neck and head support in a crash.
Reinstalling headrest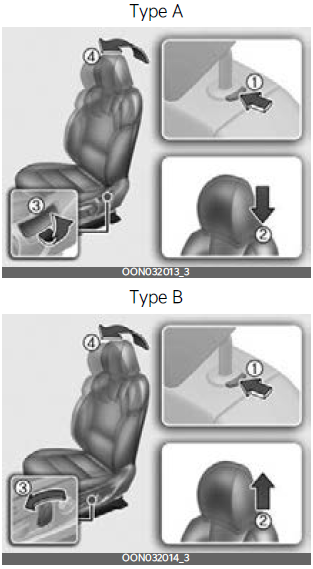
To reinstall the headrest:
- Put the headrest poles (2) into the holes while pressing the release button (1).
- Recline the seatback (4) with the recline lever or switch (3).
- Adjust the headrest to the appropriate height.
WARNING
Headrest Reinstallation
To reduce the risk of injury to the head or neck, always make sure the headrest is locked into position and adjusted properly after reinstalling.
Seatback pocket
The seatback pocket is provided on the back of the front passenger’s and driver’s seatbacks.
WARNING
Seatback pockets
Do not put heavy or sharp objects in the seatback pockets. In an accident, they could come loose from the pocket and injure vehicle occupants.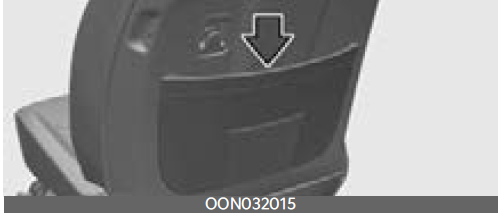
Seatback hook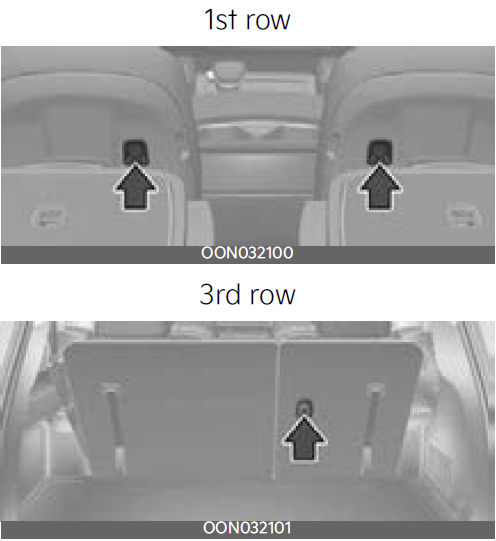
Use it when hanging light shopping bags.
CAUTION
Hanging heavy clothing
Do not hang heavy clothes, since they may damage the hook.
Headrest for rear seat
The rear seat is equipped with headrests in all the seating positions for the occupant’s safety and comfort.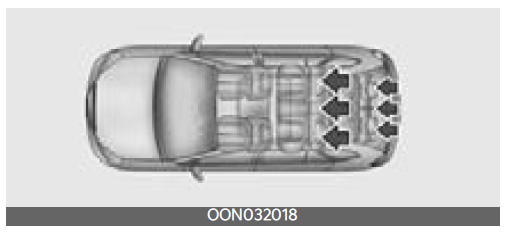
There is no centre seat on the rear 2nd row for a vehicle with 7 seats.
The headrest not only provides comfort for passengers but also helps protect the head and neck in the event of a collision. To maximize the effectiveness in case of accidents, the headrest should be adjusted so the middle of the headrest is as high as the centre of gravity of an occupant’s head. Generally, the centre of gravity of most people’s heads is similar to the height of the top of their eyes.
Also, adjust the headrest as close to your head as possible. For this reason, the use of a cushion that holds the body away from the seatback is not recommended.
Adjusting the height up and down (2nd-row seat and 3rd-row centre seat)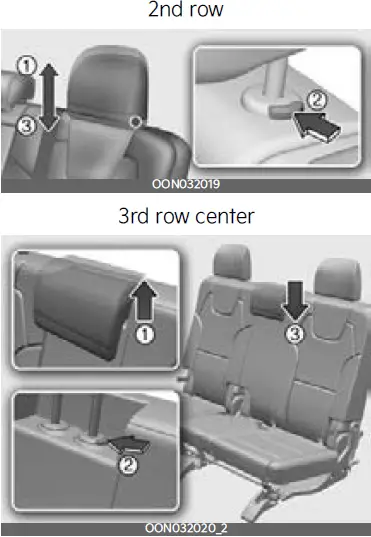
- To raise the headrest, pull it up to the desired position (1).
- To lower the headrest, push and hold the release button (2) on the headrest support and lower the headrest to the desired position (3).
2024 KIA Telluride Specs, Price, Features, Mileage And Review
Removing/reinstalling headrest (2nd-row seat and 3rd row center seat)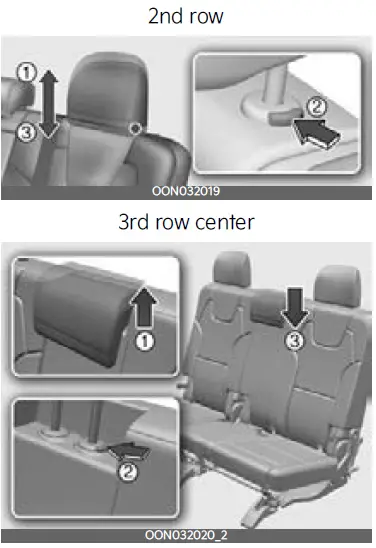
- To remove the headrest, raise it as far as it can go then press the release button (2) While pulling the headrest upward (1).
- To reinstall the headrest, put the headrest poles (3) into the holes while pressing the release button (2).
- Then adjust it to the appropriate height and ensure that it locks in position.
Folding 3rd-row headrest (except for centre)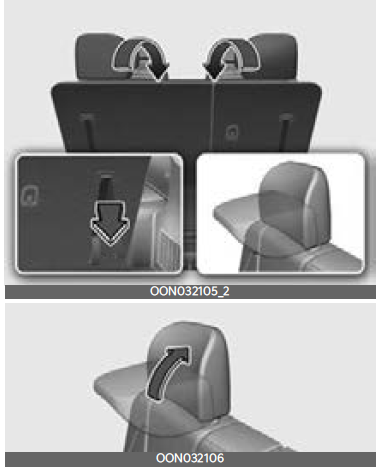
The headrest will fold down automati-cally when folding the seatback.
To unfold the headrest manually:
- Pull the strap. To fold the headrest manually:
- Raise the headrest manually. Always be sure the headrest has locked into position after you return the seat.
WARNING
Close the liftgate carefully when the third-row seats are occupied. If you close the liftgate too aggressively while the seat is occupied, you may hit the pas-senger in the head and cause injuries.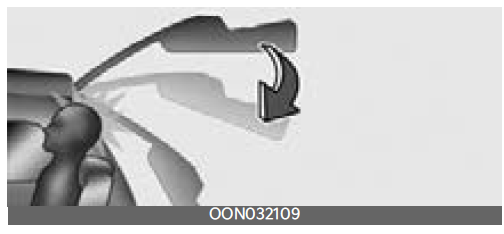
Armrest (2nd row seat) For 7 seats
The 2nd-row seats have the armrest located on the side of the seatback.
- To use the armrest, swing down the
armrest to the lowest position.
Then, adjust the armrest to the desired position while raising it.
When adjusting the position, the operat-ing sound will be heard. This indicates normal operation, not malfunction.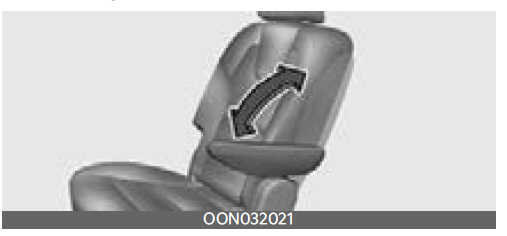
For 8 seats
- To use the armrest, pull it forward from the seatback.
Folding the rear seat
The rear seatbacks may be folded to facilitate carrying long items or to increase the luggage capacity of the vehicle.
WARNING
Folded Seatback
The purpose of the fold-down rear seat-backs is to allow you to carry longer objects that could not otherwise be accommodated.
- Never allow a passenger to sit on top of the folded-down seatback while the car is moving. This is not a proper seating position since no seat belts are available for use. This could result in serious injury or death in case of an accident or sudden stop.
WARNING
When folding the seatback, be sure to hold the seatback or headrest with your hands.
CAUTION
When folding or unfolding a rear seat, make sure to lower the seat’s headrest as much as possible and put the back of the seat in front of the rear seat in the upright position.
If there is any interference when folding or unfolding the seat, the interfered area of the seat may be damaged.
Folding down the rear seatback
- Set the front seatback to the upright position and if necessary, slide the front seat forward.
- Lower the rear headrests to the lowest position.
WARNING
Objects
Objects carried on the folded-down seat-back should not extend higher than the top of the front seatback. This could allow cargo to slide forward and cause injury or damage during sudden stops.
CAUTION
When the seats in the 2nd-row are folded to use the area as a cargo compartment, be sure to turn off the seat heater. (if equipped) - When folding the seatback, insert the rear seat belt buckle in the pocket between the rear seatback and cushion. Make sure both seat belts do not interfere with stowed luggage and cargo. Then, the seat belt webbing should be placed in the webbing guide to prevent the seat belt from being damaged by loaded cargo, etc. If the seat belt is loose, it may cause damage or noise. In that case, return the seatback to the upright position and put the webbing out from the guide to realign it.
- Pull on the seatback folding lever (for 2nd row) or strap (for 3rd row), then fold the seat toward the front of the vehicle. When you return the seatback to its upright position, always be sure it has locked into position by pushing on the top of the seatback.
There is no centre seat on the rear 2nd row for a vehicle with 7 seats.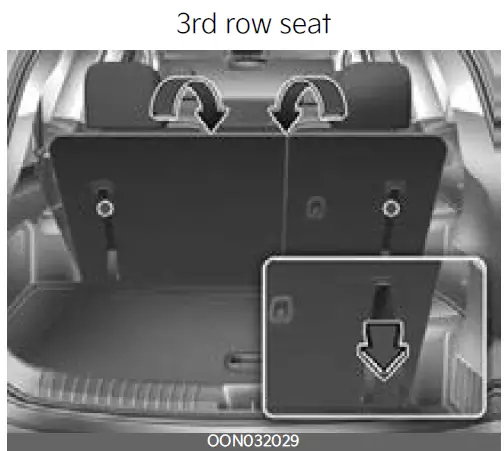
- To use the rear seat, lift and pull the seatback backwards by pulling on the folding lever (for 2nd row) or strap (for 3rd row). Pull the seatback firmly until it clicks into place. Make sure the seatback is locked in place.
- Return the rear seat belt to the proper position.
Unfolding the rear seat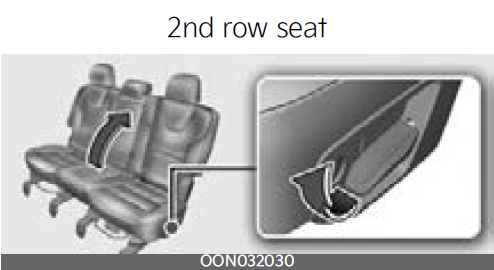
* There is no centre seat on the rear 2nd row for a vehicle with 7 seats.
- To use the rear seat, lift and pull the seat back backwards. Pull the seatback firmly until it clicks into place. Make sure the seatback is locked in place. When you return the seatback to its upright position, always be sure it has locked into position by pushing on the top of the seatback.
If the red line is visible at the bottom of the seatback folding lever, the seat-back has not been locked properly. Pull the seatback folding lever again until the red line is not visible. - Return the rear seat belt to the proper position.
- When the seatback is completely installed, check the seatback folding lever again.
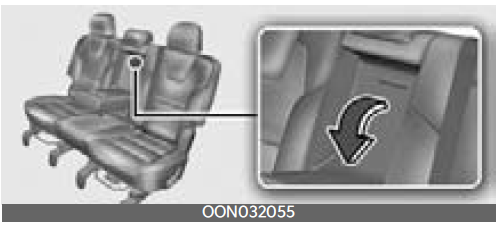
Folding 2nd-row seat remotely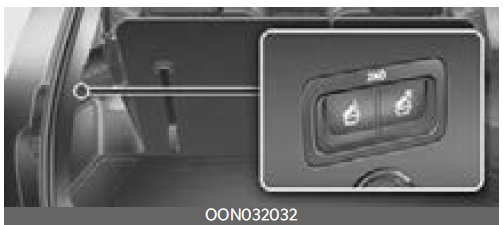
This feature allows you to fold seats in the 2nd row while the liftgate is open.
- Press the folding switch of the seat back located on the left and right sides of the liftgate.
- L: Folding the left seat in the 2nd-row
- R: Folding the right seat in the 2nd-row
You can use additional space by folding the seatback forward
- If the seatback is not fully folded, try folding it again to make it completely folded.
WARNING
Rear seat folding
Do not fold the rear seats (2nd & 3rd row seats), if passengers, pets or luggage are in the rear seats.
It may cause injury or damage to passengers, pets, and luggage.
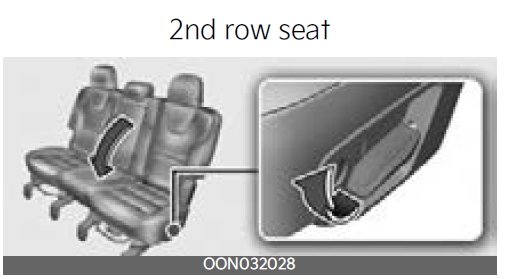
Walk-in seat (2nd row seat)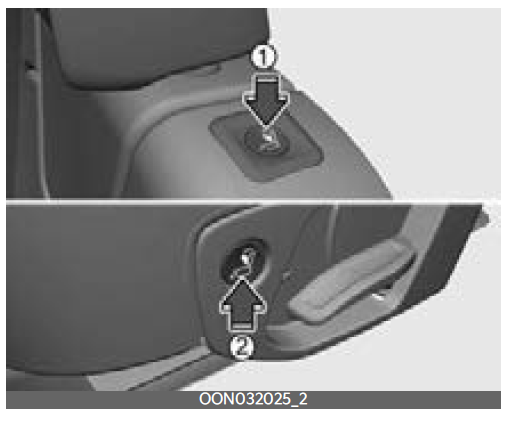
To get into the 3rd-row seat:
- Push the walk-in switch (2) on the 2nd-row seat to get into the 3rd-row seat. To get out of the 3rd-row seat:
- Push the walk-in switch (1) on the 2nd-row seat to get out of the 3rd-row seat.
- After getting in or out, push the 2nd-row seat to the original position until it clicks into place. Make sure that the seat is locked in place.
WARNING
Never attempt to adjust using the 2nd-row seat walk-in switch or strap while the vehicle is moving or the seat is occupied as the seat may suddenly move and cause the passenger on the seat to be injured.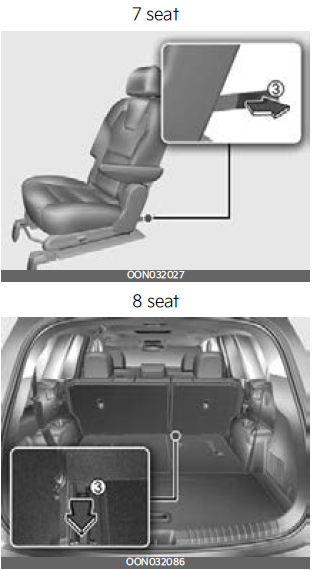
- If the walk-in switch (1 or 2) in the 2nd row (in the upper part of the 2nd-row seatback or the outer part of the seat) does not work, pull the strap (3) on the bottom left of the seat in the 2nd row. It works just like the walk-in switch and you can move the seat forward along with the seatback.
WARNING
Do not pull the strap (3) when the 2nd-row seat(s) is/are occupied.
Sudden movement of the seat(s) may result in injury. Use the strap only when the folding switch in the 2nd row (in the upper part of the second-row seatback or the outer part of the seat) does not work.
- This strap (3) is for 3rd-row passengers to exit the vehicle even if when the vehicle’s battery power is in the run-out emergency condition in an acci-dent.
WARNING
Uprighting seat
When you return the seatback to its upright position, hold the seatback and return it slowly. If the seatback is returned without holding it, the back of the seat could spring forward, resulting in injury caused by being struck by the seatback.
WARNING
Rear seatback
To ensure maximum protection in the event of an accident or sudden stop, when returning the rear seat to the upright position:
- Be careful not to damage the seat belt webbing or buckle.
- Do not allow the seat belt webbing or buckle to become pinched or caught in the rear seat.
- Ensure the seatback is completely locked into its upright position by pushing on the top of the seatback. Failure to adhere to any of these instructions could result in serious injury or death in the event of a crash.
CAUTION
Damaging rear seat belt buckles
When you fold the rear seatback, insert the buckle between the rear seatback and cushion. Doing so can prevent the buckle from being damaged by the rear seatback.
CAUTION
Rear seat belts
When returning the rear seatbacks to the upright position, remember to return the rear shoulder belts to their proper position.
WARNING
Unless the driver’s position is properly set according to the driver’s physical figure, do not fold the rear seat. It may increase bodily injuries in a sudden stop or collision.
CAUTION
Be careful when loading cargo through the rear passenger seats to prevent damage to the vehicle interior.
WARNING
Cargo
Cargo should always be secured to prevent it from being thrown about the vehicle in a collision and causing injury to the vehicle occupants. Do not place objects in the rear seats, since they cannot be properly secured and may hit the front seat occupants in a collision.
Cargo loading
Make sure the engine is off, the transmission is in P (Park) and the parking brake is securely applied whenever loading or unloading cargo. Failure to take these steps may allow the vehicle to move if the shift lever is inadvertently moved to another position.
FAQs
The seats in the 2024 Kia Telluride are upholstered with premium leather.
The 2024 Kia Telluride can comfortably seat up to eight passengers.
Yes, the seats in the 2024 Kia Telluride come with heating functionality.
Ventilation is provided in the seats of the 2024 Kia Telluride for added comfort.
Yes, the seats in the 2024 Kia Telluride are highly adjustable to cater to various preferences.
Indeed, the seats in the 2024 Kia Telluride can be folded down to create additional cargo space when needed.
Yes, the seats in the 2024 Kia Telluride feature memory settings for added convenience.
The seats in the 2024 Kia Telluride come with adjustable lumbar support for enhanced comfort during long drives.
Yes, certain trims of the 2024 Kia Telluride offer massage functionality in the seats for a luxurious driving experience.
Indeed, quilted stitching can be added to the seats of the 2024 Kia Telluride for a touch of elegance.
Yes, the seats in the 2024 Kia Telluride are designed to offer generous legroom for both front and rear passengers.
The seats in the 2024 Kia Telluride come with adjustable headrests for personalized comfort.
Yes, integrated seat belts are included in the seats of the 2024 Kia Telluride for enhanced safety.
Certainly, premium Nappa leather upholstery is available as an upgrade option for the seats in the 2024 Kia Telluride.
Yes, the seats in the 2024 Kia Telluride offer power-adjustable functionality for added convenience.
Useful Links
View Full PDF: 2024 Kia Telluride Owner’s Manual | Auto User Guide
2024 KIA Telluride Specs, Price, Features, Mileage And Review