Kia Sportage 2022 Light Bulbs User Guide
The 2022 Kia Sportage is a famous and flexible small SUV that comes with a variety of lighting options that are meant to improve style, safety, and visibility. The Sportage comes with halogen headlights as standard, but you can also get LED and HID options. This means that you can get headlights that fit your style and your driving needs. Along with its headlights, the Sportage has other lighting features, like fog lights and internal dome lights, that make driving even more enjoyable. Understanding the different light bulbs used in the 2022 Kia Sportage, what they do, and whether they can be upgraded lets owners customise the lighting in their car while still making sure it runs at its best and keeps you safe on the road. This complete guide answers many common questions about the light bulbs in the 2022 Kia Sportage. It covers everything from how to change the bulbs to the different types of bulbs, so owners can make smart choices about their car’s lighting system.
2023 KIA SPORTAGE Specs, Price, Features and Mileage
Light Bulbs
Bulb replacement precaution
Please keep extra bulbs on hand with appropriate wattage ratings in case of emergencies.
Refer to “Bulb Wattage” in chapter 8.
When changing lamps, first turn off the engine at a safe place, firmly apply the parking brake and detach the battery’s negative (-) terminal.
WARNING – Working on the lights
Prior to working on the light, firmly apply the parking brake, ensure that the ignition switch is turned to the LOCK position and turn off the lights to avoid sudden movement of the vehicle and burning your fingers or receiving an electric shock. Use only bulbs of the specified wattage.
CAUTION – Light replace- mint
Be sure to replace the burned-out bulb with one of the same wattage rating. Otherwise, it may cause damage to the fuse or electric wiring system.
CAUTION – Headlamp Lens
To prevent damage, do not clean the headlamp lens with chemical solvents or strong detergents.
- Lamp part malfunction due to network failure
The headlamp, taillight, and fog light may light up when the headlamp switch is turned ON, and not light up when the taillight or for light switch is turned ON. This may be cause by network failure or vehicle electrical control system malfunction. If there is a problem, we recommend the system be serviced by an authorized Kia dealer. - Lamp part malfunction due to electrical control system stabilization
A normally functioning lamp may flicker momentarily. This momentary occurrence is due to the stabilization function of the vehicle’s electrical control system. If the lamp stops flickering after a few moments, the vehicle does not require service.
However, if the lamp goes out after the momentary flickering or the flickering continues, we recommend the system be serviced by an authorized Kia dealer.
NOTICE
- If the light bulb or lamp connector is removed while the lamp is still on, the fuse box’s electronic system may log it as a malfunction. Therefore, a lamp malfunction incident may be recorded as a Diagnostic Trouble Code (DTC) in the fuse box.
- It is normal for an operating lamp to flicker momentarily. This is due to the stabilization function of the vehicle’s electronic control device. If the lamp lights up normally after momentarily blinking, then it is functioning as normal. However, if the lamp continues to flicker several times or turns off completely, there may be an error in the vehicle’s electronic control device. Please have the vehicle checked by an authorized Kia dealer immediately.
NOTICE
We recommend that the headlight aiming be adjusted after an accident or after the headlight assembly is reinstalled at an authorized Kia dealer.
NOTICE
You can find moisture inside the lens of lamps after a car wash or driving in the rain. It is a natural event caused by the temperature difference between the inside and the outside of the lamp and does not mean a problem with its functions. The moisture inside the lamp would disappear if you drive the vehicle with the headlamp turned on, however, the level at which the moisture is removed may differ depending on the size/location/condition of the lamp. If the moisture continues to stay inside the lamp, we recommend that you have the vehicle checked by an authorized Kia dealer.
If you don’t have the necessary tools, the correct bulbs and the expertise, consult an authorized Kia dealer. In many cases, it is difficult to replace vehicle light bulbs because other parts of the vehicle must be removed before you can get to the bulb. This is especially true if you have to remove the headlamp assembly to get to the bulb(s).
Removing/installing the headlamp assembly can result in damage to the vehicle.
If non-genuine parts or substandard bulbs are used, it may lead to blowing a fuse or other wiring damages.
Do not install extra lamps or LEDs to the vehicle. If additional lights are installed, it may lead to lamp malfunction and flickering. Additionally, the fuse box and other writing may be damaged.
Light bulb position (Front)
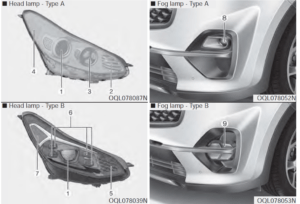
- Headlamp (Low/High)
- Front turn signal lamp (Bulb type)
- Daytime running lamp/Position lamp (Bulb type)
- Side marker (Bulb type)
- Front turn signal lamp (LED type)
- Day time running lamp/Position lamp (LED type)
- Side marker (LED type)
- Fog lamp (Bulb type)
- Fog lamp (LED type)
Light bulb position (Rear)
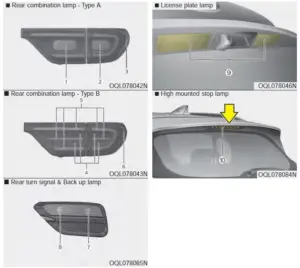
- Tail lamp (Bulb type)
- Stop and tail lamp (Bulb type)
- Side marker (Bulb type)
- Stop lamp (LED type)
- Stop and tail lamp (LED type)
- Side marker (LED type)
- Rear turn signal lamp (Bulb type)
- Backup lamp (Bulb type)
- License plate lamp (Bulb type)
- High-mounted stop lamp (LED type)
Light bulb position (Side)(if equipped)
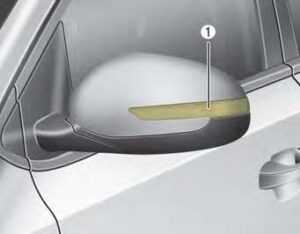
- Side repeater lamp (LED type)
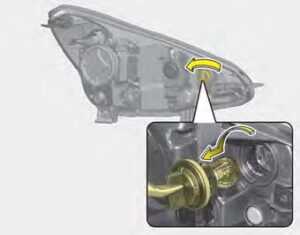
Headlamp (High/Low beam) bulb replacement
- Open the hood.
- Remove the headlamp bulb cover by turning it counterclockwise.
- Disconnect the headlamp bulb socket connector.
- Remove the bulb socket from the headlamp assembly by turning the bulb socket counterclockwise until the tabs on the bulb-socket align with the slots on the headlamp assembly.
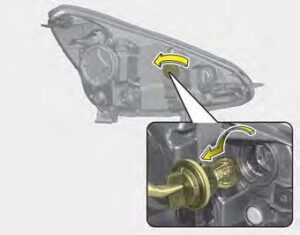
- Install a new bulb-socket assembly in the headlamp assembly by aligning the tabs on the bulb-sock-et with the slots in the headlamp assembly. Push the bulb socket into the headlamp assembly and turn the bulb socket clockwise.
- Install the headlamp bulb cover by turning it clockwise.
Headlamp bulb
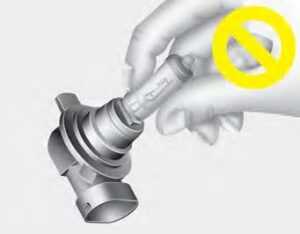
WARNING – Halogen bulbs
Handle halogen bulbs with care.
- Halogen bulbs contain pressurized gas that will produce flying pieces of glass if broken.
- Always handle them carefully, and avoid scratches and abrasions. If the bulbs are lit, avoid contact with liquids. Never touch the glass with bare hands. Residual oil may cause the bulb to overheat and burst when lit. A bulb should be operated only when installed in a headlamp.
- If a bulb becomes damaged or cracked, replace it immediately and carefully dispose of it.
- Wear eye protection when changing a bulb. Allow the bulb to cool down before handling it.
Front turn signal lamp bulb replacement
- Open the hood.
- Remove the bulb socket from the headlamp assembly by turning the bulb socket counterclockwise until the tabs on the bulb-socket align with the slots on the headlamp assembly.
- Remove the bulb from the bulb socket by pressing it in and rotating it counterclockwise until the tabs on the bulb align with the slots in the bulb socket. Pull the bulb out of the bulb-socket.
- Insert a new bulb by inserting it into the bulb socket and rotating it until it locks into place.
- Install the socket in the headlamp assembly by aligning the tabs on the bulb-socket with the slots in the assembly. Push the bulb-sock-et into the headlamp assembly and turn the socket clockwise.
Position lamp + DRL bulb replacement
- Open the hood.
- Remove the bulb socket from the headlamp assembly by turning the bulb socket counterclockwise until the tabs on the bulb-socket align with the slots on the headlamp assembly.
- Remove the bulb from the bulb socket by pressing it in and rotating it counterclockwise until the tabs on the bulb align with the slots in the bulb socket. Pull the bulb out of the bulb-socket.
- Insert a new bulb by inserting it into the bulb socket and rotating it until it locks into place.
- Install the socket in the headlamp assembly by aligning the tabs on the bulb-socket with the slots in the assembly. Push the bulb-sock-et into the headlamp assembly and turn the socket clockwise.
Front fog lamp (Bulb and LED type) bulb replacement
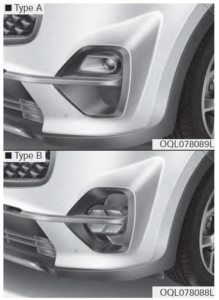
If the front fog lamp (Bulb and LED type) does not operate, we recommend that you have your vehicle checked by an authorized Kia dealer.
Stop and tail lamp bulb replacement
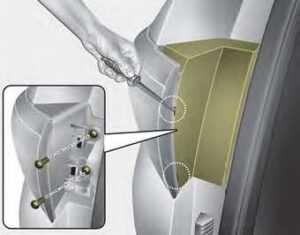
- Open the liftgate.
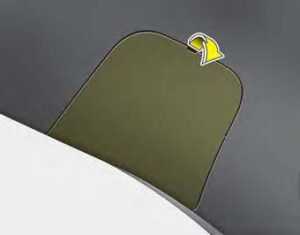
- Open the service cover.
- Loosen the light assembly retaining screws with a cross-tip screwdriver.
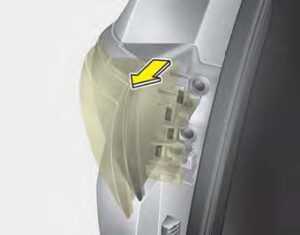
- Remove the rear combination lamp assembly from the body of the vehicle.
- Disconnect the rear combination lamp connector.
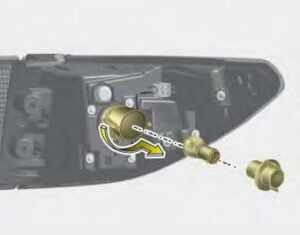
- Remove the socket from the assembly by turning the socket counterclockwise until the tabs on the socket align with the slots on the assembly.
- Remove the bulb from the socket by pressing it in and rotating it counter-clockwise until the tabs on the bulb align with the slots in the socket. Pull the bulb out of the socket.
- Insert a new bulb by inserting it into the socket and rotating it until it locks into place.
- Install the socket in the assembly by aligning the tabs on the socket with the slots in the assembly. Push the socket into the assembly and turn the socket clockwise.
- Install the rear combination lamp assembly to the body of the vehicle.
- Install the service cover.
Tail lamp (inside) bulb replacement
- Open the liftgate.
- Remove the service cover.
- Remove the socket from the assembly by turning the socket counterclockwise until the tabs on the socket align with the slots on the assembly.
- Remove the bulb from the socket by pressing it in and rotating it counter-clockwise until the tabs on the bulb align with the slots in the socket. Pull the bulb out of the socket.
- Insert a new bulb by inserting it into the socket and rotating it until it locks into place.
- Install the socket in the assembly by aligning the tabs on the socket with the slots in the assembly. Push the socket into the assembly and turn the socket clockwise.
- Install the service cover by putting it into the service hole.
2023 KIA SPORTAGE Specs, Price, Features and Mileage
Stop and tail lamp (LED type) bulb replacement
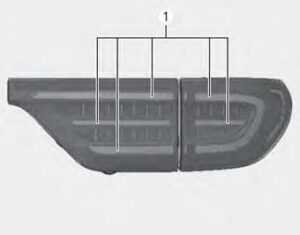
If the stop and tail lamp (LED type)(1) does not operate, we recommend that you have your vehicle checked by an authorized Kia dealer.
Back-up lamp and Rear turn signal lamp (Bulb type) bulb replacement
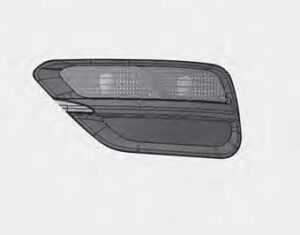
If the Backup lamp and Rear turn signal lamp (Bulb type) does not operate, we recommend that you have your vehicle checked by an authorized Kia dealer.
High-mounted stop lamp (LED type) bulb replacement
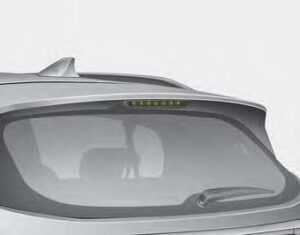
If the high-mounted stop lamp (LED type) does not operate, we recommend that you have your vehicle checked by an authorized Kia dealer.
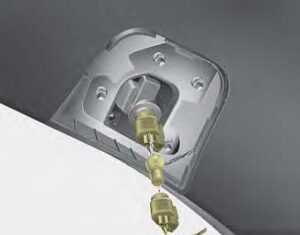
License plate lamp (Bulb type) bulb replacement
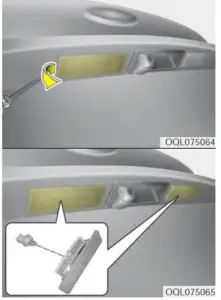
- Using a flat-blade screwdriver, gently pry the lens cover from lamp housing.
- Remove the socket from the assembly by turning the socket counterclockwise until the tabs on the socket align with the slots on the assembly.
- Remove the bulb from bulb socket by pulling it out.
- Insert a new bulb by inserting it into the bulb socket.
- Install the socket in the assembly by aligning the tabs on the socket with the slots in the assembly. Push the socket into the assembly and turn the socket clockwise.
- Align the lens cover tabs with the lamp housing notches and snap the lens into place.
Side repeater lamp (LED type) bulb replacement
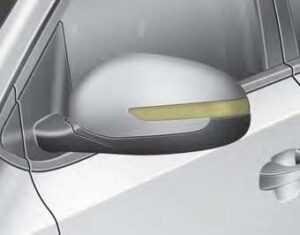
If the side repeater lamp (LED type) does not operate, we recommend that you have your vehicle checked by an authorized Kia dealer.
Map lamp (Bulb and LED type) bulb replacement

If the map lamp (Bulb and LED type) does not operate, we recommend that you have your vehicle checked by an authorized Kia dealer.
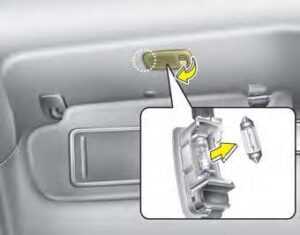
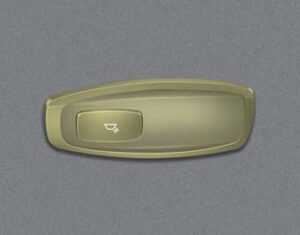
Vanity mirror lamp (Bulb type) bulb replacement
WARNING
Prior to working on the Interior lamps, ensure that the “OFF” button is depressed to avoid burning your fingers or receiving an electric shock.
- Using a flat-blade screwdriver, gently pry the lamp assembly from interior.
- Remove the bulb by pulling it straight out.
- Install a new bulb in the socket.
- Install the lamp assembly to interior.
NOTICE
Be careful not to dirty or damage the lens, lens tab, and plastic housings.
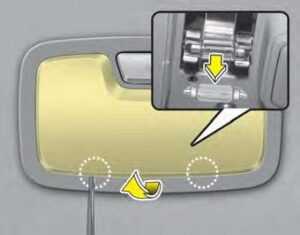
Room lamp (Bulb type) bulb replacement
WARNING
Prior to working on the Interior lamps, ensure that the “OFF” button is depressed to avoid burning your fingers or receiving an electric shock.
- Using a flat-blade screwdriver, gently pry the lens cover from lamp housing.
- Remove the bulb by pulling it straight out.
- Install a new bulb in the socket.
- Align the lens cover tabs with the lamp housing notches and snap the lens into place.
NOTICE
Be careful not to dirty or damage the lens, lens tab, and plastic housings.
Personal lamp (LED type) bulb replacement
If the personal lamp (LED type) does not operate, we recommend that you have your vehicle checked by an authorized Kia dealer.
Glove box lamp (Bulb type) bulb replacement
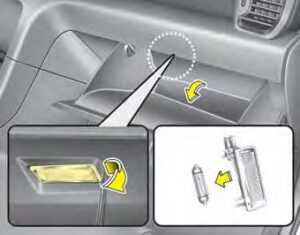
- Using a flat-blade screwdriver, gently pry the lamp assembly from interior.
- Remove the bulb by pulling it straight out.
- Install a new bulb in the socket.
- Install the lamp assembly to interior.
NOTICE
Be careful not to dirty or damage the lens, lens tab, and plastic housings.
Liftgate room lamp (Bulb type) bulb replacement
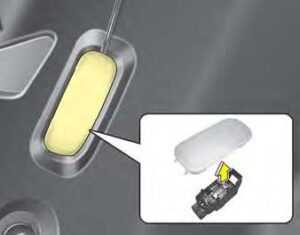
- Using a flat-blade screwdriver, gently pry the lens cover from lamp housing.
- Remove the bulb by pulling it straight out.
- Install a new bulb in the socket.
- Align the lens cover tabs with the lamp housing notches and snap the lens into place.
NOTICE
Be careful not to dirty or damage the lens, lens tab, and plastic housings.
2023 KIA SPORTAGE Specs, Price, Features and Mileage
FAQ
A: The 2022 Kia Sportage typically comes equipped with halogen headlights as standard.
A: Yes, many trim levels offer LED or HID (High-Intensity Discharge) headlights as an option or standard feature.
A: You can consult the owner’s manual for specific instructions or seek professional assistance, as replacing headlight bulbs may require removing parts of the front grille.
A: LED headlights typically offer brighter illumination, improved energy efficiency, and longer lifespan compared to halogen bulbs.
A: Some trim levels of the 2022 Kia Sportage may come equipped with fog lights, which often use halogen bulbs.
A: Fog light bulb replacement procedures can vary, so it’s best to refer to the owner’s manual for specific instructions or consult a Kia dealership.
A: The interior dome lights in the 2022 Kia Sportage often use LED bulbs for efficient and long-lasting illumination.
A: Yes, you can often replace interior dome light bulbs with LEDs of different colors or upgraded versions for customization.
A: When replacing 2022 kia sportage brake light bulbs, ensure that the vehicle’s electrical system is off, and take safety precautions to avoid burns from hot bulbs.
A: Turn signal lights on the 2022 Kia Sportage typically use standard incandescent bulbs or LED bulbs, depending on the trim level.
A: Refer to the owner’s manual for detailed instructions on accessing and replacing turn signal bulbs, as the process can vary by location.
A: The lifespan of factory-installed bulbs can vary, but they generally last for several thousand hours of operation.
A: You can use aftermarket bulbs, but it’s essential to ensure they are compatible with your Kia Sportage’s specifications and meet safety standards.
A: Light bulbs are typically considered wear-and-tear items, and their warranty coverage may be limited. It’s best to check the warranty information provided by Kia.
A: Recall and technical service bulletin information can change over time, so it’s advisable to consult the Kia dealership or the National Highway Traffic Safety Administration (NHTSA) website for the latest updates regarding your vehicle’s light bulbs.
Useful Link
View Full User Guide: Kia Sportage 2022 User Guide
Download Manuals: https://owners.kia.com/content/owners/en/manuals.html