Nissan ARMADA 2022 Hazard warning flasher switch and Jump starting
In case of an emergency situation, the Nissan Armada 2022 offers useful features such as a hazard warning flasher switch and a jump-starting feature. The hazard warning flasher switch can alert other drivers on the road when needed, such as during a breakdown or accident. On the other hand, the jump-starting feature allows the vehicle to be jump-started in the event of a dead battery, which can be particularly helpful in situations where the driver is stranded without other resources.
2023 Nissan Armada Specs, Price, Features and Mileage (Brochure)
Hazard warning flasher switch
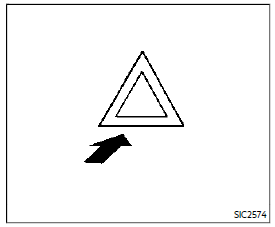
Push the switch on to warn other drivers when you must stop or park under emergency conditions. All turn signal lights will flash.
WARNING
- If stopping for an emergency, be sure to move the vehicle well off the road.
- Do not use the hazard warning flashers while moving on the highway unless unusual circum-stances force you to drive so slowly that your vehicle might become a hazard to other traffic.
- Turn signals do not work when the hazard warning flasher lights are on.
The flasher can be actuated with the ignition switch in any position.
When an impact that could activate the supplemental airbags is detected, the hazard warning flasher lights blink automatically. If the hazard warning flasher switch is pushed twice, the hazard warning flasher will turn off.
WARNING
Do not turn the hazard warning flasher switch to off until you can make sure that it is safe to do so. Also, the hazard flasher warning may not blink automatically depending on the force of impact. Some state laws may prohibit the use of the hazard warning flasher switch while driving.
ROADSIDE ASSISTANCE PROGRAM
In the event of a roadside emergency, Roadside Assistance Service is available to you. Please refer to your Warranty Information Booklet (U.S.) or Warranty & Roadside Assistance Information Booklet (Canada) for details.
EMERGENCY ENGINE SHUT OFF
To shut off the engine in an emergency situation while driving, perform the following procedure:
- Rapidly push the push-button ignition switch 3 consecutive times in less than 1.5 seconds, or
- Push and hold the push-button ignition switch for more than 2 seconds.
FLAT TIRE
TIRE PRESSURE MONITORING SYS-TEM (TPMS)
This vehicle is equipped with the Tire Pressure Monitoring System (TPMS). It monitors tire pressure of all tires except the spare. When the low tire pressure warning light is lit and the “Tire Pressure Low Add Air” warning appears in the vehicle information display, one or more of your tires is significantly under-inflated. If the vehicle is being driven with low tire pressure, the TPMS will activate and warn you of it by the low tire pressure warning light. This system will activate only when the vehicle is driven at speeds above 16 MPH (25 km/h).
WARNING
- If the low tire pressure warning light illuminates or Low-Pressure information is displayed on the monitor screen while driving, avoid sudden steering maneuvers or abrupt braking, reduce vehicle speed, pull off the road to a safe location and stop the vehicle as soon as possible. Driving with under-inflated tires may permanently damage the tires and increase the likelihood of tire failure. Serious vehicle damage could occur and may lead to an accident and could result in serious personal injury. Check the tire pressure for all four tires. Adjust the tire pressure to the recommended COLD tire pressure shown on the Tire and Loading Information label to turn the low tire pressure warning light OFF. If the light still illuminates while driving after adjusting the tire pressure, a tire may be flat. If you have a flat tire, replace it with a spare tire as soon as possible.
- Since the spare tire is not equipped with the TPMS, when a spare tire is mounted or a wheel is replaced, the TPMS will not function and the low tire pressure warning light will flash for approximately 1 minute. The light will remain on after 1 minute. Have your tires replaced and/or TPMS system reset as soon as possible. It is recommended you visit a NISSAN dealer for these services.
- Replacing tires with those not originally specified by NISSAN could affect the proper operation of the TPMS.
- Do not inject any tire liquid or aerosol tire sealant into the tires, as this may cause a malfunction of the tire pressure sensors.
CHANGING A FLAT TIRE
If you have a flat tire, follow the instructions below.
Stopping the vehicle
- 1. Safely move the vehicle off the road and away from traffic.
- Turn on the hazard warning flashers.
- Park on a level surface and apply the parking brake. Move the shift lever to the P (Park) position.
- Turn off the engine.
- Raise the hood to warn other traffic, and to signal professional road assistance personnel that you need assistance.
- Have all passengers get out of the vehicle and stand in a safe place, away from traffic and clear of the vehicle.
WARNING
- Make sure the parking brake is securely applied and the automatic transmission is in the P (Park) position.
- Never change tires when the vehicle is on a slope, ice or slippery areas. This is hazardous.
- Never change tires if oncoming traffic is close to your vehicle. Wait for professional road assistance.
Blocking wheels
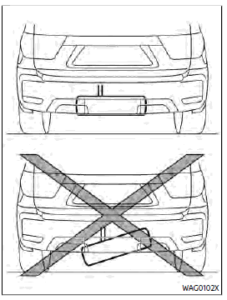
Place suitable blocks at both the front and back of the wheel diagonally opposite the flat tire to prevent the vehicle from moving when it is jacked up.
WARNING
Be sure to block the wheel as the vehicle may move and result in personal injury.
Getting the spare tire and tools
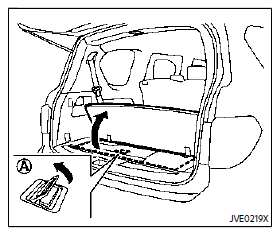
- Open the liftgate.
- Raise the cargo floorboard using the handle.
WARNING
When removing jacking tools, be sure the rubber sound suppressor, used to control jack stand from rattling against metal, is not attached to the jacking tool. If rubber sound suppressor remains on jack when the vehicle is being jacked up, the vehicle will be unstable and may fall off jack stand causing serious injury of death. - Remove the cargo floor cover.
- Remove the jacking tools.
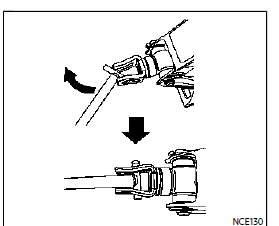
- Securely screw to connect the T-shaped end of the jack rod and the extension bar as illustrated.
- Fit the square end of the jack rod into the square hole of the wheel nut wrench to form a handle.
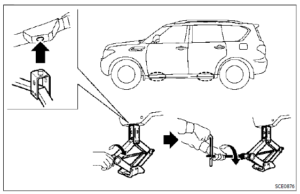
- Locate the oval opening above the middle of the rear bumper.
- Place the T-shaped end of the jack rod through the opening and direct it towards the spare wheel winch assembly, located directly above the spare wheel.
CAUTION
Do not insert the jack rod straight as it is designed to be inserted at an angle as shown. - Seat the T-shaped end of the jack rod into the T-shaped opening of the spare wheel winch. Apply pressure to keep the jack rod engaged in the spare wheel winch and turn the jack rod counterclockwise to lower the spare wheel.
- Once the spare wheel is completely lowered, remove the jack rod and reach under the vehicle to remove the hanging plate.
- Carefully slide the spare wheel from under the rear of the vehicle.
After preparing the spare tire, to remove the rod, pull out the rod while moving the rod to the right and left with the screw of the extension facing the side.
CAUTION
When storing the wheel, make sure that the hanging plate is in the centre of the wheel and then lift it up into the storage area.
CAUTION
When storing the wheel, be sure to mount the wheel horizontally. Securing the wheel that is in a tilted position as illustrated may cause looseness and dropping of the wheel while driving. Lower the wheel on the ground again, and make sure that the hanging plate is properly set. Hang the wheel again and make sure that the wheel is held horizontally, then store the wheel.
Jacking up the vehicle and removing the damaged tire
WARNING
- Never get under the vehicle while it is supported only by the jack. If it is necessary to work under the vehicle, support it with safety stands.
- Use only the jack provided with your vehicle to lift the vehicle. Do not use the jack provided with your vehicle on other vehicles. The jack is designed for lifting only your vehicle during a tire change.
- Use the correct jack-up points. Never use any other part of the vehicle for jack support.
- Never jack up the vehicle more than necessary.
- Never use blocks on or under the jack.
- Do not start or run the engine while the vehicle is on the jack, as it may cause the vehicle to move.
- Do not allow passengers to stay in the vehicle while it is on the jack.
Carefully read the caution label attached to the jack body and the following instructions.
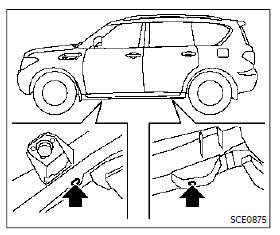
- Place the jack directly under the jack up points as illustrated.
The jack should be used on level firm ground.
- Loosen each wheel nut one or two turns by turning counterclockwise with the wheel nut wrench. Do not remove the wheel nuts until the tire is off the ground.
- Install the assembled jack rod into the jack as shown.
- Carefully raise the vehicle until the clearance between the tire and the ground is achieved.
- To lift the vehicle, securely hold the jack lever and rod with both hands and turn the jack lever.
NOTE:
Before jacking up the vehicle, make sure the ignition switch is placed in the OFF position. If the vehicle is lifted up with the engine running, the auto-leveling suspension will become disabled after 120 seconds. To reset the auto-levelling suspension, cycle the ignition switch ON/OFF one time.
Installing the spare tire
The full-size temporary use-only spare tire (if so equipped) is designed for emergency use
- Clean any mud or dirt from the surface between the wheel and hub.
- Carefully put the spare tire on and tighten the wheel nuts finger tight.
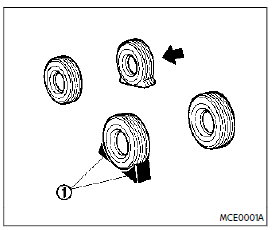
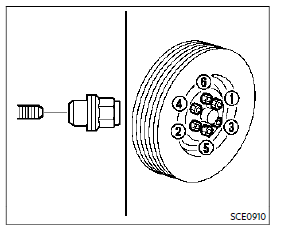
- With the wheel nut wrench, tighten the wheel nuts alternately and evenly in the sequence illustrated ( , , , , , ) until they are tight.
- Lower the vehicle slowly until the tire touches the ground. Then, with the wheel nut wrench, tighten the wheel nuts securely in the sequence as illustrated. Lower the vehicle completely.
WARNING
- Incorrect wheel nuts or improperly tightened wheel nuts can cause the wheel to become loose or come off. This could cause an accident.
- Do not use oil or grease on the wheel studs or nuts. This could cause the nuts to become loose.
- Retighten the wheel nuts when the vehicle has been driven for 600 miles (1,000 km) (also in cases of a flat tire, etc.).
- As soon as possible, tighten the
wheel nuts to the specified torque with a torque wrench.
Wheel nut tightening torque: 98 ft-lb (133 N·m) The wheel nuts must be kept tightened to specification at all times. It is recommended that wheel nuts be tightened to specifications at each lubrication interval. - Adjust tire pressure to the COLD pressure.
COLD pressure:
After the vehicle has been parked for three hours or more or driven less than 1 mile (1.6 km).
COLD tire pressures are shown on the Tire and Loading Information label affixed to the driver side center pillar.
After adjusting tire pressure to the COLD tire pressure, the display of the tire pressure information may show higher pressure than the COLD tire pressure after the vehicle has been driven more than 1 mile (1.6 km). This is because the tire pressurizes as the tire temperature rises. This does not indicate a system malfunction.
Stowing the damaged tire and tools
- Securely store the damaged tire, jack and tools in the storage area.
- Close the cargo floor cover.
- Replace the cargo floorboard.
- Close the liftgate.
WARNING
- Always make sure that the spare tire and jacking equipment are properly secured after use. Such items can become dangerous projectiles in an accident or sudden stop.
- The full-size temporary use-only spare tire (if so equipped) is designed for emergency use.
JUMP STARTING
To start your engine with a booster battery, the instructions and precautions below must be followed.
WARNING
- If done incorrectly, jump starting can lead to a battery explosion, resulting in severe injury or death. It could also damage your vehicle.
- Explosive hydrogen gas is always present in the vicinity of the battery. Keep all sparks and flames away from the battery.
- Do not allow battery fluid to come into contact with eyes, skin, clothing or painted surfaces. Battery fluid is a corrosive sulphuric acid solution that can cause severe burns. If the fluid should come into contact with anything, immediately flush the contacted area with water.
- Keep the battery out of the reach
of children. - The booster battery must be rated at 12 volts. Use of an improperly rated battery can damage your vehicle.
- . Whenever working on or near a battery, always wear suitable eye protectors (for example, goggles or industrial safety spectacles) and remove rings, metal bands, or any other jewelry. Do not lean over the battery when jump-starting.
- Do not attempt to jump-start a frozen battery. It could explode and cause serious injury.
- Your vehicle has an automatic engine cooling fan. It could come on at any time. Keep hands and other objects away from it.
WARNING
Always follow the instructions below. Failure to do so could result in damage to the charging system and cause personal injury.
- Remove the engine compartment cover, if necessary.
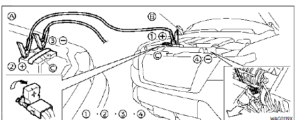
- If the booster battery is in another vehicle, position the two vehicles ( and ) to bring their batteries into close proximity to each other.
Do not allow the two vehicles to touch. - Apply parking brake. Move the shift lever to the P (Park) position. Switch off all unnecessary electrical systems (light, heater, air conditioner, etc.).
- Remove vent caps on the battery (if so equipped). Cover the battery with a firmly wrung-out moist cloth to reduce explosion hazard.
- Connect jumper cables in the sequence as illustrated ( ? ? ?)
CAUTION- Always connect positive (+) to positive (+) and negative (−) to body ground (as illustrated) —not to the battery.
- Make sure the jumper cables do not touch moving parts in the engine compartment and that clamps do not contact any other metal.
- Start the engine of the booster vehicle and let it run for a few minutes. Keep the engine speed of the booster vehicle at about 2,000 rpm, and
- start the engine of the vehicle being jump started.
CAUTION
Do not keep the starter motor engaged for more than 10 seconds. If the engine does not start right away, place the ignition switch in the OFF position and wait 10 seconds before trying again. - After starting your engine, carefully disconnect the negative cable and then the positive cable ( ? ? ? ).
- Replace the vent caps (if so equipped). Be sure to dispose of the cloth used to cover the vent holes as it may be contaminated with corrosive acid.0.
- Put the battery cover on.
FAQ
What is the hazard warning flasher switch in the Nissan Armada 2022?
The hazard warning flasher switch is a feature in the Nissan Armada 2022 that can be used to activate the hazard lights in case of an emergency.
How do I activate the hazard warning flasher switch in the Nissan Armada 2022?
To activate the hazard warning flasher switch, simply press the button located on the dashboard or steering column of the vehicle.
What is the purpose of the hazard warning flasher switch in the Nissan Armada 2022?
The hazard warning flasher switch is used to warn other drivers on the road of an emergency situation, such as a breakdown or accident.
Can I use the hazard warning flasher switch when driving in normal conditions?
No, the hazard warning flasher switch should only be used in emergency situations.
How long can I leave the hazard warning flasher switch on in the Nissan Armada 2022?
It is recommended to turn off the hazard warning flasher switch after a few minutes to avoid draining the battery.
What is the jump starting feature in the Nissan Armada 2022?
The jump starting feature is a feature in the Nissan Armada 2022 that allows the vehicle to be jump started in case of a dead battery.
How do I jump start my Nissan Armada 2022?
To jump start the Nissan Armada 2022, you will need another vehicle with a charged battery and jumper cables. Follow the instructions in the owner’s manual for specific steps.
Can I jump-start my Nissan Armada 2022 using another method?
It is recommended to only jump start the Nissan Armada 2022 using another vehicle with a charged battery and jumper cables. Using other methods can be dangerous and damage the vehicle.
How long should I let my Nissan Armada 2022 run after a jump start?
It is recommended to let the vehicle run for at least 20 minutes after a jump start to ensure that the battery is fully charged.
How often should I check my Nissan Armada 2022 battery?
It is recommended to have the battery checked at least once a year or every 12,000 miles, whichever comes first.
How do I know if my Nissan Armada 2022 battery is low?
If the battery is low, the vehicle may not start or may start slowly. You may also notice dimming lights or other electrical problems.
Can I prevent my Nissan Armada 2022 battery from dying?
To prevent the battery from dying, make sure to turn off all electrical components when the vehicle is not in use, and have the battery checked regularly.
What should I do if my Nissan Armada 2022 battery dies frequently?
If the battery dies frequently, it may be a sign of a larger electrical problem in the vehicle. Have the vehicle inspected by a qualified mechanic.
Useful Link
View Full User Guide: Nissan ARMADA 2022 User Guide
Download Manuals: https://www.nissanusa.com/owners/ownership/manuals-guides.html
2023 Nissan Armada Specs, Price, Features and Mileage (Brochure)