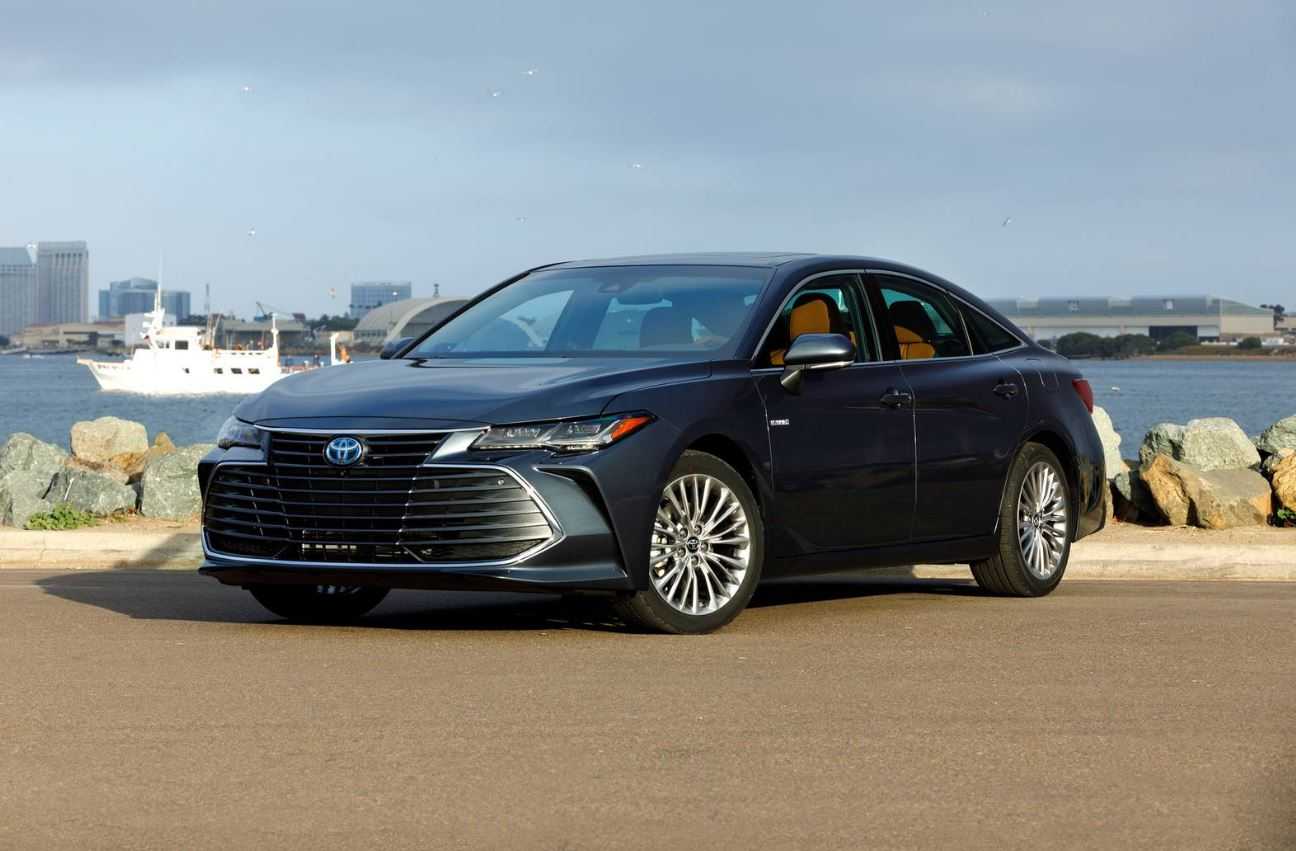
Toyota Avalon Hybrid 2019
The Toyota Avalon Hybrid is a full-size sedan with modern features, good gas mileage, and comfort. The 2019 Toyota Avalon Hybrid is described below:
drivetrain and gas mileage: The 2019 Avalon Hybrid is powered by a 2.5-liter four-cylinder engine and an electric motor that work together to make a hybrid drivetrain. This hybrid system has a total output of 215 horsepower and is very good at saving gas. A continuously variable gearbox (CVT) is used in the Avalon Hybrid to maximise power delivery and economy. It also has different ways to drive that can be chosen by the driver.
Fuel economy: The Avalon Hybrid is known for having great scores for fuel economy. It gets up to 43 mpg in the city and 44 mpg on the highway, according to the EPA. This makes it a great choice for people who want a fuel-efficient car.
Comfort and cabin: The Avalon Hybrid’s cabin is large and high-end. It can fit up to five people, and both the front and back seats have a lot of space and headroom. The inside of the car is made of high-quality materials, and the seats are cosy. There are options like leather seating, front seats that are heated and cooled, and power-adjustable seats with memory settings.
Technology and Features: The 2019 Toyota Avalon Hybrid has high-tech features. It has an infotainment system with a 9-inch touchscreen, Apple CarPlay, Android Auto, and Bluetooth connection. A luxury sound system, wireless smartphone charging, a head-up display, and a Wi-Fi hotspot are also available. The Avalon Hybrid also has a number of driver-assistance systems, such as adaptive cruise control, lane departure warning, and automatic emergency braking.
Design and Style: The outside of the 2019 Avalon Hybrid is the same as the outside of the non-hybrid Avalon. It looks sleek and modern, with a big front face, LED headlights, and LED taillights, if you want them. Overall, the design is beautiful and refined, making it both aerodynamically efficient and look classy.
Safety: Toyota puts a lot of thought into safety, and the Avalon Hybrid has a full set of safety systems. It comes with the Toyota Safety Sense-P suite, which has features like forward collision warning, pedestrian detection, lane departure warning with steering aid, automatic high beams, and adaptive cruise control.
The 2019 Toyota Avalon Hybrid is a good choice for a hybrid car because it gets good gas mileage, is comfortable, and has high-tech features. I suggest calling a Toyota dealership or going to the official Toyota website to get the most exact and up-to-date information.
Installing child restraints
Follow the child restraint system manufacturer’s instructions. Firmly secure child restraints to the seats using the LATCH anchors or a seat belt. Attach the top tether strap when installing a child restraint. The lap/shoulder belt can be used if your child’s restraint system is not compatible with the LATCH (Lower Anchors and Tethers for Children) system.
Child restraint LATCH anchors
LATCH anchors are provided for the outboard rear seats. (Marks displaying the location of the anchors are attached to the seats.) Seat belts equipped with a child restraint locking mechanism (ALR/ELR belts except driver’s seat belt) (P. 30)
Anchor brackets (for top tether strap) An anchor bracket is provided for each rear seat.
Installation with the LATCH system
- When installed in the rear outboard seats
Install the child restraint system in accordance with the operation manual enclosed with the child restraint system.- If the head restraint interferes with the child restraint system installation and the head restraint can be removed, remove the head restraint.(P. 158)
- Remove the cover.
With flexible lower attachments - Latch the hooks of the lower straps onto the LATCH anchors.
For owners in Canada:
The symbol on a child restraint system indicates the presence of a lower connector system. - If the child restraint has a top tether strap, follow the child restraint manufacturer’s operation manual regarding the installation, using the top tether strap to latch onto the top tether strap anchor. (P. 65)
- After installing the child restraint system, rock it back and forth to ensure that it is installed securely. (P. 67)
- When installed in the rear center seat
There are no LATCH anchors behind the rear center seat. How-ever, the inboard LATCH anchors of the outboard seats, which are 16.9 in. (430 mm) apart, can be used if the child restraint system manufacturer’s instructions permit use of those anchors with the anchor spacing stated. Child restraint systems with rigid lower attachments cannot be installed in the center seat. This type of child restraint system can only be installed in the outboard seat.
Rear-facing Infant seat/convertible seat
- Place the child restraint system on the rear seat facing the rear of the vehicle.
- Run the seat belt through the child restraint system and insert the plate into the buckle. Make sure that the belt is not twisted.
- Fully extend the shoulder belt and allow it to retract to put it in lock mode. In lock mode, the belt cannot be extended.
- While pushing the child restraint system down into the rear seat, allow the shoulder belt to retract until the child restraint system is securely in place.
After the shoulder belt has retracted to a point where there is no slack in the belt, pull the belt to check that it cannot be extended.
Forward-facing Convertible seat
- If the head restraint interferes with the child restraint system installation and the head restraint can be removed, remove the head restraint.(P. 158)
- Place the child restraint system on the seat facing the front of the vehicle.
- Run the seat belt through the child restraint system and insert the plate into the buckle. Make sure that the belt is not twisted.
- Fully extend the shoulder belt and allow it to retract to put it in lock mode. In lock mode, the belt cannot be extended.
- While pushing the child restraint system into the rear seat, allow the shoulder belt to retract until the child restraint system is securely in place.
After the shoulder belt has retracted to a point where there is no slack in the belt, pull the belt to check that it cannot be extended. - If the child restraint has a top tether strap, the top tether strap should be latched onto the top tether strap anchor. (P. 65)
Booster seat
- Place the child restraint system on the seat facing the front of the vehicle.
- Sit the child in the child restraint system. Fit the seat belt to the child restraint system according to the manufacturer’s instructions and insert the plate into the buckle. Make sure that the belt is not twisted. Check that the shoulder belt is correctly positioned over the child’s shoulder and that the lap belt is as low as possible.
(P. 28)
Removing a child restraint installed with a seat belt
Push the buckle release button and fully retract the seat belt.
Child restraint systems with a top tether strap
Install the child restraint system in accordance with the operation manual enclosed with the child restraint system.
- Adjust the head restraint to the utmost position. If the head restraint interferes with the child restraint system installation and the head restraint can be removed, remove the head restraint.
- Secure the child restraint system using the seat belt or LATCH anchors.
- Open the anchor bracket cover, latch the hook onto the anchor bracket, and tighten the top tether strap. Make sure the top tether strap is securely latched.
Laws and regulations pertaining to anchorages
The LATCH system conforms to FMVSS225 or CMVSS210.2. Child restraint systems conforming to FMVSS213 or CMVSS213 specifications can be used. This vehicle is designed to conform to the SAE J1819.
WARNING
- When installing a booster seat
To prevent the belt from going into ALR lock mode, do not fully extend the shoulder belt. ALR mode causes the belt to tighten only. This could cause injury or discomfort to the child. (P. 30)
When installing a child restraint system
Follow the directions given in the child restraint system installation manual and fix the child restraint system securely in place.
If the child restraint system is not correctly fixed in place, the child or other passengers may be seriously injured or even killed in the event of sudden braking, sudden swerving or an accident.
- If the driver’s seat interferes with the child restraint system and prevents it from being attached correctly, attach the child restraint system to the right-hand rear seat.
- Adjust the front passenger seat so that it does not interfere with the child restraint system.
- Only put a forward-facing child restraint system on the front seat when unavoidable. When installing a forward-facing child restraint system on the front pas- passenger seat, move the seat as far back as possible even if the “AIR BAG OFF” indicator light is illuminated. Failure to do so may result in death or serious injury if the airbags deploy (inflate).
Reference Link
Download Link: https://www.toyota.com/owners/resources/warranty-owners-manuals