Winnebago Adventurer 2023 Appliances and Systems User Manual
Appliances and Systems
The appliances installed in your motorhome are manufactured by reputable RV appliance makers and have been tested by independent laboratories to meet all applicable standards and codes set for RV appliances.
See Section 2 – Safety and Precautions of this manual for any safety and precautions you need to take regarding the operation of your appliances.
Refrigerator
–If Equipped
The refrigerator in your motorhome can operate from either of two energy sources available to the motorhome:
- 120-Volt AC Electric
Propane Gas
To be able to use both types of energy, the refrigerator does not have a compressor like household refrigerators. Instead, it uses an ammonia-water solution for cooling. Basically, ammonia vapor is distilled from the solution by heat produced from either propane gas flame or electrical heat element. The ammonia vapor is then carried to the finned condenser where it liquefies. The liquid then flows to an evaporator where it creates cooling by evaporation. The ammonia circulates back into the water solution and the cooling cycle continues.
WARNING
Do not let children play inside the motorhome unattended. Unlike your home refrigerator/freezer that one could push open the door from the inside, your motorhome refrigerator has a travel latch and when engaged would trap a child inside resulting in suffocation leading to death or serious injury.
Leveling
Before operating the refrigerator when the motorhome is stationary, place a small level on the bottom of the refrigerator and make certain the unit is level. If over 1/2 of the bubble is inside the circle in any direction, the motorhome is level enough for continuous operation of the refrigerator while parked.
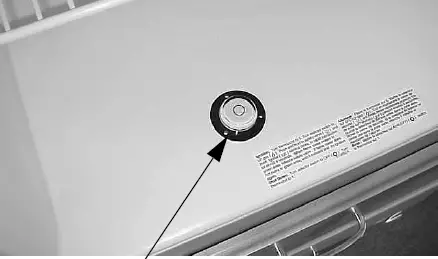
Place bubble level in bottom of refrigerator
Bubble must be at least 1/2 inside circle
Normal vehicle leveling to provide comfort for the occupants is satisfactory for refrigerator operation.
NOTICE
The refrigerator is made to operate within 3 off level side-to-side and 6 off level front-to-back (as looking at the front of the refrigerator). Operating it at more than these limits can cause damage to the cooling system. Make sure the vehicle is level before you operate the refrigerator.
Your motorhome is equipped with one of the following refrigerators. See the instructions for the refrigerator in your motorhome.
Further Information
Refer to the manufacturer’s user guide provided in your InfoCase for complete operating instructions, safety precautions, and maintenance information.
REFRIGERATOR – RESIDENTIAL
–If Equipped
Your motorhome may be equipped with a “residential style” refrigerator. This refrigerator operates off of the 120-volt electrical system in your motorhome.
In order to operate, the refrigerator requires either the shoreline to be plugged in, the generator running, or inverter power.
The inverter is intended to power your 120 volt residential refrigerator primarily when driving your vehicle. The house batteries will drain quickly if the refrigerator is powered from the inverter when the engine is not running. Other 120 volt appliances and other 120 volt devices are not intended to operate with inverter power for long periods of time as they too will quickly drain your house batteries.
NOTE: The refrigerator operates off of 120-volt power. When power is off, the ice maker drain valve (located behind sidewall access compartment) needs to be in the ON position. This will ensure that water does not discharge from the water dispenser when power is reconnected to the appliance.
WARNING
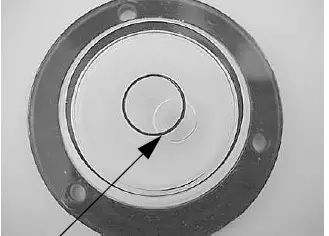
At refrigerator/freezer or motorhome End of Life remove travel latch. Failure to remove travel latch could result in trapping a child inside resulting in suffocation leading to death or serious injury.
Do not let children play inside the motorhome unattended. Unlike your home refrigerator/freezer that one could push open the door from the inside, your motorhome refrigerator has a travel latch and when engaged would trap a child inside.
Travel Latch
To engage the travel latch, rotate the handle to lock position. To disengage the travel latch, rotate the handle to the unlock position.
(Latch shown in lock position)
-Typical View
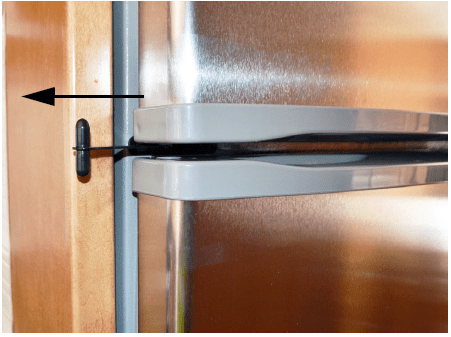
(Latch shown in unlock position)
-Typical View
Basic Refrigerator Operation
Temperature controls are factory preset for your convenience. When you first use your refrigerator, make sure the controls are still set to the recommended setting as shown.
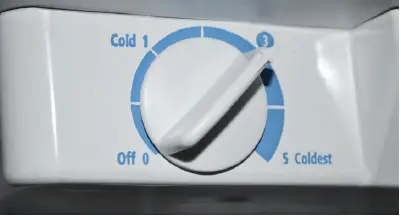
Recommended setting is “Mid-setting 3”
See the manufacturer’s user guide provided in your InfoCase for information on adjusting refrigerator/freezer temperatures to best suit your needs.
NOTE: Allow 24 hours for your refrigerator to cool completely before storing food.
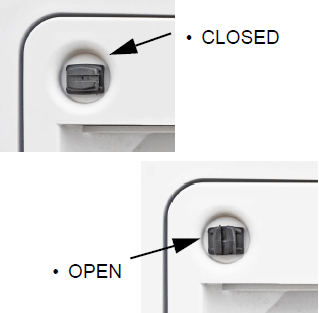
Ice Maker Operation
- To turn the ice maker on, lower the wire shut-off arm.
NOTE: Do not force the wire shut-off arm up or down. - To manually turn the ice maker off, lift the wire shut-off arm to the OFF (arm up) position until it clicks.
NOTE: Your ice maker is equipped with an automatic shutoff. As ice cubes fill the storage bin, the wire arm is raised to the OFF (arm up position).
Further Information
Refer to the manufacturer’s user guide provided in your InfoCase for complete operating instructions, safety precautions, and maintenance information.
ICE MAKER
–If Equipped
Some refrigerators are equipped with an automatic ice maker system. The ice maker unit is installed in the freezer compartment of the refrigerator.
NOTE: A water shut-off valve for the ice maker is located near the water faucet filter inside the galley cabinet beneath the sink.
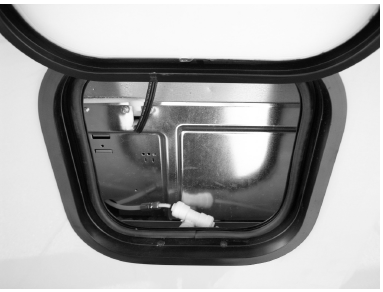
REFRIGERATOR SERVICE ACCESS COMPARTMENT
(Exterior)
–If Equipped
The exterior refrigerator service compartment allows access to the rear of the refrigerator for inspection, maintenance, and service.
To Open
- Use a screwdriver or coin to turn the latch knobs to the vertical position as shown.
- Remove the door from the opening.
To Close
- Replace the door into the opening.
- Push the latch knobs in while turning to the horizontal position as shown.
REFRIGERATOR SERVICE ACCESS COMPARTMENT – RESIDENTIAL
(Exterior)
The exterior residential refrigerator service compartment allows access to the rear of the refrigerator for inspection, maintenance, and service.
- Unlock access compartment with provided key (located on your key ring).
Residential Refrigerator
Service Compartment
(Located along driver or passenger sidewall, depending on model)
-Typical View
RANGE TOP (GAS/ELECTRIC)
–If Equipped
NOTE: See the appliance manufacturer’s user guide provided in your InfoCase for complete operating instructions and safety precautions.
The range in your motorhome operates on propane gas and electricity and will provide most of the functions of the range in your home.
Refer to the appliance manufacturer’s user guide provided in your InfoCase for complete range features and operating instructions.
To Light Gas Burner
- Depress the burner knob and turn 1-2 seconds counter-clockwise to the HI position
(maximum rate), push in and hold the knob until the flame has been lit. If the burner does not light in HI position, try again with the knob in LOW position.
NOTE: If the burner does not light within about ten seconds or if the flame should go out during cooking, turn the burner off. If gas has accumulated and a strong gas odor is detected, open a window and wait 5 minutes for the gas odor to disappear before relighting the burner.
If the appliance has not been operated for a period of time, the surface burner may be difficult to light due to air in the gas line. - To extinguish the burner flame, turn the burner knob clockwise to the OFF position.
Avoiding Asphyxiation
The following warning label has been located in the cooking area to remind you to provide an adequate supply of fresh air for combustion.
DANGER
Do not use gas cooking appliances for comfort heating. Can lead to carbon monoxide poisoning, which can lead to death or serious injury.
WARNING
Gas cooking appliances need fresh air for safe operation.
Before operating:
Open vents or windows slightly or turn on exhaust fan prior to using cooking appliance. Gas flames consume oxygen, which should be replaced to ensure proper combustion. Improper use can result in death or serious injury.
Unlike homes, the amount of oxygen supply is limited due to the size of the recreational vehicle, and proper ventilation when using the cooking appliances avoids dangers of asphyxiation.
It is especially important that cooking appliances not be used for comfort heating, as the danger of asphyxiation is greater when the appliance is used for long periods of time.
FAILURE TO COMPLY COULD RESULT IN DEATH OR SERIOUS INJURY.
WARNING
Portable fuel-burning equipment including wood and charcoal grills and stoves, shall not be used inside the recreational vehicle. The use of this equipment inside the recreational vehicle can cause fires or asphyxiation. Failure to comply could result in death or serious injury.
MICROWAVE/CONVECTION OVEN
–If Equipped
Refer to the manufacturer’s user guide located inside the appliance for complete operating instructions.
NOTICE
Do not store items in oven.
If oven would turn on stored items can ignite resulting in fire and or property damage.
MICROWAVE OVEN/RANGE HOOD
–If Equipped
The range hood vent is built into the microwave oven. The range hood fan carries cooking odors and gas fumes to the outside of the motorhome. A light on the underside of the hood provides illumination for food preparation. The hood fan and light switches are located on the microwave control panel.
NOTICE
Do not store items in oven.
If oven would turn on stored items can ignite resulting in fire and or property damage.
Further Information
See the manufacturer’s user guide provided inside the appliance for complete operating instructions and replacement of vent hood light bulbs and replacement or cleaning of grease filter elements.
RANGE HOOD
–If Equipped
The range hood vent draws cooking odors and airborne grease particles into the filtration grid and either recirculates the air or vents it to the outside of the motorhome, depending on model.
A light on the underside of the hood provides illumination for cooking and food preparation.
Further Information
See the manufacturer’s user guide provided in your InfoCase for instructions on replacement of light bulbs and replacement or cleaning of grease filter elements.
TAILGATE PACKAGE
–If Equipped
Your motorhome may be equipped with a refrigerator and portable outdoor grill located in a passenger side compartment.
Refrigerator Operation
- The first time you turn the refrigerator on, adjust the thermostat to “4” and allow 24 hours for your refrigerator to cool completely before storing food.
- Adjust the thermostat to your desired temperature.
Portable Outdoor Grill
The gas connection supplied is intended to be only used with the grill and hose supplied.
Do not alter this hose or use it for any applications other than the grill supplied with the hose.
LP Accessory Connection
(Located behind access door at the rear passenger side of the vehicle)
- Do not use grill under awning or compartment door.
Do not use grill next to motorhome.
DANGER
Do not connect grill to any unregulated propane supply (e.g. 20lb cylinder). Use only the hose and propane supply connection provided. Failure to do so could lead to a fire or explosion resulting in death or serious injury.
WARNING
Do not alter the propane hose assembly or propane supply connection that is provided with your vehicle. Failure to do so could lead to fire or explosion resulting in death or serious injury.
WARNING
Do not alter this propane hose assembly. Failure to do so could lead to a fire or explosion resulting in death or serious injury.
Further Information
See the appliance manufacturer’s user guide provided in your InfoCase for complete operating instructions, safety precautions, and maintenance care.
WASHER/DRYER – STACKABLE
–If Equipped
Your motorhome may be equipped with a
Stackable Washer/Dryer for the luxury of home as you travel.
Before using the Stackable Washer/Dryer, please spend a few moments reading the manufacturer’s user guide provided in your InfoCase for complete operating instructions, troubleshooting and maintenance tips, as well as safety precautions.
CAUTION
Open a window or vent while operating dryer. It is dangerous to create a negative air pressure inside a vehicle containing fuel-burning appliances.
Water Supply Faucets
The Washing Machine Water Supply Faucets are located along side the Stackable Washer/Dryer cabinet. Open access door to reach Water Supply Faucets.
Always turn Water Supply Faucets OFF when not using the Washing Machine to avoid possible water leaks if a hose or hose gasket should fail.
Model 33C
Water Supply Faucets
(Located behind access door rear of the washer/dryer cabinet.)
See “Winterizing Optional Appliances” in Section 7 – Plumbing for steps in winterizing your Stackable Washer/Dryer.
Further Information
Refer to the manufacturer’s user guide provided in your InfoCase for complete operating instructions, troubleshooting and maintenance tips, as well as safety precautions.
WASHER/DRYER (COMBINATION)
–If Equipped
Your motorhome may be equipped with a Combination Washer/Dryer for the luxury of home as you travel.
Before using the Washer/Dryer, please spend a few moments reading the manufacturer’s user guide provided in your InfoCase for complete operating instructions, troubleshooting and maintenance tips, as well as safety precautions.
CAUTION
Open a window or vent while operating dryer. It is dangerous to create a negative air pressure inside a vehicle containing fuel-burning appliances.
To Open the Door During a Cycle
The door can be unlocked for up to five (5) minutes into any wash cycle and at any time during a dry cycle.
- To Unlock: Press the ON/OFF button. When the door is unlocked, you will hear two (2) “clicks” and the Door Lock LED will be flashing.
- To Resume: Close the door and press the ON/OFF button to resume the cycle.
IMPORTANT! Never attempt to open the door when the Door Lock LED (located between the START and ON/OFF button) is LIT SOLID
Water Supply Faucets
The washing machine water supply faucets are located inside a cabinet near the washer/dryer. Always turn water supply faucets off when not using washing machine to avoid possible water leaks if a hose or hose gasket should fail.
Model 35F
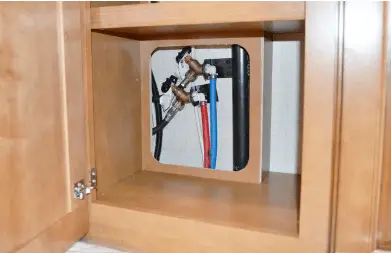
Water Supply Faucets
(Located inside cabinet front of washer/dryer – remove access panel)
Model 36Z

Water Supply Faucets
(Located inside pantry cabinet above washer/dryer, remove panel to access)
See “Winterizing Optional Appliances” in Section 7 – Plumbing for steps in winterizing your Washer/Dryer.
Further Information
Refer to the manufacturer’s user guide provided in your InfoCase for complete operating instructions, troubleshooting and maintenance tips, as well as safety precautions.
WASHER/DRYER – PREP PACKAGE
If your motorhome is not equipped with a Washer/Dryer, plumbing may be present for installation.
Typically, the plumbing lines are located inside the wardrobe or storage cabinet depending on model.
We recommend obtaining parts and service for the Washer/Dryer installation from your Winnebago Industries® dealer.
MONITOR PANEL
The Touchscreen Panel (located in the hallway) provides a convenient, central location for checking the condition of all utility systems in your motorhome.
The touchscreen displays the fresh water and holding tank levels, propane gas tank level, as well as the chassis battery and house battery condition. You can start the generator, operate the slide outs, operate the bed lift, control the lighting, operate the jacks, control the climate, operate the awning, control the solar settings, control the chassis settings, or turn on the water pump and water heater.
Water and Holding Tank Levels
The approximate fluid levels are measured by electronic sensors on the sides of the tanks. Tank levels are displayed as Empty (0%), 5% increments, and Full (100%).
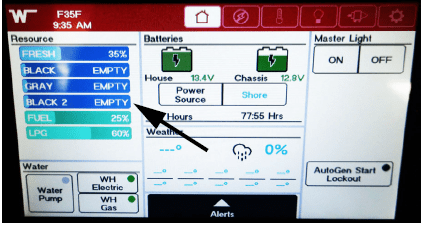
Holding tank levels on the Home Screen
-Typical View
Tank Capacities
See “Tank Capacities” in Section 1 – Introduction.
Battery Charge Meter
To get an accurate reading:
- Both the chassis engine and the generator engine must be shut off and 120-volt AC shoreline unplugged.
An interior light should be turned on to provide a small load which draws off the battery surface charge.
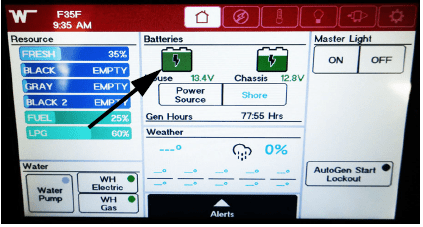
Battery Voltage section on the Home
Screen
-Typical View
Water Pump Switch
When use of the self-contained water system is desired, turn the Water Pump switch on. The “Pump On” light will illuminate when the pump switch is on and the system is operable. Water will be available as soon as a faucet is opened.
Refer to the Water Pump information elsewhere in this section for additional information on the water pump and initial start-up.
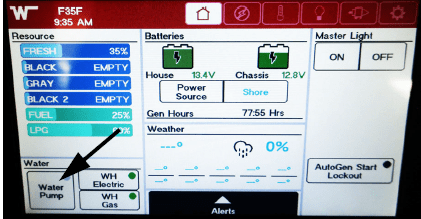
Water Pump Button
Tap Water Pump to turn off/on
-Typical View
NOTE: Some models may be equipped with a Water Pump switch in the water service center on the outside of the motorhome or within the bathroom area for your convenience.
WATER HEATER – GAS
–If Equipped
NOTE: Read the Water Heater operating guide provided in your InfoCase for complete operating instructions, safety warnings, and maintenance information before operating the Water Heater.
Ensure the Water Heater is filled with water before operating.
To fill the Water Heater, turn the Water Pump switch ON and open a hot water faucet anywhere in the motorhome. When water begins to flow steadily from the faucet, the Water Heater is full.
Propane Gas Operation
Your motorhome is equipped with one of the following System Monitor Panels shown below.
- Press the Water Heater switch (located on the Systems Monitor Panel) to the ON position.

Water heater controls on the Home Screen
-Typical View
- The “Pilot Out” light will glow for about 10-15 seconds, then it will go out. The “Heater On” indicator will remain lit.
If the “Pilot Out” light comes on during operation, it means that the burner has gone into “lockout” mode and must be restarted. If this happens, turn the Water Heater switch OFF for approximately 5 minutes, then turn back on.
Further Information
See the Water Heater manufacturer’s operation manual provided in your InfoCase for complete operating instructions, safety warnings, and maintenance information.
SOLAR CHARGE SYSTEM
–If Equipped
The roof-mounted Solar Charge System uses the sun to help keep your house batteries charged. The Connected Coach electrical screen will show you when the Solar Charge Panel is actively charging the house batteries.
The solar charging system installed in your motorhome has a maximum input rating of 510 Watts. Every solar panel connected to the system needs to be accounted for, this includes all roof mounted panels and the ground level single solar port.
3-Port Solar Cap
The Port Solar Cap (located on the roof) is intended to make it easy to add additional solar panels to the roof. The 3 -Port Solar Cap when fully loaded has a maximum input rating of 450 Watts.
3-Port Solar Cap
(Located on the roof)
Single Solar Port
–If Equipped
The Single Solar Port (located at ground level) is for using a portable solar panel, it has a maximum input rating of 150 Watts. The Single Solar Port is connected to the coach batteries through the solar charge controller (located inside rear driver side exterior compartment). When connecting a portable solar panel, a separate solar charge controller is not needed and will reduce the effectiveness of the portable solar panel.
Single Solar Port
(Located inside driver side exterior compartment-typical view)
NOTE: The Solar Charge System is not intended to make the coach battery system
“maintenance free.” It will not completely compensate for continuous low amperage draw from components such as the propane gas leak detector (if equipped), the dash radio clock, and the radio station memory circuitry, for example.
Although it can help to extend battery life, the motorhome shoreline should be plugged in routinely to “top off” the batteries. We also recommend following regular battery inspection and maintenance, especially in cold weather. See “Battery Care” in Section 6 – Electrical.
Further Information
Refer to the manufacturer’s user manual provided in your InfoCase for complete operating instructions.
WATER HEATER – GAS
–If Equipped
NOTE: Read the Water Heater operating guide provided in your InfoCase for complete operating instructions, safety warnings, and maintenance information before operating the Water Heater.
Ensure the Water Heater is filled with water before operating.
To fill the Water Heater, turn the Water Pump switch ON and open a hot water faucet anywhere in the motorhome. When water begins to flow steadily from the faucet, the Water Heater is full.
Propane Gas Operation
Your motorhome is equipped with one of the following System Monitor Panels shown below.
- Press the Water Heater switch (located on the Systems Monitor Panel) to the ON position.
Water heater controls on the Home Screen
-Typical View
- The “Pilot Out” light will glow for about 10-15 seconds, then it will go out. The “Heater On” indicator will remain lit.
- If the “Pilot Out” light comes on during operation, it means that the burner has gone into “lockout” mode and must be restarted. If this happens, turn the Water Heater switch OFF for approximately 5 minutes, then turn back on.
Further Information
See the Water Heater manufacturer’s operation manual provided in your InfoCase for complete operating instructions, safety warnings, and maintenance information.
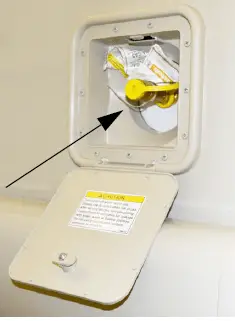
PRESSURE-TEMPERATURE RELIEF VALVE
On occasion, water may be seen seeping from the water heater pressure temperature relief valve. This is no cause for repair or replacement of the valve.
Water Heater Exterior Service Access
-Typical View
Normally there is an air gap at the top of the water heater tank, which acts as a pressure buffer. In time, however, heated water may expand and fill this air gap, causing a slight increase in water pressure. This may cause the P-T valve to “weep” until the air gap is manually replaced.
CAUTION
Hot water can escape from tank causing injury. Operate this valve only when the tank water is cold.
To Replace the Air Gap:
- Turn off the Water Heater switch and incoming water supply (city water and/or demand pump).
- Open a faucet in the motorhome to relieve water pressure.
- Pull the handle of the P-T valve straight out and allow water to flow until it stops.
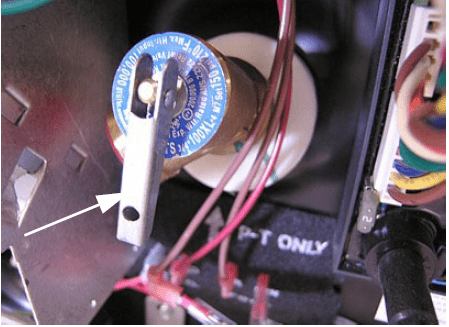 Lift handle straight out to open P-T valve when water heater is cold.
– Typical View - Let the handle of the P-T valve snap shut.
- Close the faucet and turn on the water supply before switching the water heater on. Manually operate the pressure temperature relief valve at least once a year.
NOTE: If your water heater is equipped with the motoraid system, it uses an extension from the engine cooling system to heat water in the water heater while driving. The engine cooling system must also be cold before opening the pressure-temperature relief valve. See “Motoraid Water Heater” for more information.
FURNACE – PROPANE GAS
–If Equipped
To Start Up
- Open the Propane Gas Tank valve by turning fully “counter-clockwise”.
- From the “Home” screen on the monitor panel select the temperature icon to open the climate screen. The temperature of the front and the rear of the motorhome can be adjusted using the up and down arrows to the desired temperature.
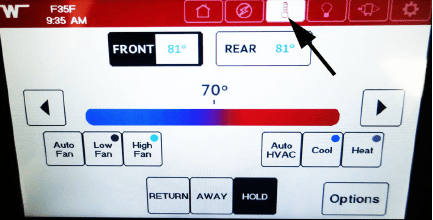
Press the temperature icon to access the climate screen.
-Typical View
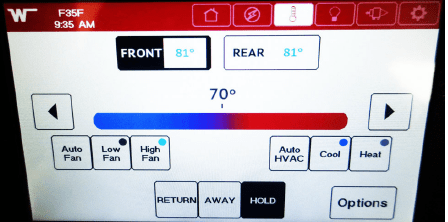
Use the left and right arrows to adjust the front and the rear of the motorhome to the desired temperature.
-Typical View
- The furnace fan should start to blow immediately after setting the thermostat.
After approximately 30 seconds, the furnace burner should light. The furnace should now cycle off and on automatically as the thermostat demands just like a household furnace.
If heat does not come out of the heat ducts after a minute or so, the burner is not lit.
Turn the thermostat off for 3-5 minutes, ensure Propane Gas Tank valve is open and tank is not empty, then repeat Steps 2-4.
If the furnace will not light after three attempts, go to “Shut Down” steps and contact your dealer or a local RV service center for repair.
NOTE: If the furnace burner has any residuals of metal protectant or lubricants used during manufacture of the furnace, it vmay smoke slightly when the furnace is used for the first time and may set off your smoke alarm.
We recommend that you provide adequate ventilation when using the furnace for the first time to avoid a nuisance smoke alarm.
We do not recommend removing the smoke alarm battery.
To Shut Down
- Below the temperature adjustment arrows for the front and the rear, push the “OFF” button on both.
- Close propane tank valve if motorhome will be stored for a period of time.
Further Information
Refer to the manufacturer’s user guide provided in your InfoCase for further information, including operating precautions, and periodic maintenance. See “Motorhome Maintenance Chart” in Section 11 – Maintenance and Storage for recommended intervals.
DUCTED ROOF AIR CONDITIONING SYSTEM
The furnace thermostat also controls ducted roof air conditioner operation when the Thermostat switch is placed in “Cool” position.
All cooling functions controlling to setpoint have a short cycle protection time delay of three minutes. There will be no delay if the cycle OFF time exceeds three minutes.
NOTE: The ducted roof air conditioning system has ceiling registers that can be closed if necessary to force more cool air toward a specific area of the motorhome or to route cool air away from a specific area. If too many vents are closed, however, it can cause the air conditioner unit to shut down, particularly in high humidity conditions.
Further Information
Refer to the manufacturer’s user guide provided in your InfoCase for complete operating instructions.
AIR CONDITIONER FILTER
The washable foam air conditioner filter is located in the ceiling-mounted return A/C grille in the lounge area of the motorhome.
It is recommended to check the filter monthly for dirt build-up and cleaned or replaced, as necessary.
Reference Links
View Full User Guide: Winnebago Adventurer 2023 User Manual
Download link: https://www.winnebago.com/owners/owner-resources/manuals-and-diagrams/operator-manuals