
Kia Stinger 2022 Fuses User Guide
The Kia Stinger 2022 is equipped with a complex electrical system that is safeguarded by fuses positioned throughout the car. Fuses are designed to protect the electrical components from damage caused by a power surge or short circuit. When an electrical problem arises, the corresponding fuse may blow, preventing further damage to the system. The Stinger 2022 has two fuse boxes, one located in the engine compartment and the other in the passenger compartment. The engine compartment fuse box includes high-current fuses that safeguard the main electrical systems, while the passenger compartment fuse box includes low-current fuses that protect the secondary electrical systems. The owner’s manual provides a detailed diagram of the fuse box layout, as well as a list of the fuses and their ratings, indicating the function and location of each fuse. It is vital to use the correct fuse rating when replacing a blown fuse, as using a fuse with a higher rating can cause damage to the electrical system or even lead to a fire. To replace a blown fuse, pull it out with a fuse puller tool and insert a new fuse of the same rating. It is suggested to keep spare fuses in the car at all times to ensure prompt replacement of any blown fuses. If replacing a fuse does not fix the electrical issue, it may be necessary to consult a qualified technician to diagnose and repair the problem. Never bypass a blown fuse or use a fuse with a higher rating than recommended, as it can cause severe damage to the electrical system and pose a safety risk.
Fuses
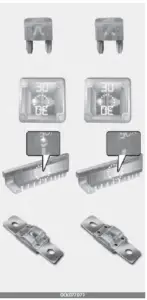
Blade type / Cartridge type / Multi fuse / Fusible link
- Left side : Normal , Right side :
Blown
A vehicles electrical system is protected from electrical overload damage by fuses.
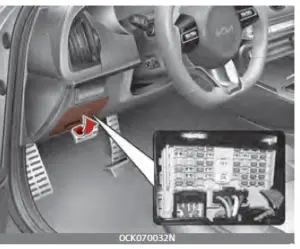
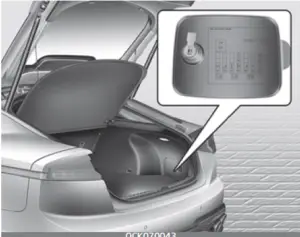
This vehicle has 4 (or 5) fuse panels, one located in the drivers side panel bolster, the other in the engine compartment near the battery.
If any of your vehicles lights, accessories, or controls do not work, check the appropriate circuit fuse. If a fuse has blown, the element inside the fuse will melt.
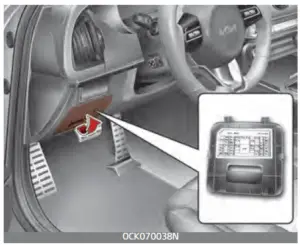
If the electrical system does not work, first check the drivers side fuse panel.
Always replace a blown fuse with one of the same rating.
If the replacement fuse blows, this indicates an electrical problem. Avoid using the system involved and immediately consult an authorized Kia dealer.
Three kinds of fuses are used: blade type for lower amperage rating, cartridge type, and multi fuse for higher amperage ratings.
WARNING
Fuse replacement
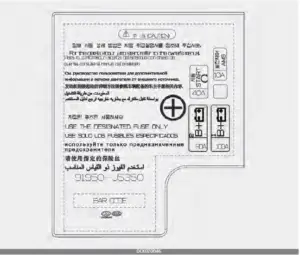
- Never replace a fuse with anything but another fuse of the same rating.
- A higher capacity fuse could cause damage and possibly a fire.
- Never install a wire or aluminum foil instead of the proper fuse – even as a temporary repair. It may cause extensive wiring dam-age and a possible fire.
- Do not arbitrarily modify or add-on electric wiring to the vehicle.
CAUTION
Do not use a screwdriver or any other metal object to remove fuses because it may cause a short circuit and damage the system.
NOTICE
- When replacing fuse, turn the ignition OFF and turn off switches of all electrical devices then remove battery (-) terminal.
- The actual fuse/relay panel label may differ from equipped items.
WARNING
Electrical Fire
Always ensure replacements fuses and relays are securely fastened when installed. Failure to do so can result in a vehicle fire.
CAUTION
- When replacing a blown fuse or relay, make sure the new fuse or relay fits tightly into the clips. Failure to tightly install the fuse or relay may cause damage to the wiring and electric systems.
- Do not remove fuses, relays and terminals fastened with bolts or nuts. The fuses, relays and terminals may not be fastened correctly which may cause vehicle damage.
CAUTION
- Do not input any other objects except fuses or relays into fuse/ relay terminals such as a driver or wiring. It may cause contact failure and system malfunction.
- Do not plug in screwdrivers or aftermarket wiring into the terminal originally designed for fuse and relays only. The electrical system and wiring of the vehicle interior may be damaged or burned due to contact failure.
- If you directly connect the wire on the taillight or replace the bulb which is over the regulated capacity to install trailers etc., the inner junction block can get burned.
CAUTION
Visually inspect the battery cap to ensure it is securely closed. If the battery cap is not securely closed, moisture may enter the system and damage the electrical components.
WARNING
Electrical wiring repairs
All electrical repairs should be per-formed by authorized Kia dealer-ships using approved Kia parts. Using other wiring components, especially when retrofitting AVN or theft alarm system, remote engine control, car phone or radio may cause vehicle damage and increase the risk of a vehicle fire.
NOTICE
Remodeling Prohibited
Do not rewire your vehicle in any way as doing so may affect the performance of several safety features in your vehicle. Rewiring your vehicle may also void your warranty and cause you to be responsible for any subsequent vehicle damage which may result.
NOTICE
Window tinting precaution
Window tint (especially metallic film) might cause communication disorder or poor radio reception, and malfunction of the automatic light-ing system due to excessive change of illumination inside the vehicle. The solution used might also flow into electric, electronic devices causing disorder and failure.
- Turn the ignition switch and all other switches off.
- Open the fuse panel cover.
If the switch is located in the OFF position, a caution indicator will be displayed in the cluster. - Pull the suspected fuse straight out.
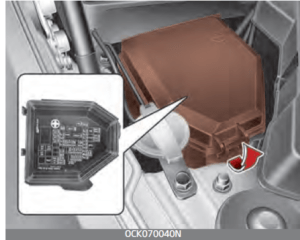
Use the removal tool provided on the engine compart-ment fuse panel cover.
- Check the removed fuse; replace it if it is blown.
Spare fuses are provided in the engine compartment fuse panel. - 5. Push in a new fuse of the same rating, and make sure it fits tightly in the clips.
If it fits loosely, consult an authorized Kia dealer.
If you do not have a spare, use a fuse of the same rating from a circuit you may not need for operating the vehicle, such as the power outlet fuse.
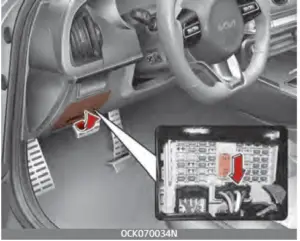
If the head lamp, turn signal lamp, stop signal lamp, fog lamp, DRL, tail lamp, HMSL do not work and the fuses are OK, check the fuse panel in the engine compartment. If a fuse is blown, it must be replaced.
NOTICE
If the headlamp, fog lamp, turn signal lamp, or tail lamp malfunction even without any problem to the lamps, have the vehicle checked by an authorized Kia dealer for assistance.
Fuse switch
Always set the fuse switch to the ON position before using the vehicle.
If you move the switch to the OFF position, some items such as audio and digital clock must be reset and transmitter (or smart key) may not work properly. When the switch is Off, the caution indicator will be dis-played on the instrument cluster.
Always place the fuse switch in the ON position while driving the vehicle.
If the switch is located in the OFF position, a caution indicator will be displayed in the cluster.
CAUTION
Fuse Panel Covers
The contact points of the switches may wear out with excessive use. Please refrain from excessive use of the switches (except for long-term parking for over 1 month).
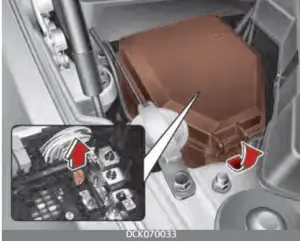
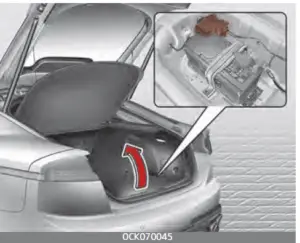
Engine compartment fuse replace-ment 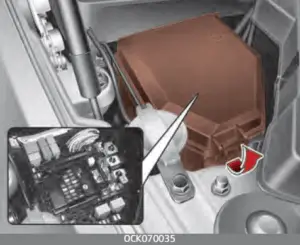
- Turn the ignition switch and all other switches off.
- Remove the fuse panel cover by pressing the tab and pulling the cover up. When the blade type fuse is disconnected, remove it by using the clip designed for changing fuses located in the engine compartment fuse box. Upon removal, securely insert reserve fuse of the same rating.
- Check the removed fuse; replace it if it is blown. To remove or insert the fuse, use the fuse puller in the engine compartment fuse panel.
- Push in a new fuse of the same rating, and make sure it fits tightly in the clips. If it fits loosely, consult an authorized Kia dealer.
CAUTION
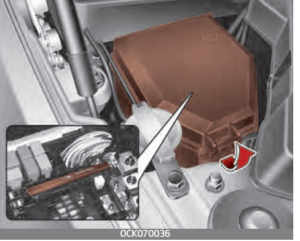
Always securely install the fuse panel cover in the engine compart-ment to protect against electrical failure which may occur from water contact. Listen for the audible click-ing sound to ensure fuse panel cover is securely fastened.
Multi fuse
If the multi fuse is blown, it must be removed as follows:
- Turn off the engine.
- Disconnect the negative battery cable.
- Remove the nuts shown in the picture above.
- Replace the fuse with a new one of the same rating.
- Reverse these steps to reinstall the multi fuse.
NOTICE
Do not disassemble nor assemble the multi fuse when it is secured with nuts and bolts. Incorrect or partial assembly torque may cause a fire. Have the vehicle checked by an authorized Kia dealer.
Main fuse

If the main fuse is blown, it must be removed as follows:
- Turn off the engine.
- Disconnect the negative battery cable.
- Remove the nuts shown in the picture above.
- Replace the fuse with a new one of the same rating.
- Reverse these steps to reinstall the main fuse.
NOTICE
The electronic system may not function correctly even when the engine compartment and internal fuse boxes individual fuses are not disconnected. In such case the cause of the problem may be disconnection of the main fuse.
Since the main fuse is designed more intricately than other parts, have the vehicle checked by an authorized Kia dealer.
Fuse/relay panel description Drivers side fuse panel
Engine compartment fuse panel
Rear fuse box panel
Battery box fuse panel.
Inside the fuse/relay panel covers, you can find the fuse/relay label describing fuse/relay name and capacity.
NOTICE
Not all fuse panel descriptions in this manual may be applicable to your vehicle. It is accurate at the time of printing. When you inspect the fuse panel in your vehicle, refer to the fuse panel label.
Drivers side fuse panel
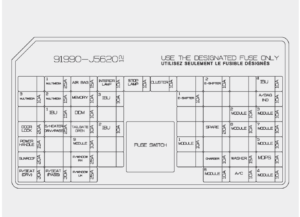
Instrument panel (Drivers side fuse panel)
| ‘uTF /BmF | ‘uTF
SBUJOH |
CJSDuJU 1SPUFDUFE |
| MULTI ME%IA 1 | 25A | Low %C-%C Converter (Audio) |
| AIR BAG | 15A | SRS (Supplemental Restraint System) Control Module, Passenger Occupant %ejection Sensor |
|
ROOM LAMP |
10A |
Overhead Console Lamp, Room Lamp, Vanity Lamp Switch Left Handle side/Right Handle side, Luggage Lamp Left Handle side/Right Handle side, Glove Box Lamp, %river/Passenger %poor Lamp, %river/Passenger Foot Lamp |
| STOP LAMP | 10A | IBU, Stop Lamp Switch |
| CLUSTER | 10A | Instrument Cluster, Head-Up %display |
| E-SHIFTER 2 | 10A | Electronic Auto Transmission Shift Lever (IG1) |
| ‘uTF /BmF | ‘uTF
SBUJOH |
CJSDuJU 1SPUFDUFE |
| IBU 4 | 10A | IBU (IG1) |
| MULTI ME%IA 3 | 10A | Instrument Cluster, Head-Up %display, Air Conditioner
Switch, 8ireless Charger |
| MULTI ME%IA 2 | 15A | Audio or A/V & Navigation Head Unit |
| MEMORY | 10A | Air Conditioner Control Module, Air Conditioner
Switch, Security Indicator, Head-Up %display |
| IBU 3 | 10A | IBU (B+) |
| E-SHIFTER 1 | 10A | Electronic Auto Transmission Shift Lever (B+) |
| AIR BAG IN% | 10A | Instrument Cluster, Passenger/Rear Seat Belt
Reminder Indagator |
| IBU 1 | 15A | IBU (B+) |
| %RIVER %OOR
MO%ULE |
10A | %river %poor Module, %river/Passenger Power Outside
Mirror |
| MO%ULE 2 | 10A | IBU (IG2) |
| MO%ULE 3 | 10A | Auto Transmission Shift Lever Switch, %river %poor
Module, Stop Lamp Switch |
| %OOR LOCK | 20A | %poor Lock Relay, %poor Unlock Relay |
| SEAT HEATER | 25A | Front Air Ventilation Seat Control Module, Front Seat
8armer Control Module |
| TAILGATE | 10A | Tail Gate Lid Relay, Fuel Lid Relay, Crash Pad Switch |
| IBU 2 | 10A | IBU (B+ (ESCL)), Rain Sensor |
| MO%ULE 8 | 10A | Cooling Fan Controller (BL%C Motor) |
|
MO%ULE 7 |
10A |
IBU, A8% (All 8heel %rive) ECM (Electronic Control Module), Auto Transmission Shift Lever Indicator, Console Switch (Front/Upper), SVM (Surround View Monitor), Crash Pad Switch, Steering Angle Sensor, Steering Tilt & Telescopic Module, ESC (Electronic Stability Control) Unit, Multi-Function Camera Unit, Front
Radar |
| PO8ER HAN%LE | 15A | Steering Tilt & Telescopic Module |
| MO%ULE 9 | 10A | %river Air Lumbar Control Unit |
|
MO%ULE 1 |
10A |
%ata Link Connector, Console Switch (Upper), %river/ Passenger/%poor Mood Lamp, Mood Lamp (Garnish),
Mood Lamp Monitor, Hazard Switch, Mood Lamp Unit |
| ‘uTF /BmF | ‘uTF
SBUJOH |
CJSDuJU 1SPUFDUFE |
|
MO%ULE 5 |
10A |
Air Conditioner Control Module, Air Conditioner Switch, Audio, A/V & Navigation Head Unit, %ata Link Connect, Head Lamp Left Handle side/Right Handle side, Low %C-%C Converter (Audio/AMP (Amplifier)), Electro Chromic Mirror, AMP (Amplifier), %river Inte- grated memory system Control Module, Front Air Ventilation Seat Control Module, Front/Rear Seat
8armer Control Module, 8ireless Charger |
| SUNROOF | 20A | Sunroof Control Unit (Glass) |
| PASSENGER PO8ER 8IN%O8 |
25A |
Passenger Safety Power 8indow Module, Rear Safety Power 8indow Module Right Handle side, Rear
%oor Module Right Handle side |
| CHARGER | 10A | Front/Rear USB Charger, Front Power Outlet (Cigar) |
| 8ASHER | 15A | Multifunction Switch |
| M%PS | 10A | M%PS (Motor %riven Power Steering) Unit |
| %RIVER PO8ER
SEAT |
30A | %river Integrated memory system Control Module,
%river Seat Manual Switch |
| PASSENGER
PO8ER SEAT |
30A | Passenger Seat Manual Switch |
| %RIVER PO8ER 8IN%O8 |
25A |
%river Power 8indow Module, Rear Power 8indow Module Left Handle side, Rear Safety Power 8indow
Module Left Handle side |
|
MO%ULE 6 |
10A |
IBU, Low %C-%C Converter (Audio/AMP (Amplifier)), Electronic Auto Transmission Shift Lever (SB8 (Shift By 8ire)), Engine Room Junction Block (Power Outlet
Relay) |
| A/C | 10A | Air Conditioner Control Module, Air Conditioner
Switch, Engine Room Junction Block (Blower Relay) |
| MO%ULE 4 | 10A | Head Lamp Left Handle side/Right Handle side, AFS
Control Unit |
Engine compartment fuse panel

Engine room compartment fuse panel
| ‘uTF /BmF | ‘uTF
SBUJOH |
CJSDuJU 1SPUFDUFE |
| ALT | 175A
250A |
Alternator, Multi Fuse – C/FAN1/B+4/B+3/B+2/B+1/
EOP/BLO8ER/PO8ER TAIL GATE |
| START | 30A | Start Relay |
| C/FAN 2 | 100A | [BL%C (Brushless %direct Current) Motor & (Gasoline)
3.3 T-G%i] ] Cooling Fan Controller |
| C/FAN 1 | 80A | [BL%C (Brushless %direct Current) Motor Smartstream
G2.5 FR T-G%i] Cooling Fan Controller |
|
B+3 |
50A |
Instrument Panel Junction Block (Fuse – STOP LAMP/ Leak Current Autocut %sevice (Fuse INTERIOR LAMP,
%%M, IBU3, MEMORY, MULTI ME%IA1, MULTI ME%IA2, MULTI ME%IA3)) |
| ‘uTF /BmF | ‘uTF
SBUJOH |
CJSDuJU 1SPUFDUFE |
|
B+2 |
50A |
Instrument Panel Junction Block (Fuse – %OOR LOCK / PO8ER HAN%LE/SUNROOF/%RIVER PO8ER SEAT/
PASSENGER PO8ER SEAT) |
|
B+1 |
50A |
Instrument Panel Junction Block (Fuse – SEAT HEATER/TAIL GATE/MO%ULE 9/PASSENGER PO8ER
8IN%O8/%RIVER PO8ER 8IN%O8) |
| EOP | 50A | Electric Oil Pump |
| ESC 1 | 25A | ESC (Electronic Stability Control) Control Module |
| ESC 2 | 25A | ESC (Electronic Stability Control) Control Module |
| BLO8ER | 40A | Blower Relay |
| PO8ER TAIL-
GATE |
30A | Power Tail Gate Module |
| M%PS | 100A | M%PS (Motor %riven Power Steering) Unit |
| B+4 | 60A | Engine Control Relay, Fuse – HORN / 8IPER1 / H/
BEAM H/LAMP / B/ALARM) |
| E-CVVT 1 | 40A | [Smartstream G2.5 FR T-G%i] E-CVVT Relay |
| VACUUM PUMP | 20A | [(Gasoline) 2.0 FR T-G%i, (Gasoline) 3.3 T-G%i]
Vacuum Pump Relay |
| A8% | 20A | A8% (All 8heel %rive) ECM (Electronic Control Module) |
| IG 2 | 20A | IG2 Relay |
| PO8ER OUTLET 2 | 20A | Rear Power Outlet |
| PO8ER OUTLET 1 | 20A | Front Power Outlet #1 |
| A/C 1 | 10A | Air Conditioner Control Module |
| E-CVVT 3 | 20A | [Smartstream G2.5 FR T-G%i]
ECM (Engine Control Module) |
| E-CVVT 2 | 20A | [Smartstream G2.5 FR T-G%i]
ECM (Engine Control Module) |
| ESC 3 | 10A | ESC (Electronic Stability Control) Control Module |
| ECU 3 | 10A | ECM (Engine Control Module) |
| ECU 2 | 15A | ECM (Engine Control Module) |
| HORN | 20A | Horn Relay |
| 8IPER 1 | 30A | 8iper Power Relay |
| ‘uTF /BmF | ‘uTF
SBUJOH |
CJSDuJU 1SPUFDUFE |
| TCU 2 | 15A | TCM (Transmission Control Module), Electronic Oil
Pump |
|
O2S ENSOR |
15A |
[Smartstream G2.5 FR T-G%i] Oxygen Sensor (UP/
%O8N) [(Gasoline) 3.3 T-G%i] Oxygen Sensor #1/#2/#3/#4 |
| TCU 1 | 20A | TCM (Transmission Control Module) |
| 8IPER 2 | 10A | ECM (Engine Control Module), IBU, 8iper Motor, Front
8iper (Low) Relay |
| SENSOR 1 | 15A | Fuel pump relay
[Smartstream G2.5 FR T-G%i ] Injector #1/#2/#3/#4 |
|
IGN COIL |
20A |
[Smartstream G2.5 FR T-G%i] Ignition Coil #1/#2/#3/ #4
[(Gasoline) 3.3 T-G%i] Ignition Coil #1/#2/#3/#4/#5/ #6 |
| H/BEAM H/LAMP | 10A | Head Lamp (High) Relay |
| ECU 1 | 20A | ECM (Engine Control Module) |
|
SENSOR 2 |
10A |
Recirculation Valve Control Solenoid Valve, Purge Control Solenoid Valve, Canister Close Valve[Smartstream G2.5 FR T-G%i] Variable Oil Pump, Oil Control Valve, Air Conditioner Relay [(Gasoline) 3.3 T-G%i] Electronic Thermostat, Oil Pressure Solenoid Valve, Oil Control Valve #1/#2/ #3/#4 (Intake/Exhaust), Variable Exhaust Flap
Actuator LH/RH |
| E8P | 20A | Electric 8ater Pump |
| A/C 2 | 10A | Air Conditioner Relay |
| 3FMBy /BmF | TyQF |
| Vacuum Pump Relay | ISO HC MICRO |
| Power Outlet Relay | ISO HC MICRO |
| Blower Relay | ISO HC MICRO |
| Start Relay | ISO HC MICRO |
| E-CVVT Relay | ISO MICRO |
Rear fuse box panel

Rear fuse box panel
| ‘uTF /BmF | ‘uTF
SBUJOH |
CJSDuJU 1SPUFDUFE |
| ECS | 15A | ECS (Electronic Control Suspension) Unit |
| REAR S/HEAT | 20A | Rear Seat 8armer Control Module |
| HEAT MIRROR | 10A | Air Conditioner Switch, %river/Passenger Power Out-
side Mirror |
| FUEL PUMP | 20A | Fuel Pump Relay |
| REAR HEATE% | 40A | Rear Heated Relay |
| AMP 2 | 25A | AMP (Amplifier) (MOBIS/PREMIUM) |
| AMP 1 | 30A | Low %C-%C Converter (AMP (Amplifier)) |
| IG 1 | 15A | IG1 Relay |
| ACC | 30A | Instrument Panel Junction Block ((Fuse – PO8ER OUT-
LET/ CHARGER/ MO%ULE6) |
| B+1 | 30A | Instrument Panel Junction Block (Fuse – IBU1/IBU2/
IPS2/IPS5/IPS6/IPS8/IPS9/IPS10)) |
| B+2 | 30A | Instrument Panel Junction Block (Fuse – E-SHIFTER/
MO%ULE1/IPS1/IPS4/IPS7) |
Battery box fuse panel
Battery box fuse panel
| ‘uTF /BmF | ‘uTF
SBUJOH |
CJSDuJU 1SPUFDUFE |
| B+1 | 100A | Rear Sub Junction Block (Fuse – FUEL PUMP / REAR
HEATE%/ AMP1) |
| B+2 | 80A | Rear Sub Junction Block (%CU Relay, Fuse – ECS1 /
REAR S/HEAT / IG1) |
| START | 40A | Engine Room Junction Block (Power Outlet Relay),
Fuse -START / ECU2 / TCU1) |
| AMS | 10A | Battery Sensor |
Q&A
- What are fuses in the Kia Stinger 2022?
Fuses are electrical components designed to protect the car’s electrical system from damage caused by a power surge or short circuit. - Where are the fuse boxes located in the Kia Stinger 2022?
The Kia Stinger 2022 has two fuse boxes: one located in the engine compartment and another in the passenger compartment. - What type of fuses are found in the engine compartment fuse box?
The engine compartment fuse box contains high-current fuses that protect the main electrical systems of the car. - What type of fuses are found in the passenger compartment fuse box?
The passenger compartment fuse box contains low-current fuses that protect the secondary electrical systems of the car. - How can you identify the location and function of each fuse in the Kia Stinger 2022?
The location and function of each fuse are indicated in the owner’s manual, which provides a detailed diagram of the fuse box layout and a list of the fuses and their ratings. - What can happen if you use a fuse with a higher rating than recommended in the Kia Stinger 2022?
Using a fuse with a higher rating can cause damage to the electrical system or even start a fire. - What should you do if a fuse blows in the Kia Stinger 2022?
If a fuse has blown, it can be easily replaced by pulling it out with a fuse puller tool and inserting a new fuse of the same rating. - Is it recommended to carry spare fuses in the Kia Stinger 2022?
Yes, it is recommended to always carry spare fuses in the car to ensure that any blown fuses can be replaced quickly and easily. - What should you do if replacing a fuse does not resolve an electrical issue in the Kia Stinger 2022?
If replacing a fuse does not resolve the electrical issue, it may be necessary to seek the assistance of a qualified technician who can diagnose and repair the problem. - Can bypassing a blown fuse in the Kia Stinger 2022 cause any harm?
It is important to never bypass a blown fuse or use a fuse with a higher rating than recommended, as this can result in serious damage to the electrical system and even pose a safety risk. - What are some of the electrical systems in the Kia Stinger 2022 that are protected by fuses?
The electrical systems that are protected by fuses in the Kia Stinger 2022 include the lights, air conditioning, power windows, audio system, and engine control module. - Can a blown fuse in the Kia Stinger 2022 cause any warning lights to appear on the dashboard?
Yes, a blown fuse can cause warning lights to appear on the dashboard, indicating a problem with the affected electrical system. - What should you do if you are unsure of which fuse to replace in the Kia Stinger 2022?
If you are unsure of which fuse to replace, consult the owner’s manual or seek the assistance of a qualified technician. - What is the purpose of a fuse puller tool in the Kia Stinger 2022?
A fuse puller tool is used to safely and easily remove a blown fuse from the fuse box in the Kia Stinger 2022. - Can the fuse boxes in the Kia Stinger 2022 be easily accessed?
Yes, the fuse boxes in the Kia Stinger 2022 are easily accessible, making it easy to replace blown fuses when necessary.
2023 Kia Stinger Specs, Price, Features, Mileage (Brochure)
Useful Link
Download Manuals: https://owners.kia.com/content/owners/en/manuals.html