
Nissan ALTIMA 2023 NissanConnect® Owner’s Manual and RearView Monitor
The 2023 Nissan Altima blends state-of-the-art technology with intuitive amenities, such as the RearView Monitor and the Connect® Owner’s Manual. For convenient access, the Connect® Owner’s Manual is offered in print and digital format. It offers thorough instructions on all vehicle features, maintenance, and troubleshooting. Concurrently, the RearView Monitor improves convenience and safety by providing a real-time video feed of the area behind the car when it is in reverse, together with dynamic parking aid instructions. When combined, these innovations give Altima owners the knowledge and resources they require for a smooth and safe driving experience, making every trip in the 2023 Altima both educational and secure.
2023 Nissan Altima Specs, Price, Features and Mileage (Brochure)
NissanConnect® Owner’s Manual
Refer to the digital NissanConnect® Owner’s manual using the QR code on this page, or your printed NissanConnect® Owner’s manual (if so equipped). This manual includes the following information:
- NissanConnect® Services (if so equipped)
- Navigation system (if so equipped)
- Audio system
- Apple CarPlay® (if so equipped)
- Android Auto™ (if so equipped)
- Bluetooth® Hands-Free Phone system
- Viewing information
- Other settings
- Voice recognition
- General system information
Control panel buttons
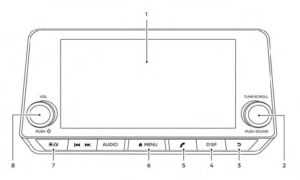
- Display screen
- TUNE·SCROLL knob / PUSH SOUND button
- BACK button
- DISP button
- button*
- MENU button
- (brightness control) button
- VOL (volume) knob / PUSH button
When you use this system, make sure the engine is running. If you use the system with the engine not running for a long time, it will discharge the battery, and the engine will not start.
Reference symbols:
“Example” — Words marked in quotes refer to a key shown only on the display. These keys can be selected by touching the screen.
How to use the touch-screen
CAUTION
The glass display screen may break if it is hit with a hard or sharp object. If the glass screen breaks, do not touch it. Doing so could result in an injury. To clean the display, never use a rough cloth, alcohol, benzine, thinner or any kind of solvent or paper towel with a chemical cleaning agent. They will scratch or deteriorate the panel. Do not splash any liquid such as water or car fragrance on the display. Contact with liquid will cause the system to malfunction. To help ensure safe driving, some functions cannot be operated while driving. The on-screen functions that are not available while driving will be “grayed out” or muted.

| Menu Item | Result | |
| Selecting the item | Touch an item to select. To select the “Phone” key, touch the “Phone” key on the screen. Touch the “ ” key to return to the previous screen. | |
| Adjusting the item | Touch the “+” key or the “−” key to adjust the settings of an item. Touch the up arrow to scroll up the page one item at a time. Touch the down arrow to scroll down the page one item at a time. | |
| Inputting characters | Touch the number key. There are some options available when inputting characters. | |
| 123 | Touch to manually enter numbers. | |
| OK | Completes the character input. | |
Touch-screen maintenance
If you clean the display screen, use a dry, soft cloth. If additional cleaning is necessary, use a small amount of neutral detergent with a soft cloth. Never spray the screen with water or detergent. Dampen the cloth first and then wipe the screen.
 HOW TO USE THE MENU BUTTON
To select and/or adjust several functions, features and modes that are available for your vehicle:
- Press the MENU button.
- Touch the “Settings” key.
- Touch the desired item.
(brightness control) BUTTON
To change the display brightness, press the button. Pressing the button again will change the display to the day or night display. Press and hold the button for more than 2 seconds to turn the display off. Press and hold the button again to turn the display on.
HOW TO USE THE VOL (volume)KNOB / PUSH (power)
Press the PUSH (power) button to turn the audio function on and off. Turn the VOL (volume) knob to adjust the audio volume.

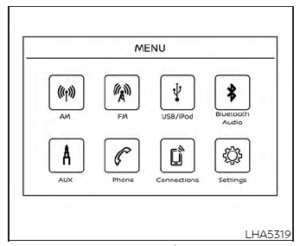
SELECTING MENU FROM LAUNCH BAR
Various system functions can be accessed by touching the items on the Launch Bar 1O which is displayed on most of the main menu screens (the Launch Bar does not appear on some screens such as settings screens, camera screens, etc.) Touch the keys on the Launch Bar to display the corresponding menu screens.
The following menu items are available on the Launch Bar:
- AM
- FM
- USB/iPod
- Bluetooth
- AUX
- Settings
REARVIEW MONITOR (if so equipped)
- CAMERA or DISP button
WARNING
Failure to follow the warnings and instructions for proper use of the Rear-View Monitor system could result in serious injury or death. Rear View Monitor is a convenience feature and is not a substitute for proper backing. Always turn and look out the windows and check mirrors to be sure that it is safe to move before operating the vehicle. Always back up slowly. The system is designed as an aid to the driver in showing large stationary objects directly behind the vehicle, to help avoid damaging the vehicle. The distance guide lines and the vehicle width lines should be used as a reference only when the vehicle is on a level paved surface. The distance viewed on the monitor is for reference only and may be different than the actual distance between the vehicle and displayed objects.
CAUTION
Do not scratch the camera lens when cleaning dirt or snow from the front of the camera. The RearView Monitor system automatically shows a rear view of the vehicle when the shift lever is shifted into the R (Reverse) position. The radio can still be heard while the RearView Monitor is active.
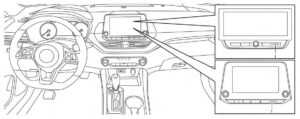
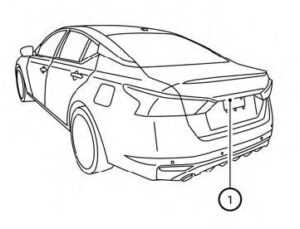 To display the rearview, the RearView Moni-tor system uses a camera located just above the vehicle’s license plate 1O.
REARVIEW MONITOR SYSTEM OPERATION
With the ignition switch in the ON position, move the shift lever to the R (Reverse) position to operate the RearView Monitor.
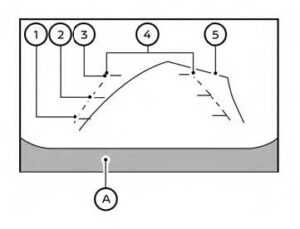
HOW TO READ THE DISPLAYED LINES
Guiding lines which indicate the vehicle width and distances to objects with reference to the vehicle body line OA are displayed on the monitor.
Distance guidelines
Indicate distances from the vehicle body.
- Redline 1O: approx. 1.5 ft (0.5 m)
- Yellow line 2O: approx. 3 ft (1 m)
- Green line 3O: approx. 7 ft (2 m)
Vehicle width guide lines 4O
Indicate the vehicle width when backing up.
Predicted course lines 5O
Indicate the predicted course when backing up. The predicted course lines will be displayed on the monitor when the shift lever is in the R (Reverse) position and the steering wheel is turned. The predicted course lines will move depending on how much the steering wheel is turned and will not be displayed while the steering wheel is in the straight-ahead position. The vehicle width guide lines and the width of the predicted course lines are wider than the actual width and course.
DIFFERENCE BETWEEN PREDICTED AND ACTUAL DISTANCES
The displayed guidelines and their locations on the ground are for approximate reference only. Objects on uphill or downhill surfaces or projecting objects will be actually located at distances different from those displayed in the monitor relative to the guidelines (refer to illustrations). When in doubt, turn around and view the objects as you are backing up, or park and exit the vehicle to view the positioning of objects behind the vehicle.
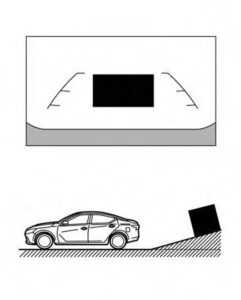
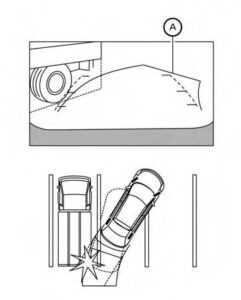
Backing up on a steep uphill
When backing up the vehicle up a hill, the distance guide lines and the vehicle width guide lines are shown closer than the actual distance. Note that any object on the hill is further than it appears on the monitor.
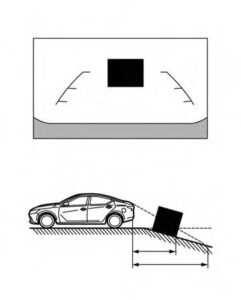
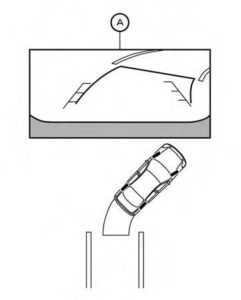
Backing up on a steep downhill
When backing up the vehicle down a hill, the distance guide lines and the vehicle width guide lines are shown farther than the actual distance. Note that any object on the hill is closer than it appears on the monitor.
Backing up near a projecting object
The predicted course lines OA do not touch the object in the display. However, the vehicle may hit the object if it projects over the actual backing up course.
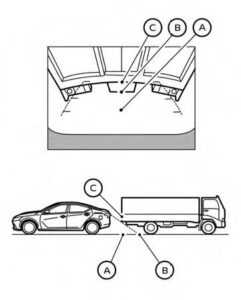
Backing up behind a projecting object
The position OC is shown farther than the position OB in the display. However, the position OC is actually at the same distance as the position OA . The vehicle may hit the object when backing up to the position OA if the object projects over the actual backing-up course.
HOW TO PARK WITH PREDICTED COURSE LINES
WARNING
- If the tires are replaced with different-sized tires, the predicted course lines may be displayed incorrectly.
- On a snow-covered or slippery road, there may be a difference between the predicted course line and the actual course line.
- If the battery is disconnected or becomes discharged, the predicted course lines may be displayed incorrectly. If this occurs, please perform the following procedures:
- Turn the steering wheel from lock to lock while the engine is running.
- Drive the vehicle on a straight road for more than 5 minutes.
- When the steering wheel is turned with the ignition switch in the ACC position, the predicted course lines may be displayed incorrectly.
- Visually check that the parking space is safe before parking your vehicle.
- The rear view of the vehicle is displayed on the screen OA when the shift lever is moved to the R (Reverse) position.
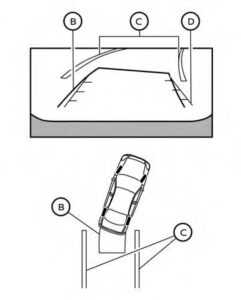
- Slowly back up the vehicle adjusting the steering wheel so that the predicted course lines OB enter the parking space OC .
- Maneuver the steering wheel to make the vehicle width guide lines OD parallel to the parking space OC while referring to the predicted course lines.
- When the vehicle is parked in the space completely, move the shift lever to the P (Park) position and apply the parking brake.
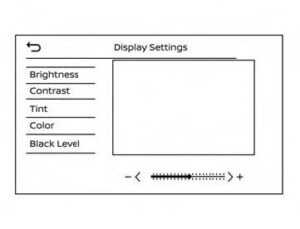
Type A (if so equipped)
ADJUSTING THE SCREEN
For vehicles with the DISP button (Type A)
- Press the MENU button.
- Touch the “Settings” key.
- Touch the “Camera” key
- Touch the “Display Settings” key.
- Touch the “Brightness”, “Contrast”, Tint”, “Color”, or “Black Level” key.
- Adjust the item by touching the “+” or “–” key on the touch-screen display.
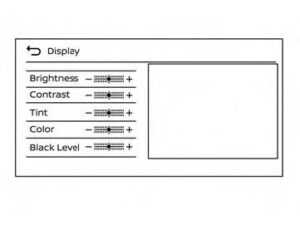
Type B (if so equipped)
For vehicles with a CAMERA button
- Type A
- Press the CAMERA button.
- Touch the “Display Settings” key.
- Touch the “Brightness”, “Contrast”, Tint”, “Color”, or “Black Level” key.
- Adjust the item by touching the “+” or “–” key on the touch-screen display.
- Type B
- Press the CAMERA button.
- Touch the “Display Settings” key.
- Adjust the items (“Brightness”, “Contrast”, “Tint”, “Color” or “Black Level”) by touching the “+” or “–” key on the touch-screen display.
NOTE:
Do not adjust any of the display settings of the RearView Monitor while the vehicle is moving.
HOW TO TURN ON AND OFF PREDICTED COURSE LINES
For vehicles with a CAMERA button
To toggle ON and OFF the predicted course lines while in the P (Park) position:
- Press the CAMERA button.
- Touch the “Predicted Course Lines” key to turn the feature ON or OFF.
- To toggle ON and OFF the predicted course lines while in the R (Reverse) position, press the CAMERA button.
For vehicles with the DISP button
To toggle ON and OFF the predicted course lines while in the P (Park) position:
- Touch the “Settings” key.
- Touch the “Camera” key.
- Touch the “Predicted Course Lines” key to turn the feature ON or OFF.
REARVIEW MONITOR SYSTEM LIMITATIONS
WARNING
Listed below are the system limitations for RearView Monitor. Failure to operate the vehicle in accordance with these system limitations could result in serious injury or death. The system cannot completely eliminate blind spots and may not show every object. Underneath the bumper and the corner areas of the bumper cannot be viewed on the RearView Monitor because of its monitoring range limitations. The system will not show small objects below the bumper, and may not show objects close to the bumper or on the ground. Objects viewed in the RearView Monitor differ from an actual distance because a wide-angle lens is used.

- U button
- (brightness control) button
How to use the VOL (volume) knob / - PUSH (power) button
- Selecting menu from launch bar
- RearView Monitor (if so equipped)
- RearView Monitor system operation
- How to read the displayed lines
- The difference between predicted and actual distances
- How to park with predicted course lines
- Adjusting the screen
- How to turn on and off predicted course lines
- RearView Monitor system limitations
- System maintenance
FAQ
The Connect® Owner’s Manual is typically provided in print form with the vehicle, and a digital version may be available through the vehicle’s infotainment system or Nissan’s official website.
Yes, the owner’s manual typically covers a wide range of topics, including vehicle features, maintenance schedules, and troubleshooting guidance.
Many automakers, including Nissan, provide digital copies of owner’s manuals on their official websites, allowing you to download and view them on your device.
Yes, the owner’s manual often includes detailed instructions for using the infotainment system, including features like navigation, audio controls, and smartphone integration.
The RearView Monitor is a safety feature that uses a camera to provide a live video feed of the area behind the vehicle when the car is in reverse, helping the driver to park and avoid obstacles.
Typically, the RearView Monitor is automatically activated when you shift into reverse gear.
Many RearView Monitor systems include dynamic guidelines on the display to help drivers judge distances and maneuver safely while parking.
Yes, you can often disable the RearView Monitor system through the vehicle’s settings or controls.
The effectiveness of the RearView Monitor can vary depending on lighting conditions, but it is designed to be useful in various lighting situations.
The RearView Monitor is often part of a broader safety suite in modern vehicles, which may include features like blind-spot monitoring, lane departure warning, and more.
Many vehicles allow you to customize the display settings of the RearView Monitor for optimal visibility.
Refer to the owner’s manual for specific maintenance and cleaning instructions for the RearView Monitor camera to ensure it remains functional.
The RearView Monitor typically provides visual information, but some vehicles may also include audible warnings when obstacles are detected.
Upgrading the RearView Monitor system aftermarket may be possible, but it’s essential to consult with professionals to ensure compatibility and proper installation.
If you encounter problems with the RearView Monitor, the owner’s manual should provide troubleshooting guidance, or you can contact a Nissan dealership for assistance.
Useful Link
View Full User Guide: Nissan ALTIMA 2023 User Guide
Download Manuals: https://www.nissanusa.com/owners/ownership/manuals-guides.html
2023 Nissan Altima Specs, Price, Features and Mileage (Brochure)