Winnebago Adventurer 2023 Driving Your Motorhome User Manual
Driving Your Motorhome
The information in this section refers only to features installed or adapted to the dash and driver compartment area by Winnebago Industries®. It also includes passenger seating in the living area of the motorhome.
Further Information
See the chassis manual in your InfoCase for all original chassis related controls, instrumentation, switches, and other features. This includes items such as transmission, parking brakes, cruise control, gauges, wipers, lights, etc.
SEATS – DRIVER/CO-PILOT
The driver and co-pilot seats may be independently adjusted to suit individual preference.
The seats may be swiveled to provide easy entrance and exit. The swivel feature also allows the seats on most models to be turned toward the living area for additional seating while the unit is parked.
WARNING
Assure seat is in its forward and locked position for travel. Do not adjust seat while vehicle is in motion. Failure to comply may result in injuries.
Driver Seat
-Typical View
Passenger Seat
-Typical View
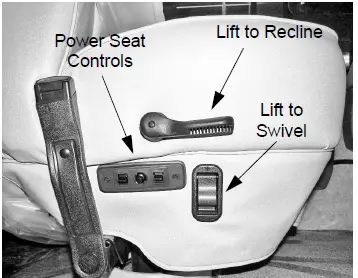
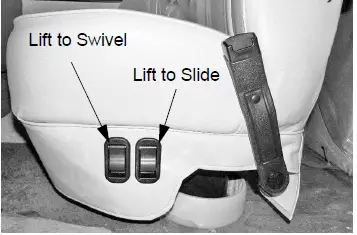
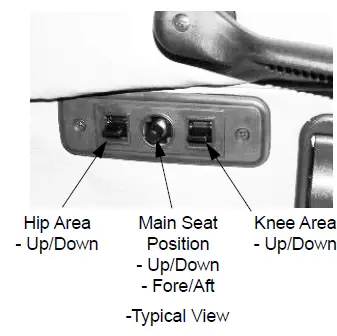
Multi-Adjustable Power Seat –If Equipped
The power seat controls are located on the lower right hand side of the driver seat base.
To Face Driver Seat Rearward
Manual Seat
- Tilt the steering wheel all the way up.
Put the left armrest down.
Swivel the seat to the right until it just contacts the steering wheel, then slide the seat ahead all the way. - Lift the recliner lever and let the seat back tilt ahead to clear the steering wheel.
Swivel the seat the rest of the way to face the living area. - Tilt the steering wheel down.
Reverse the procedure to face the seat forward.
Power Seat
- Tilt the steering wheel all the way up and put the left armrest down.
Move the seat rearward fully and then ahead a few inches.
Swivel the seat to the right until it just contacts the steering wheel, then move the seat ahead all the way to clear the steering wheel.
Swivel the seat the rest of the way to face the living area.
Position the tilt wheel down and to provide maximum clearance to recline the seat.
Reverse the procedure to face the seat forward.
Armrest Adjustment –If Equipped
The armrests may be swung upward out of the way for easy exit or access to the front seats. A roller on the underside of the front of the armrest also lets you adjust the resting angle for personal comfort, whether the seat is upright or reclined.
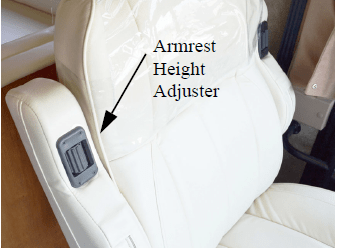
-Typical View
CO-PILOT FOOTREST
–If Equipped
The co-pilot seat may be equipped with a manual footrest that provides greater utility to be used as a lounge chair when rotated for television viewing or as part of a lounge conversational area.
- To extend footrest, lift black footrest lever (located on right-hand side of seat).
To retract footrest, push downward with your legs and the footrest will close.
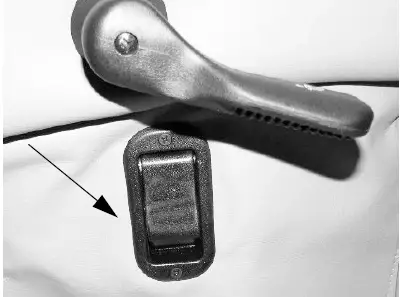
Footrest Lever
(Located on right-hand side of co-pilot seat)
-Typical View
SEAT BELTS
Seats intended for occupancy while the vehicle is in motion are equipped with seat belts for the protection of the driver and passengers.
Lap Belts
The lap belts must be worn as low as possible and fit snugly across the hip area. Always sit erect and well back into the seat. To gain full protection of the safety belt, never let more than one person use the same safety belt at any one time, and do not let the safety belts become damaged by pinching them in the doors or in the seat mechanism. After any serious accident, any seat belts which were in use at the time must be inspected and replaced if necessary.
Adjustment
To lengthen belt, swivel the tab end at a right angle to belt and pull strap to desired length. To shorten, pull loose end of belt.
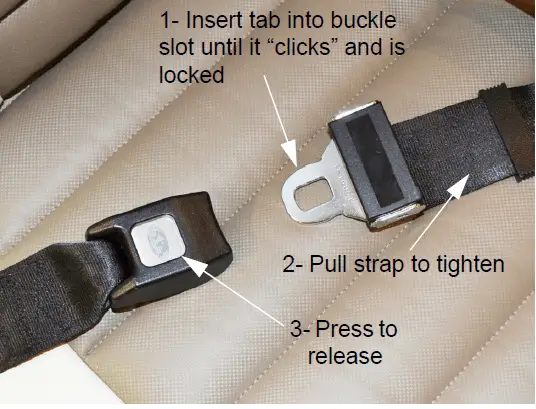
To Fasten
Be sure belt is not twisted. Grasp each part of the belt assembly and push tongue into buckle. Adjust to a snug fit by pulling the loose end away from the tongue.
To Release
Press button in center of buckle and slide tongue out of buckle.
WARNING
Snug and low belt positions are essential. This will ensure that the force exerted by the lap belt in a collision is spread over the strong hip area and not across the abdomen, which could result in serious injury.
Only seats equipped with seat belts are to be occupied while vehicle is in motion. Swivel seats must be in the locked, forward facing position while vehicle is in motion.
Lap/Shoulder Belts
Fastening
Hold the belt just behind the tongue. Next, bring the belt across the body and insert the tongue into the buckle until the latch engages.
Unfastening
Press the release button in the buckle. Hold onto the tongue when you release it from the buckle to keep it from retracting too rapidly.
When the lap-shoulder belt is in use, the lap belt must ride low across the hip area and the shoulder belt must ride diagonally over the shoulder toward the buckle.
The shoulder belt is designed to lock only during a sudden stop, sudden body movement, or a collision. At all other times it will move freely with the occupant.
WARNING
Never wear the shoulder belt in any position other than as stated above. Failure to do so could increase the chance or extent of injury in a collision.
Seat Belt Care and Cleaning
- Be careful not to damage the belt webbing and hardware. Take care not to pinch them in the seat or doors.
Inspect the belts and hardware periodically. Check for cuts, frays, and loose parts. Damaged parts should be replaced. Do not remove or modify the belt system. - Keep belts clean and dry. If the belts need cleaning, use only a mild soap and water solution. Do not use hot water. Do not use abrasive cleaners, bleach, or dyes. These products may weaken the belts.
Replace any belt assembly that was used during a severe impact. Replace the complete assembly even if damage is not apparent.
CHILD RESTRAINTS
–If Equipped
A properly installed and secured child restraint system can help reduce the chance or severity of personal injury to a child in an accident or during a sudden maneuver. Children may have a greater chance of being injured in an accident if they are seated in a child restraint system which is not properly secured.
A child restraint system is designed to be secured in a vehicle seat by a lap belt or the lap belt portion of a lap-shoulder belt.
When purchasing a child restraint system, follow these guidelines:
- Look for the label certifying that it meets all applicable safety standards.
- Make sure that it will attach to your vehicle and restrain your child securely and conveniently so that you are able to install it correctly each time it is used.
- Be certain that it is appropriate for the child’s height, weight, and development. The instructions and/or the regulation label attached to the restraint typically provides this information.
- Review the instructions for installation and use of the restraint. Be sure that you understand them fully and can install the restraint properly and safely in your vehicle.
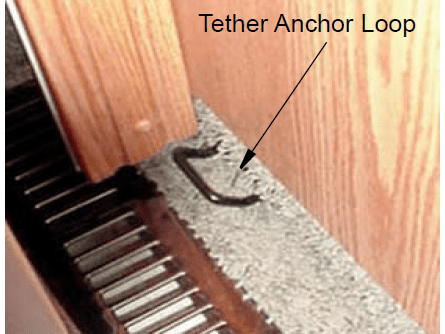
Tether Anchor Loop
–If Equipped
If your motorhome has a dinette, it may be equipped with a child seat tether anchor loop located on the floor directly behind the forward facing dinette seat.
The dinette table must be in the lowered position when a child seat is in use.
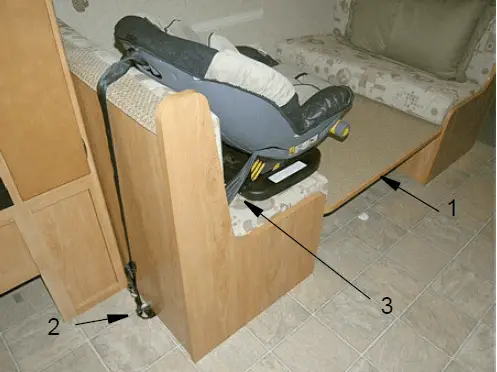
- Lower the dinette table.
- Route the tether over the top of the dinette seat back and hook it to the anchor loop on the floor.
- Fasten the lap belt.
Typical Installation
Model 35F
On Model 35F, the tether anchor loop is located behind an access opening underneath the dinette. Lower dinette table and remove dinette cushion and bench board to access.
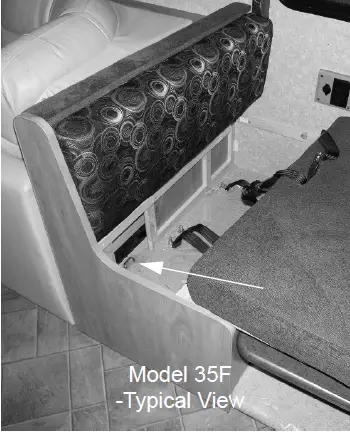
See the child seat manufacturer’s specific instructions for proper attachment and adjustment of the tether and seat belts.
KEYS
Your motorhome is supplied with several keys. In addition to the chassis manufacturer’s ignition key, you receive keys for the entrance door and exterior compartment doors.
Keys have an identification number, either a small metal tag or stamped into the key head. These numbers are recorded on the vehicle’s component model/serial sheet, which is included in your InfoCase. In case keys are lost or stolen, your dealer or a locksmith can provide you with duplicate keys or modify the locks.
PASSENGER WORKSTATION
–If Equipped
(Typical View – Your motorhome may differ in appearance)
Your motorhome is featured with a passenger in-dash workstation, for your convenience.
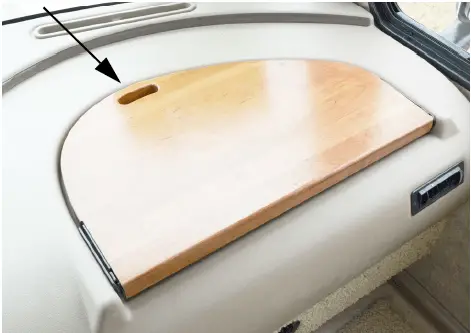
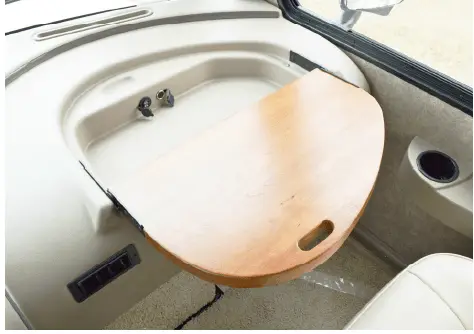
- Reverse step to store passenger workstation.
-
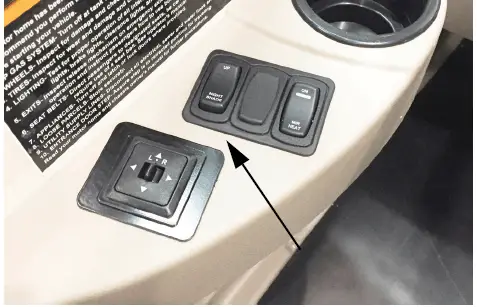
MIRRORS – POWER ELECTRIC
- –If Equipped
- Always adjust mirrors for maximum rear visibility before driving off. Make sure the seat is adjusted for proper vehicle control and that you are sitting back squarely into the seat.
- Mirror Adjustment Control
The mirror control is located on the driver side armrest panel or the dash. The ignition key must be on to adjust the mirrors.
Move Selector Switch L or R to select mirror. Center “neutral” position disables arrows
to avoid unintentionally moving a mirror.

Press Arrow Buttons to move mirror surface in direction indicated.
Mirror Heaters
The mirrors may also contain heating elements to de-fog or de-ice the mirror glass during cold weather operation. A switch for the mirror heaters is located on the dash. To turn on, press the switch UP. Press DOWN to turn off.

Mirror Heat Switch
(Located on driver side trim panel)
-Typical View
Mirror Arm/Head Adjustment
If you cannot adjust a mirror properly using the control switch, the mirror may need a coarse adjustment by rotating the mirror head.
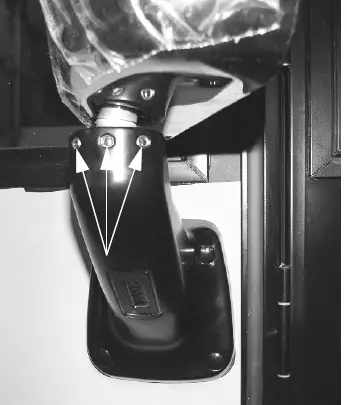
Mirror Head Pivot Lock
- Loosen Allen head set screws to pivot mirror head.
Torque 75-100 in./lbs.
NOTE: Set screws may be located on the opposite side of the mirror arm. Passenger side mirror is similar.
Sideview Camera
The sideview cameras (built into the driver and passenger side mirrors) activate with the corresponding turn signals and replace the rear camera view on the monitor until the turn is completed or the signal lever is canceled manually.

BRAKE-SHIFT INTERLOCK
Ford® Chassis
The Brake-Shift Interlock is a safety feature that prevents the shift lever from being moved from the Park position unless the ignition is ON and the service brake pedal is pressed.
NOTE: If the brake light fuse is blown, the interlock feature will not work properly and an alternate method must be used. See the chassis manual provided in your InfoCase for detailed instructions on what to do in this situation.
PARK BRAKE – FOOT PEDAL
Ford® Chassis
The park brake foot pedal and release lever are located beneath the left side of the dash.
Step the pedal down fully to apply and pull the brake release lever to disengage.
TOW/HAUL TRANSMISSION MODE
Ford® Chassis only
This mode locks out Overdrive and helps reduce gear “hunting” by the automatic transmission while towing. It also improves power delivery and uses engine braking to help control vehicle speed when descending hills.
This mode may also be useful when the motorhome is fully loaded or when driving into a strong headwind. (See chassis manual for further information)
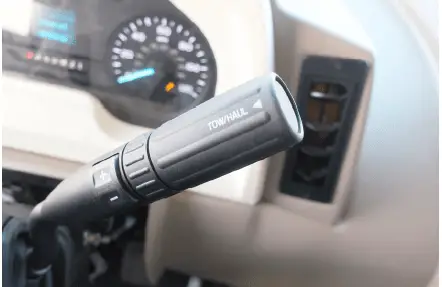
- Press the button at the end of the shift lever to engage Tow/Haul Mode when pulling a trailer or tow vehicle.
- – Typical View
MAP LIGHT SWITCH
–If Equipped
Your vehicle may be equipped with driver and passenger side Map Lights for your convenience.
The driver side map light switch is located in the left side cup holder location. Press switch up/down to turn Map Light off and on.
The passenger side Map Light switch is located on the wall to the right of the passenger seat. Press switch up/down to turn Map Light off and on.
TRACTION CONTROL BUTTON
Your vehicle is equipped with a traction control system that helps to reduce drive wheel spin when there is a loss of traction. This works by applying the brakes to individual wheels when the vehicle starts to slide, and reducing the power to greatly increase traction.
Turning the traction control off will cause the wheels to spin which is beneficial if the vehicle is stuck in snow or mud.
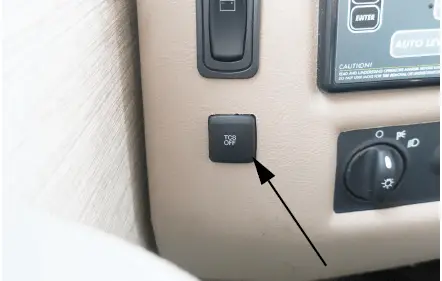
Traction Control Button is located on the driver side left of the headlight switch
-Typical View
Further Information
Refer to the chassis manual provided in your InfoCase for more information on the traction control button.
HAZARD WARNING FLASHERS
The hazard warning flashers provide additional safety when the vehicle must be stopped on the side of the roadway and presents a possible hazard to other motorists. When the flashers are on, it serves as a warning to other drivers.
Further Information
Refer to the chassis manual provided in your InfoCase for instructions on activating, operating, and canceling hazard warning flashers.
BATTERY BOOST SWITCH
The Battery Boost switch can be used to draw emergency starting power from the house batteries to start the engine if the chassis battery is discharged.
Press and Hold the Battery Boost switch in the ON position while turning ignition key for emergency starting power.
NOTE: House batteries must be sufficiently charged for this feature to work.

FRONT DROP-DOWN SHADE (12-VOLT)
Your motorhome is equipped with a 12V Front Windshield Visor/Shade that provides privacy and solar heat protection as well as a sunvisor feature.
The power switch for the 12V Front Drop-Down Night Shade is located on the driver trim panels.
12-Volt Front Drop-Down
Night Shade Switch
(Located on driver side trim panel)
-Typical View
Press the Night Shade switch up or down to adjust the shade to the setting that best suits your needs.
Dual range motors provide lowering of the night shade to visor height restriction when the ignition is ON and lowers completely to cover the entire windshield when the ignition is OFF.
The Chassis Battery Disconnect switch must be ON to supply power to the night shade.
NOTE: If power is gradually drained and falls below the lower limit of 11-volts, the motors may lose their electronic set limits and will require reprogramming once normal power has been restored. Refer to the Night Shade manufacturer’s information provided in your InfoCase.
Automatic Safety Retraction
The Night Shade in your vehicle is equipped with an Automatic Safety Retraction feature, which will retract the Night Shade to the full upper position in the rare event of an internal motor failure.
Should the Automatic Safety Retraction feature deploy, go to your nearest Winnebago Industries® dealer for service before operating the shade again.
NOTE: Do NOT attempt to extend the Night Shade or operate the power switches after deployment.
Further Information
Refer to the manufacturer’s user guide provided in your InfoCase for complete operating instructions, troubleshooting tips, and maintenance care.
RADIO IN-DASH/REARVIEW MONITOR SYSTEM
–If Equipped
The radio in your motorhome features an MP3 player, AM/FM, USB, and receives Bluetooth streaming audio from Bluetooth enabled audio sources such as a cellphone. The radio is also equipped with a SiriusXM® radio (subscription required for use).
This system is also featured with a rearview camera monitor system, which lets you see what is directly behind your motorhome for safety and maneuvering assistance. The viewing screen is integrated into the dash.
The radio screen switches automatically when the transmission is shifted into reverse.
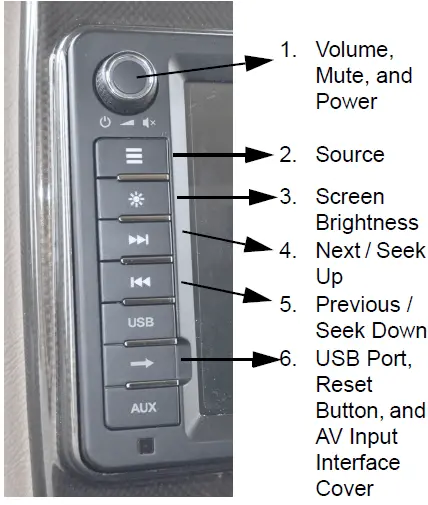
Basic Operating Instructions
- (1) VOLUME, MUTE, and POWER -Rotate to adjust volume. The screen will display the volume level for 3 seconds. Press to activate mute. Press again to resume listening.
Press to turn on the unit. Press and hold to turn the unit OFF. - (2) SOURCE – Press to switch between sources menu and the previous source.
- (3) SCREEN BRIGHTNESS – Press to adjust brightness of the screen.
- (4) NEXT / SEEK UP
- (5) PREVIOUS / SEEK DOWN
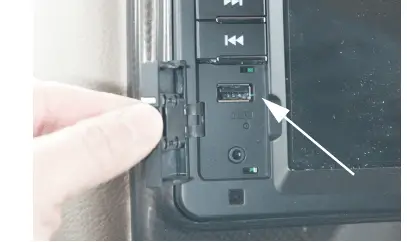
- (6) INTERFACE COVER – USB Port, Reset Button, and AV Input. Lift to open cover.
Sideview Cameras
–If Equipped
The sideview cameras (built into the driver and passenger side mirrors) activate with the corresponding turn signals and replace the rear camera view on the monitor until the turn is completed or the signal lever is canceled manually.
Satellite Radio
–If Equipped
Your motorhome may be equipped with a SiriusXM® satellite radio receiver that plays through your radio. A subscription to SiriusXM® is required to use.
See the receiver manufacturer’s information in your InfoCase for programming and operating instructions.
USB
Your motorhome is equipped with a USB connection to connect items such as memory sticks, MP3 players, digital cameras, smartphones, etc.
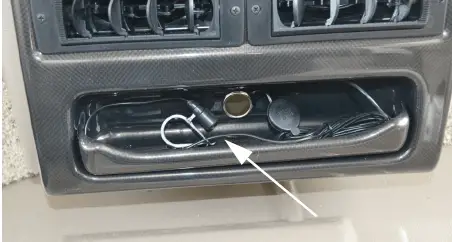
Bluetooth Microphone
(Located on lower dash)
-Typical View (if equipped)
Radio Remote Control
A hand-held remote control for the radio lets you control the radio from a distance for your convenience. The remote control is included in your InfoCase.
Radio Power Switch
The Radio Power switch lets you connect the dash radio to the coach batteries with the ignition switch turned off for listening while parked. This prevents accidental draining of the chassis battery with prolonged use of the radio.
NOTE:The House/Coach Battery Disconnect switch must be ON while listening to the dash radio, as the audio relay is powered by house batteries. If the House/Coach Battery Disconnect switch is OFF, the speakers will not emit sound.
Radio Power Switch (Located on dash)
- Press DOWN to listen to the radio while parked without the ignition key on.
Press UP to listen while driving.
Further Information
See the manufacturer’s user guide provided in your InfoCase for complete operating instructions.
AIR CONDITIONER/HEATER – AUTOMOTIVE (DASH)
Controls for the air conditioner, heater, defroster, and vent are located on the dash.
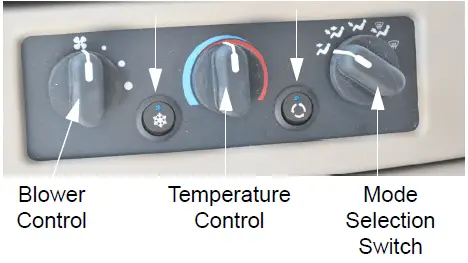
-Typical View
NOTE: The dash air conditioner/heater is not designed to heat and cool the entire interior of the motorhome, but is intended only to provide heating and cooling for the cab area.
A small amount of air will blow out all of the defrost and the dash vents regardless of the mode setting.
Further Information
See the manufacturer’s user guide provided in your InfoCase for complete operating instructions.
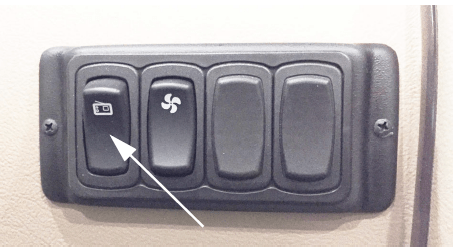
DEFROST FANS
–If Equipped
The two-speed auxiliary fans are intended to assist the automotive windshield defroster system in clearing fog and frost in cold weather or humid conditions.
- HIGH – For maximum defrost output, press the Defrost Fan switch UP.
LOW – For lower defrost output, press the Defrost Fan switch DOWN.
The middle position on the switch is OFF.

CB Power Wires
(Located behind fuse and breaker panel)
-Typical View
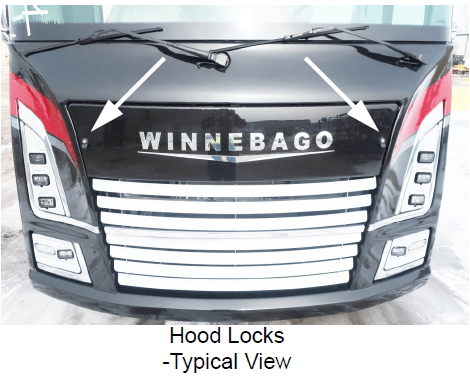
FRONT SERVICE ACCESS
(HOOD)
The Hood Panel can be opened for access to service items such as the engine oil dipstick, oil fill, radiator fill, power steering reservoir, and windshield washer fluid reservoir.
To Open Hood
Unlock front Hood Locks with the provided Hood Lock Key (located on key ring). Lower hood into open position.
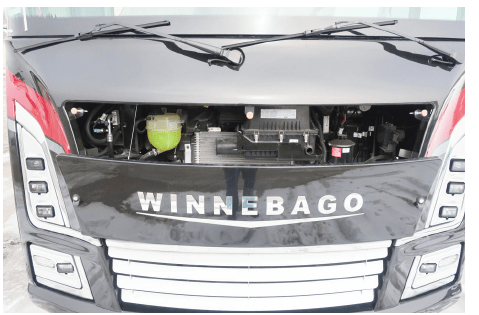
To Close Hood
- Swing hood panel up into closed position.
Press top edge of hood panel in with palms of hands, while locking Hood Locks with the provided Hood Lock Key (located on key ring).
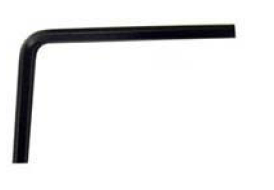
Motor Cover Allen Wrench (Located in the InfoCase) 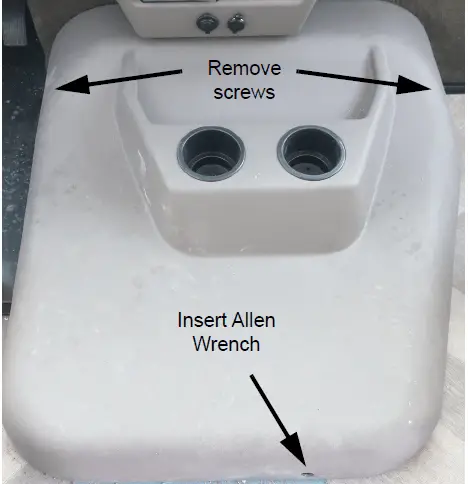
Motor Cover Allen Wrench (Located in the InfoCase)
-Typical View
- Remove the screws at the lower front corners on each side of the engine cover.
To Reinstall the Engine Cover
- Position the front end of the cover first, then lower the rear end.
It is important to ensure the front edge is pushed completely forward to the radiator cover to ensure an air-tight seal.
Press the rear end of the engine cover down and turn the hex wrench to the right
(clockwise) until the latch pulls the cover downward and stops.
Reinstall the screws at the lower front corners on each side of the engine cover.
ENGINE COOLING SYSTEM
Do not remove the radiator cap while engine and radiator are still hot. Always check coolant level visually at the see-through coolant reservoir.
NOTE: Your chassis engine cooling system is filled with special extended-life coolant. See the chassis manual for the correct type of coolant. The coolant system MUST be refilled or topped up with the same type of coolant as equipped to maintain the special long-life properties.
NOTICE
When refilling the coolant system of a vehicle equipped with a rear auxiliary automotive heater and motoraid water heater, be sure to allow for additional coolant capacity of the heater and its supply and return hoses.
Further Information
Refer to the chassis manual in your InfoCase for information and precautions on filling, servicing, and checking the fluid level.
CHASSIS BATTERY DISCONNECT SWITCH
The Chassis Battery Disconnect switch disconnects most chassis electrical loads from the chassis (starting) batteries to avoid discharge by constant draws such as engine computers, radio clock, sensors, etc. (except the electric entrance step). This feature is intended to help conserve battery charge during storage.
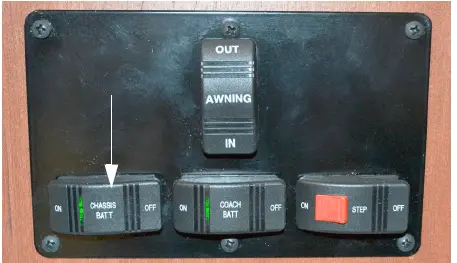
Chassis Battery Disconnect Switch (Located near entrance door)
-Typical View
NOTE: The Chassis Battery Disconnect switch must be ON to start the engine.
TIRES
Improper tire pressure can result in tire overloading and abnormal wear and also affects handling, ride characteristics, and fuel economy.
WARNING
Make sure all replacement tires are of the same size and rating as those shown on your Vehicle Certification Label.
SUSPENSION ALIGNMENT AND TIRE BALANCE
The front suspension and steering system of this vehicle was factory aligned using highly accurate equipment prior to delivery to the dealership. However, alignment should be checked and adjusted after you have fully loaded the motorhome according to your personal needs. Thereafter, the alignment should be periodically inspected to help prevent uneven tire wear.
Any excessive or abnormal tire wear may indicate worn or misaligned suspension or steering, unbalanced tire, or other tire/suspension problem.
Alignment can be affected by worn steering/suspension parts or by incidents which happen during driving, such as hitting a curb, pothole, or railroad track, etc. Improper alignment can cause tires to roll at an angle and wear unevenly. It may also cause the vehicle to “pull” to the right or left. Have your dealer inspect your vehicle’s suspension and steering components periodically for misalignment or wear.
Out-of-balance tires will not roll smoothly and can lead to vibrations and uneven tread wear, such as cupping and flat spots. Tires may need to be balanced if uneven wear is detected or if ride comfort decreases noticeably.
Further Information
Refer to the chassis manual provided in your InfoCase for further information.
LIGHTS
All exterior lights should be checked for proper operation each time the vehicle is prepared for a trip. Any bulbs which fail to light should be checked and replaced, when necessary, with a new bulb of the same size. A failure of more than one light, such as both taillights not operating, may indicate a burned out fuse. Check fuse and replace with one of the same rating when necessary. If a fuse is not the cause of the problem, the wiring system should be checked immediately by an authorized service center.
Further Information
Refer to the chassis manual in your InfoCase for further information.
CIRCUIT BREAKERS AND FUSES – CHASSIS/DASH AUTOMOTIVE 12-VOLT
The 12-Volt Automotive Fuses and Circuit Breakers are conveniently located beneath the left end of the dash in front of the driver seat. Remove cover to access.
The circuit breakers will pop outward if they are tripped. Simply push in to reset. Always replace plug-in blade fuses with ones of the same size and amperage rating/color.

Automotive 12-Volt
Circuit Breakers and Fuses
(Located beneath left end of dash)
-Typical View 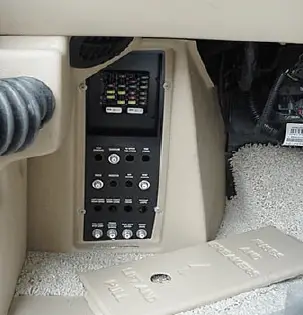
Further Information
Refer to the chassis manual provided in your InfoCase for additional information about chassis-supplied fuses and circuit breakers.
Reference Links
View Full User Guide: Winnebago Adventurer 2023 User Manual
Download link: https://www.winnebago.com/owners/owner-resources/manuals-and-diagrams/operator-manuals