2023 Kia Telluride Child Restraint System (CRS) and Air Bag – Restraint System
The 2023 Kia Telluride has an improved Child Restraint System (CRS) and Air Bag – an improved Supplemental Restraint System that puts passenger safety first with cutting-edge technology. These systems were made to protect the safety of both children and adults. They show how committed Kia is to making driving a safe and secure experience. The Child Restraint System makes sure that children are safe and comfortable in their seats, and the Air Bag system gives extra protection in case of an accident. By making these features a natural part of the car’s design, Kia shows that it cares about the safety of its passengers and the peace of mind of families on the road.
2023 Kia Telluride Specs, Price, Features, Milage (brochure)
Child Restraint System (CRS)
Infants and younger children must be restrained in an appropriate rear-facing or forward-facing Child Restraint System (CRS) that has first been properly secured to the rear seat of the vehicle. Please refer to your state or federal laws for child seating requirements in the operation of a motor vehicle.
Children are always in the rear
Children under age 13 must always ride in the rear seats and must always be properly restrained to minimize the risk of injury in an accident, sudden stop or sudden manoeuvre.
WARNING
restraint Location
Never install a child or infant seat on the front passenger’s seat. A child riding in the front passenger seat can be forcefully struck by an inflating airbag and seriously injured.
WARNING
Hot Child Restraint
A Child Restraint System can become very hot if it is left in a closed vehicle on a sunny day. Be sure to check the seat cover, buckles and latches before placing a child in the restraint system.
According to accident statistics, children are safer when properly restrained in the rear seats than in the front seat. Even with airbags, children can be seriously injured or killed. Children too large for a child restraint must use the seat belts provided.
All 50 states have child restraint laws that require children to travel in approved child restraint devices. The laws governing the age or height/weight restrictions at which seat belts can be used instead of child restraints differ among states, so you should be aware of the specific requirements in your state, and where you are travelling.
The CRS must be properly placed and installed in the rear seat. You must use a commercially available CRS that meets the requirements of the Federal Motor Vehicle Safety Standards (FMVSS).
A CRS is generally designed to be secured in a vehicle seat by lap belt portion of a lap/shoulder belt, or by a LATCH system in the rear seats of the vehicle.
Child Restraint System (CRS)
Infants and younger children must be restrained in an appropriate rear-facing or forward-facing CRS that has first been properly secured to the rear seat of the vehicle. Read and comply with the instructions for installation and use provided by the manufacturer of the CRS.
WARNING
Child Restraint Installation
An improperly secured child restraint can increase the risk of serious injury or death in an accident. Always take the following precautions when using a Child Restraint System:
- Always follow the Child Restraint System manufacturer’s instructions for installation and use.
- Always properly restrain your child in the child restraint.
- If the vehicle head restraint prevents proper installation of a child seat (as described in the Child Restraint System manual), the head restraint of the respective seating position shall be readjusted or entirely removed.
- Do not use an infant carrier or a child safety seat that “hooks” over a seat-back as it may not provide adequate protection in an accident.
- Be especially careful when installing a child restraint on the centre seating position in the second row as it is narrower than the outboard positions. A wide child restraint installed on the center seat may cover the safety belt buckles for the other seating positions. Do not allow someone to ride in a seating position where the safety belt buckle is covered by a child restraint.
- A child restraint in the center seating position may also contact or push up against the safety belt buckles, which can damage the buckles and make them unusable or unsafe. Always check that the child restraint does not contact any of the safety belt buckles. Check the placement of the child restraint regularly to make sure that it has not shifted and come into con-tact with any of the safety belt buckles.
NOTICE
After an accident, have a Kia dealer check the Child Restraint System, seat belts, tether anchors and lower anchors.
Selecting a CRS
When selecting a CRS for your child, always:
- Make sure the CRS has a label certifying that it meets applicable Federal Motor Vehicle Safety Standards
(FMVSS 213). - ]Select a child restraint based on your child’s height and weight. The required label or the instructions for use typically provide this information.
- Select a child restraint that fits the vehicle seating position where it will be used.
- Read and comply with the warnings and instructions for installation and use provided with the CRS.
WARNING
Holding Children
Never hold a child in your arms or lap when riding in a vehicle. The violent forces created during a crash will tear the child from your arms and throw the child against the car’s interior. Always use a Child Restraint System which is appropriate for your child’s height and weight.
WARNING
Unattended Children
Never leave children unattended in a vehicle. The car can heat up very quickly, resulting in injuries to the child in the vehicle.
WARNING
Seat Belt Use
Do not use one seat belt for two occupants at the same time. This will eliminate any safety benefit provided by the seat belt to the occupants.
CRS types
There are three main types of CRS: rear-facing seats, forward-facing seats, and booster seats. They are classified according to the child’s age, height and weight.
Rear-facing child seats
A rear-facing child seat provides restraint with the seating surface against the back of the child. The harness system holds the child in place, and in an accident, acts to keep the child positioned in the seat and reduces the stress to the neck and spinal cord.
All children under age one must always ride in a rear-facing infant child restraint.
Convertible and 3-in-1 child seats typically have higher height and weight limits for the rear-facing position, allowing you to keep your child rear-facing for a longer period of time.
Continue to use a rear-facing child seat for as long as your child will fit within the height and weight limits allowed by the child seat manufacturer. It’s the best way to keep them safe. Once your child has outgrown the rear-facing child restraint, your child is ready for a forward-facing child restraint with a harness.
Forward-facing child restraints
A forward-facing child seat provides restraint for the child’s body with a harness. Keep children in a forward-facing child seat with a harness until they reach the top height or weight limit allowed by your child restraint manufacturer.
Once your child outgrows the forward-facing child restraint, your child is ready for a booster seat.
Booster seats
A booster seat is a restraint designed to improve the fit of the vehicle’s seat belt system. A booster seat positions the seat belt so that it fits properly over the lap of your child.
Keep your child in a booster seat until they are big enough to sit in the seat without a booster and still have the seat belt fit properly. For a seat belt to fit properly, the lap belt must lie snugly across the upper thighs, not the stomach. The shoulder belt should lie snug across the shoulder and chest and not across the neck or face. Children under age 13 must always ride in the rear seats and must always be properly restrained to minimize the risk of injury.
Installing a CRS
After selecting a proper child seat for your child, check to make sure it fits properly in your vehicle.
Follow the instructions provided by the manufacturer when installing the child seat. Note these general steps when installing the seat to your vehicle:
- Properly secure the child restraint to the vehicle. All child restraints must be secured to the vehicle with the lap part of a lap/shoulder belt or with the LATCH system.
- Make sure the child restraint is firmly secured. After installing a child restraint to the vehicle, push and pull the seat forward and from side to side to verify that it is securely attached to the seat. A child restraint secured with a seat belt should be installed as firmly as possible. However, some side-to-side movement can be expected.
- Secure the child in the child restraint. Make sure the child is properly strapped in the child restraint according to the manufacturer’s instructions.
Lower Anchors and Tether for Children (LATCH) system
The LATCH system holds a child restraint during driving and in an accident. This system is designed to make installation of the child restraint easier and reduce the possibility of improperly installing your child restraint. The LATCH system uses anchors in the vehicle and attachments on the child restraint. The LATCH system eliminates the need to use seat belts to secure the child restraint to the rear seats.
Lower anchors are metal bars built into the vehicle. There are two lower anchors for each LATCH seating position that will accommodate a child restraint with lower attachments.
To use the LATCH system in your vehicle, you must have a child restraint with LATCH attachments.
The child seat manufacturer will provide you with instructions on how to use the child seat with its attachments for the LATCH lower anchors.
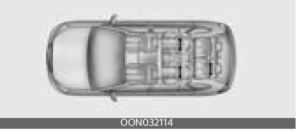
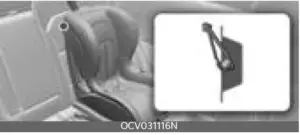
LATCH anchors have been provided in the left and right outboard of 2nd row and the left outboard of 3rd row seating positions. Their locations are shown in the illustration.
For 8-seater vehicles, LATCH is not pro-vided for the middle seat in the 2nd row.
For 7- or 8-seater vehicles, LATCH is not provided for the right seat in the 3rd row.
WARNING
LATCH Lower Anchors
Never attempt to attach a LATCH equipped seat in the center seating position. LATCH lower anchors are only to be used in the left and right outboard of 2nd row and the left outboard of 3rd row seating positions. You may damage the anchors or the anchors may fail and break in a collision if the seat is in the center seating position.
The lower anchor position indicator symbols are located on the left and right 2nd row rear seatbacks to identify the position of the lower anchors in your vehicle (see arrows in illustration).
7 seats 2nd row
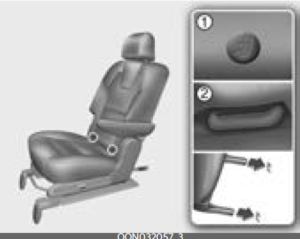
8 seats 2nd row
- Lower Anchor position indicator
- Lower Anchor
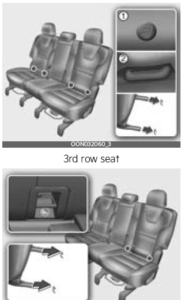
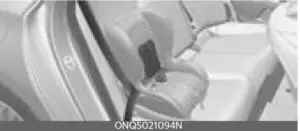
The LATCH anchors are located between the seatback and the seat cushion of the left and right outboard of 2nd row and the left outboard of 3rd row seating positions.
Two LATCH anchors are also applied to the left of the 3rd row seats.
Securing a child restraint with the LATCH anchors system
To install a LATCH-compatible child restraint in either of the rear outboard seating positions:
- Move the seat belt buckle away from the lower anchors. Otherwise, the webbing or buckle can be damaged by the latch anchor, which can make them become unusable or unsafe. (Especially 3rd row left outboard seating positions)
- Move any other objects away from the anchors that could prevent a secure connection between the child restraint and the lower anchors.
- Adjust the seat back to the full rear-ward position (3rd row only).
- Place child restraint on the vehicle seat, then attach the seat to the lower anchors according to the instructions provided by the child restraint manufacturer.
- If the child seat includes a top tether strap, attach the tether connector to the seat tether anchor according to the instructions provided by the child restraint manufacturer.
- Rotate the seat back forward (as needed) to a locked position that ensures good contact between the seat back and child restraint.
- Then follow the child restraint instructions for properly adjusting and tightening the attachments on the child restraint to the LATCH anchors.
WARNING
Take the following precautions when using the LATCH system:
- Read and follow all installation instructions provided with your Child Restraint System.
- To prevent the child from reaching and taking hold of the unused seat belts, buckle all unused rear seat belts before the child is placed into the vehicle. Lock each unused seatbelt following the instructions in the “automatic locking mode” subsection, and place the webbing behind the child seat or against an unused seatback. Children can be strangled if a shoulder belt becomes wrapped around their neck and the seat belt tightens.
- NEVER attach more than one child restraint to a single anchor. This could cause the anchor or attachment to come loose or break.
- Always have the LATCH system inspected by your authorized Kia dealer after an accident. An accident can damage the LATCH system and may not properly secure the child restraint.
NOTICE
The recommended maximum weight for the LATCH system is 65 lbs. (30 kg). When selecting a proper child restraint, consider that the maximum total weight of the child plus the child restraint should be less than 65 lbs. (30 kg).
As a guide, the MAX child restraint weight should be determined by the following calculation:
Child Restraint Weight = 65 – (child’s total weight in lbs.)
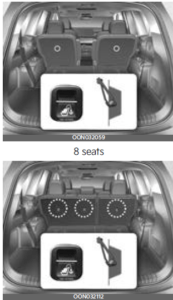
Securing a child restraint seat with “Tether Anchor” system
7 seats
3rd-row seat
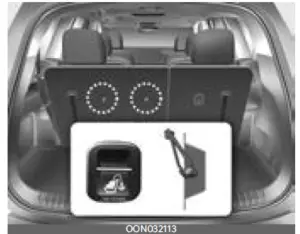
First secure the child restraint with the LATCH lower anchors or the seat belt. If the child restraint manufacturer recommends that the top tether strap be attached, attach and tighten the top tether strap to the top tether strap anchor.
Child restraint hook holders are located on the shelf behind the rear seats.
WARNING
Take the following precautions when installing the tether strap:
- Read and follow all installation instructions provided with your Child Restraint System.
- NEVER attach more than one child restraint to a single tether anchor. This could cause the anchor or attachment to come loose or break.
- Do not attach the tether strap to anything other than the correct tether anchor. It may not work properly if attached to something else.
- Do not use the tether anchors for adult seat belts or harnesses, or for attaching other items or equipment to the vehicle.
- Always fasten the seat belts behind the child restraint seat when they are not used to secure the child seat. Failure to do so may result in child strangulation.
To install the tether anchor:
- Route the child restraint tether strap over the child restraint seatback. Route the tether strap under the head restraint and between the head restraint posts, or route the tether strap over the top of the vehicle seat-back. Make sure the strap is not twisted.
- Connect the tether strap hook to the tether anchor, then tighten the tether strap according to the child seat manufacturer’s instructions to firmly secure the child restraint to the seat.
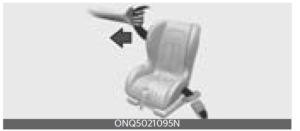
- Check that the child restraint is securely attached to the seat by pushing and pulling the seat forward and from side to side.
Securing a child restraint with a lap/shoulder belt
When not using the LATCH system, all child restraints must be secured to a vehicle rear seat with the lap part of a lap/shoulder belt.
Automatic locking mode
All passenger seat belts move freely under normal conditions and only lock under extreme or emergency conditions (emergency locking mode). So, in order to secure a child restraint, you must manually pull the seat belt all the way out to shift the retractor to the “automatic locking” mode.
The “automatic locking” mode will help prevent the normal movement of the child in the vehicle from causing the seat belt to loosen and compromise the CRS.
To install a CRS on the rear seats, do the following:
- Place the CRS on a rear seat and route the lap/shoulder belt around or through the child restraint, following the restraint manufacturer’s instructions.
Be sure the seat belt webbing is not twisted. - Fasten the lap/shoulder belt latch into the buckle. Listen for the distinct “click” sound.
Position the release button so that it is easy to access in case of an emergency.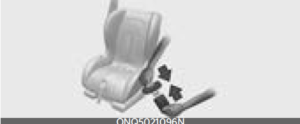
- Pull the shoulder portion of the seat belt all the way out. When the shoulder portion of the seat belt is fully extended, it will shift the retractor to the “automatic locking” (child restraint) mode.
- Slowly allow the shoulder portion of the seat belt to retract and listen for an audible “clicking” or “ratcheting” sound. This indicates that the retractor is in the “automatic locking” m
- Remove as much slack from the belt as possible by pushing down on the CRS while feeding the shoulder belt back into the retractor.
- Push and pull on the CRS to confirm that the seat belt is holding it firmly in place. If it is not, release the seat belt and repeat steps 2 through 6.
- Double-check that the retractor is in the “automatic locking” mode by attempting to pull more of the seat belt out of the retractor. If you cannot, the retractor is in the “automatic locking” mode.
NOTICE
When the seat belt is allowed to retract to its fully stowed position, the retractor will automatically switch from the “automatic locking” mode to the emergency lock mode for normal adult usage.
WARNING
Auto lock mode
Set the retractor to Automatic Lock mode when installing any Child Restraint System. If the retractor is not in the automatic locking mode, the child restraint can move when your vehicle turns or stops suddenly. A child can be seriously injured or killed if the child restraint is not properly anchored in the car.
To remove the child restraint, press the release button on the buckle and then pull the lap/shoulder belt out of the restraint and allow the seat belt to retract fully.
Airbag – advanced Supplemental Restraint System
The actual airbags in the vehicle may differ from the illustration.
- Driver’s front airbag
- Passenger’s front airbag
- Side airbag
- Curtain airbag
- Driver’s knee airbag
Even in vehicles with airbags, you and your passengers must always wear the safety belts provided in order to minimize the risk and severity of injury in the event of a collision or rollover.
How does the airbag system operate?
- Air bags are activated (able to inflate if necessary) only when the ENGINE START/STOP button has been turned to the ON position.
- The appropriate airbags inflate instantly in the event of a serious frontal collision or side collision in order to help protect the occupants from serious physical injury.
- There is no single speed at which the airbags will inflate. Generally, airbags are designed to inflate based upon the severity of a collision and its direction, etc. Several factors determine whether the sensors produce an electronic deployment / inflation signal.
- Airbags will not deploy in every crash or collision situation. Air bag deployment depends on a number of factors including vehicle speed, angles of impact, and, the density and stiffness of the vehicles or objects which your vehicle hits in the collision. The determining factors are not limited to those mentioned above.
- The front airbags will completely inflate and deflate in an instant. It is virtually impossible for you to see the airbags inflate during an accident. It is much more likely that you will sim-ply see the deflated airbags hanging out of their storage compartments after the collision.
- In addition to inflating in serious side collisions, side and/or curtain airbags will inflate if the sensing system detects a rollover.
- When a rollover is detected, side and/ or curtain airbags will remain inflated longer. This helps provide protection from ejection, especially when used in conjunction with seat belts.
- In order to help provide protection, the airbags must inflate rapidly. The airbag inflates extremely fast between the occupant and the vehicle structures before the occupant impacts the vehicle structures. This speed of inflation reduces the risk of serious or life-threatening injuries and is thus a necessary part of the airbag design. However, airbag inflation can also cause injuries which can include fascial abrasions, bruises and broken bones. This is because the rapid inflation also causes the airbags to expand with a great deal of force.
- There are even circumstances under which contact with the steering wheel or passenger airbag can cause fatal injuries, especially if the occupant is positioned excessively close to the steering wheel or passenger air bag.
WARNING
Airbag inflation
Sit as far back as possible from the steering wheel while still maintaining comfortable control of the vehicle. A distance of at least 10 inches (25 cm) from your chest to the steering wheel is recommended. Failure to do so can result in airbag inflation injuries to the driver.
Noise and smoke
When inflated, the airbags make a loud noise and leave smoke and powder in the air inside the vehicle. This is normal and is a result of the ignition of the airbag inflator. After the air bag inflates, you may feel substantial discomfort in breathing due to the contact of your chest with both the seat belt and the airbag, as well as from breathing the smoke and powder. Open your doors and/or windows as soon as possible after impact in order to reduce discomfort and prevent prolonged exposure to the smoke and powder.
Though smoke and powder are non-toxic, it may cause irritation to the skin (eyes, nose and throat, etc). If this is the case, wash and rinse with cold water immediately and consult a doctor if the symptom persists.
WARNING
Hot components
Do not touch the airbag storage area’s internal components immediately after airbag inflation. The air bag-related parts in the steering wheel, instrument panel and the roof rails above the front and rear doors are very hot. Hot components can result in burn injuries.
WARNING
Do not install or place any accessories near air bag deployment areas, such as the instrument panel, windows, pillars, and roof rails.
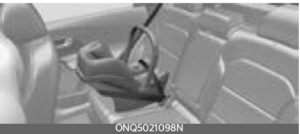
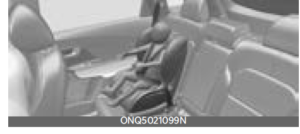
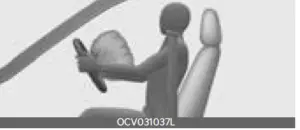
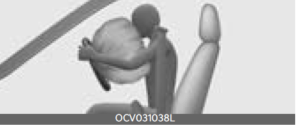
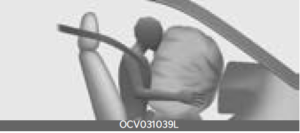
Do not install a child restraint on the front passenger’s seat
Never place a rear-facing child restraint in the front passenger’s seat.
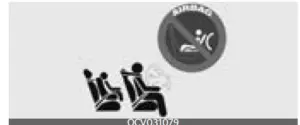
If the airbag deploys, it would impact the rear-facing child restraint, causing serious or fatal injury.
In addition, do not place front-facing child restraints in the front passenger’s seat. If the front passenger airbag inflates, it could cause serious or fatal injuries to the child.
WARNING
Airbag deployment
When children are seated in the rear outboard seats of a vehicle equipped with side and/or curtain airbags, install the Child Restraint System as far away from the door side as possible. Inflation of the side and/or curtain airbags could impact the child.
Airbag warning light
The purpose of air bag warning light in your instrument panel is to alert you of a potential problem with your airbag system, which could include your side and/or curtain airbags used for rollover protection.
If the airbag warning light appears for more than 6 seconds after the ENGINE START/STOP button has been turned to the ON position, or if it appears during vehicle operation, an SRS component may not be functioning properly and you should have your vehicle checked by an authorized Kia dealer.
If any of the following conditions occur, this indicates a malfunction in the air bag system. Have an authorized Kia dealer inspect the air bag system as soon as possible.
- The light does not turn on briefly when you turn the ENGINE START/STOP button to the ON position.
- The light stays on after illuminating for approximately 6 seconds.
- The light comes on while the vehicle is in motion.
- The light blinks when the ENGINE START/STOP button to the ON position.
Supplemental Restraint System (SRS) components and functions
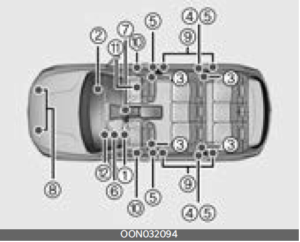
The actual position of SRS components may differ from the illustration.
The SRS consists of the following components:
- Driver’s front airbag module
- Passenger’s front airbag module
- Side air bag modules
- Curtain air bag modules
- Retractor pre-tensioner assemblies
- Airbag warning light
- SRS Control Module (SRSCM) / roll-over sensor
- Front impact sensors
- Side impact sensors
- Side pressure sensors
- Occupant Detection System
- Driver’s knee air bag module
Driver’s front air bag (1)
The front air bag modules are located both in the centre of the steering wheel and in the front passenger’s panel above the glove box. When the SRSCM detects a sufficiently severe impact to the front of the vehicle, it will automatically deploy the front airbags.
Driver’s front air bag (2)
Upon deployment, tear seams molded directly into the pad covers will separate under pressure from the expansion of the air bags. Further opening of the covers then allows full inflation of the air bags.
Driver’s front airbag (3)
A fully inflated airbag (with a properly fastened seat belt) slows the forward motion of the driver or passenger, reducing the risk of head and chest injury.
After complete inflation, the air bag immediately starts deflating, enabling the driver to maintain forward visibility and the ability to steer or operate other controls.
Passenger’s front air bag
WARNING
Airbag obstructions
Do not install or place any accessories on the steering wheel, instrument panel, or on the front passenger’s panel above the glove box in a vehicle. Such objects may become dangerous projectiles if the air bag deploys.
WARNING
Flying objects
Do not place any objects (an umbrella, bag, etc.) between the front door and the front seat. Such objects may become dangerous projectiles if the side airbag inflates.
- If an airbag deploys, there may be a loud noise followed by a fine dust released in the vehicle. These conditions are normal and are not hazard-ousted air bags are packed in this fine powder. The dust generated during air bag deployment may cause skin or eye irritation as well as aggravate asthma for some persons.
- Always wash all exposed skin areas thoroughly with cold water and mild soap after an accident in which the airbags were deployed.
- The SRS can function only when the ENGINE START/STOP button is in the ON position. The SRS is not working properly if any of the following situations occur:
- the SRS airbag warning light does not appear
- the SRS airbag warning light remains on continuously after appearing for about 6 seconds when the ENGINE START/STOP button is turned to the ON position or after the vehicle is in ready mode the SRS airbag warning light comes on while driving
If this occurs, have your vehicle immediately inspected by an authorized Kia dealer.
NOTICE
Before you replace a fuse or disconnect a battery terminal, change the ENGINE START/STOP button to the OFF position. Never remove or replace the air bag related fuse(s) when the ENGINE START/STOP button is ON position. Failure to heed this warning will cause the SRS air bag warning light to appear.
FAQ
A Child Restraint System (CRS) is designed to secure and protect children during car travel, providing safety in case of an accident.
Using a proper CRS helps minimize the risk of injury to children in the event of a collision or sudden stop.
There are different types of CRS, including rear-facing infant seats, convertible seats, forward-facing seats, and booster seats. The appropriate type depends on the child’s age, weight, and height.
Children typically transition to forward-facing seats after outgrowing rear-facing seats, usually around the age of 2 and meeting the weight and height requirements.
Booster seats are used when children have outgrown forward-facing seats but are still too small for regular seat belts, usually around 4 to 8 years old.
An Advanced Supplemental Restraint System, commonly known as an airbag, is a safety feature in vehicles designed to rapidly inflate in the event of a collision to provide cushioning and protection for passengers.
It’s generally recommended to place children in the back seat, especially if there’s an active airbag in the front passenger seat. If necessary, consult your vehicle’s manual for guidance on deactivating the airbag for the front passenger seat.
While some vehicles allow rear-facing CRS installation in the front seat, it’s safer to place them in the back seat, as the back seat is generally considered the safest location.
Proper installation of a CRS involves following the manufacturer’s instructions and ensuring a secure fit using the vehicle’s seat belts or LATCH system (Lower Anchors and Tethers for Children).
LATCH is a system designed to simplify the installation of CRS by using built-in anchors and attachments in the vehicle and the CRS, eliminating the need for seat belts.
Weight and height limits vary by CRS type and model. Always refer to the CRS manufacturer’s guidelines for accurate information.
Some vehicles are equipped with inflatable seat belts. Check the CRS manufacturer’s instructions to determine compatibility.
For specific guidelines related to the Kia Telluride 2023, refer to the vehicle’s owner’s manual or contact a Kia dealership for accurate information.
If the Kia Telluride 2023 is equipped with an airbag on/off switch, its location should be indicated in the vehicle’s manual. It’s typically used when placing a rear-facing CRS in the front seat.
CRS and airbags should comply with international safety standards and regulations. Look for products that meet standards like FMVSS 213 for child seats and FMVSS 208 for airbags in the United States.
Useful Link
View Full PDF: Kia Telluride 2023 User Guide | Autouser Guid
Kia Telluride 2023 Armrest (2nd Row Seat), Folding the Rear Seat and Seat Belts User Guide