


2024 Buick Encore GX Seats Owner’s Manual
Comfortable and adjustable head restraints for all seats, supportive front seats with several adjustments, large rear seats, and a practical rear seat armrest with cup holders enhance passenger comfort in the 2024 Buick Encore GX.
2024 Buick Encore GX Specs, Price, Features, Mileage and Review
Head Restraints Guide
Warning
With head restraints that are not installed and adjusted properly, there is a a greater chance that occupants will suffer a neck/spinal injury in a crash. Do not drive until the head restraints for all occupants are installed and adjusted properly.
Front Seats
The vehicle’s front seats have adjustable head restraints in the outboard seating positions.
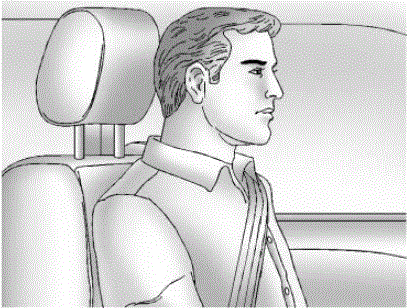
Adjust the head restraint so that the top of the restraint is at the same height as the top of the occupant’s head. This position reduces the chances of a neck injury in a crash.
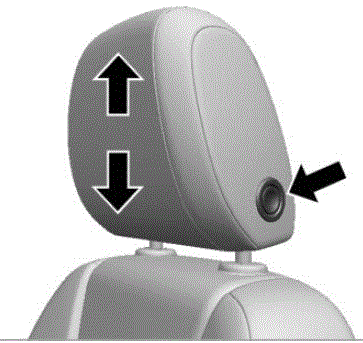
To raise or lower the head restraint, press the button located on the side of the head restraint, and pull up or push the head restraint down, and release the button. Pull and push on the head restraint after the button is released to make sure that it is locked in place.
The front seat outboard head restraints are not removable.
Rear Seats
The vehicle’s rear seats have adjustable head restraints in the outboard seating positions. The height of the head restraint can be adjusted. Pull the head restraint up to raise it. Try to move the head restraint to make sure it is locked in place.
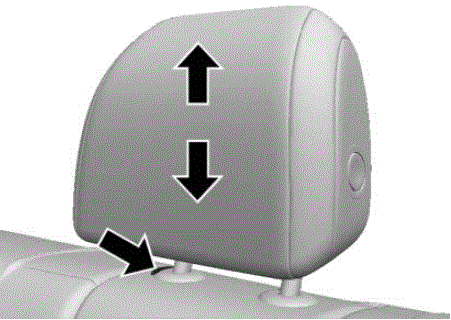
To lower the head restraint, press the button on the top of the seatback and push the head restraint down. Try to move the head restraint after the button is released to make sure it is locked in place
Folding the Rear Head Restraint
The head restraint can be folded rearward to allow for better visibility when the rear seat is unoccupied.
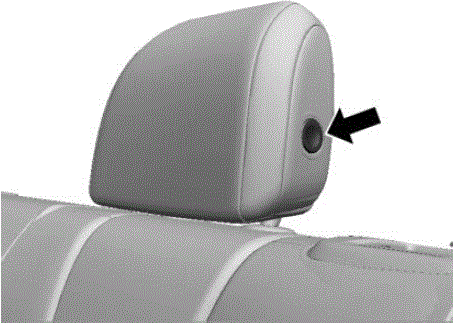
To fold the head restraint, press the button on the side of the head restraint
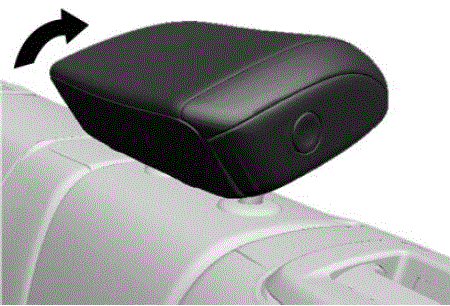
The head restraint will fold rearward automatically.
When an occupant or child restraint is in the seat, always return the head restraint to the full upright position. Pull the head restraint up and forward until it locks into place.
Push and pull on the head restraint to make sure that it is locked.
Always adjust the head restraint so that the top of the restraint is at the same height as the top of the occupant’s head.
Rear outboard head restraints are not removable.
Front Seats
Seat Adjustment
Seat Position
Warning
You can lose control of the vehicle if you try to adjust a driver seat while the vehicle is moving. Adjust the driver seat only when the vehicle is not moving.

To adjust a manual seat:
- Pull the handle at the front of the seat.
- Slide the seat to the desired position and release the handle.
- Try to move the seat back and forth to be sure it is locked in place.
Height Adjustment

If equipped, move the lever up or down to manually raise or lower the seat.
Power Seat Adjustment
Warning
You can lose control of the vehicle if you try to adjust a driver seat while the vehicle is moving. Adjust the driver seat only when the vehicle is not moving.
Warning
The power seats will work with the ignition off. Children could operate the power seats and be injured. Never leave children alone in the vehicle.

To adjust the seat:
- Move the seat forward or rearward by sliding the control forward or rearward.
- Raise or lower the front part of the seat cushion by moving the front of the control up or down.
- Raise or lower the entire seat by moving the rear of the control up or down.
Reclining Seatbacks
Warning
If either seatback is not locked, it could move forward in a sudden stop or crash. That could cause injury to the person sitting there. Always push and pull on the seatbacks to be sure they are locked.
Manual Reclining Seatbacks

To recline the seatback:
- Lift the lever. If necessary, move the seat belt out of the way to access the lever.
- Move the seatback to the desired position, then release the lever to lock the seatback in place.
- Push and pull on the seatback to make sure it is locked.
To return the seatback to an upright position:
- Lift the lever fully without applying pressure to the seatback, and the seatback returns to the upright position.
- Push and pull on the seatback to make sure it is locked.
Warning
Sitting in a reclined position when the vehicle is in motion can be dangerous. Even when buckled up, the seat belts cannot do their job.
The shoulder belt will not be against your body. Instead, it will be in front of you. In a crash, you could go into it, receiving neck or other injuries.
Warning
The lap belt could go up over your abdomen. The belt forces would be there, not at your pelvic bones. This could cause serious internal injuries.
For proper protection when the vehicle is in motion, have the seatback upright. Then sit well back in the seat and wear the seat belt properly.

Do not have a seatback reclined if the vehicle is moving.
Power Reclining Seatbacks

- Tilt the top of the control rearward to recline.
- Tilt the top of the control forward to raise.
Lumbar Adjustment

Press and hold the control forward to increase or rearward to decrease support.
Memory Seats

Overview
If equipped, the memory seat feature allows drivers to save their unique driving positions and a shared exit position. See “Saving Seating Positions” later in this section. The saved positions can be recalled manually by all drivers, see “Manually Recalling Seating Positions” later in this section, and drivers with remote keys 1 and 2 can also recall them automatically. See “Auto Seat Entry Memory Recall” or “Auto Seat Exit Memory Recall” later in this section. To enable automatic recalls, turn on Seat Entry Memory and/or Seat Exit Memory. See “Enabling Automatic Recalls” later in this section. The memory recalls may be cancelled at any time during the recall. See “Cancel Memory Seating Recalls” later in this section.
Identifying Driver Number
The vehicle identifies the current driver by their remote key number 1–8. The current remote key number may be identified by Driver Information Center (DIC) welcome message, “You are driver x for memory recalls.” This message is displayed the first few times the vehicle is turned on when a different remote key is used. For Seat Entry Memory to work properly, save positions to the 1 or 2 memory button matching the driver number of this welcome message. To aid in identifying remote key IDs, it is recommended to only carry one remote key when entering the vehicle. Perform the following if the welcome message is not displayed:
- Move all keys and remote keys away from the vehicle.
- Start the vehicle with another remote key. A DIC welcome message should display indicating the driver number of the other remote key. Turn the vehicle off and remove the other key or remote key from the vehicle.
- Start the vehicle with the initial key or remote key. The DIC welcome message should display the driver number of the initial remote key.
Saving Seating Positions
Read these instructions completely before saving memory positions.
To save preferred driving positions to 1 and 2:
- Turn the vehicle on or to accessory mode. A DIC welcome message may indicate the driver number of the current remote key. See “Identifying Driver Number” previously in this section.
- Adjust all available memory features to the desired driving position.
- Press and release SET; a beep will sound.
- Immediately upon releasing SET, press and hold memory button 1 or 2 matching the current driver’s remote key number until two beeps sound. If too much time passes between releasing SET and pressing 1 or 2, the two beeps will not sound indicating memory position were not saved. Repeat Steps 3 and 4 to try again.
- Repeat Steps 1–4 for the other remote key 1 or 2 using the other 1 or 2 memory button.
It is recommended to save the preferred driving positions to both 1 and 2 if you are the only driver.
To save the common exit seating position to 
the exit button.
Manually Recalling Seating Positions
Press and hold 1, 2, or button until the recall is complete, to recall the positions previously saved to that button.
Manual Memory recall movement for 1, 2 or
Enabling Automatic Recalls
- Seat Entry Memory moves the driver seat to the selected 1 or 2 position when the vehicle is started. Select Settings > Vehicle > Seating Position > Seat Entry Memory > ON or OFF. See “Auto Seat Entry Memory Recall” later in this section.
- Seat Exit Memory moves the driver seat to the preferred exit position of the button when the vehicle is turned off and the door is opened. Select Settings > Vehicle > Seating Position > Seat Exit Memory > ON or OFF. See “Auto Seat Exit Memory Recall” later in this section.
Auto Seat Entry Memory Recall
Seat Entry Memory will automatically begin movement to the seating positions of the 1 or 2 button corresponding to the driver’s remote key number 1 or 2 detected by the vehicle when:
- The vehicle is turned on.
- Seating positions have been previously saved to the same 1 or 2 button. See “Saving Seating Positions” previously in this section.
- Seat Entry Memory is enabled. See “Enabling Automatic Recalls” previously in this section.
- The shift lever is in P (Park).
Seat Entry Memory Recall will continue if the vehicle is shifted out of P (Park) prior to reaching the saved memory position.
If the saved memory seat position does not automatically recall, verify the recall is enabled. See “Enabling Automatic Recalls” previously in this section.
If the memory seat recalls to the wrong position, the driver’s remote key number 1 or 2 may not match the memory button number positions they were saved to. Try the other remote key or try saving the positions to the other 1 or 2 memory button. See “Saving Seating Positions” previously in this section.
Automatic Seat Entry Memory recalls are only available for driver’s remote key numbers 1 and 2. Remote keys 3–8 will not provide Seat Entry Memory recalls.
Auto Seat Exit Memory Recall
Seat Exit Memory will begin movement to the seating position of the
button when
- The vehicle is turned off and the driver door is open or opened within a short time.
- A seating position has been previously been saved to the
- memory button. See “Saving Seating Positions” previously in this section.
- Seat Exit Memory is enabled. See “Enabling Automatic Recalls” previously in this section.
- The shift lever is in P (Park).
Seat Exit Memory recall will continue if the vehicle is shifted out of P (Park) prior to reaching the saved memory position.
Seat Exit Memory is not linked to the driver’s remote key. The seating position saved to
is used for all drivers.
Cancel Memory Seating Recalls
- During any memory recall:
Press a power seat control
Press SET memory button - During Manual memory recall:
Release 1, 2, ormemory button - During Auto Seat Entry Memory Recall:
Turn vehicle off
Press SET, 1, 2, ormemory buttons - During Auto Seat Exit Memory Recall:
Press SET, 1, 2, or memory buttons
Obstructions
If something has blocked the seat while recalling a memory position, the recall may stop. Remove the obstruction and try the recall again. If the memory position still does not recall, see your dealer.
Heated Front Seats
Warning
If temperature change or pain to the skin cannot be felt, the seat heater may cause burns. To reduce the risk of burns, use care when using the seat heater, especially for long periods of time. Do not place anything on the seat that insulates against heat, such as a blanket, cushion, cover, or similar item. This may cause the seat heater to overheat. An overheated seat heater may cause a burn or may damage the seat.

Type I

Type II
If equipped, the controls are on the climate control panel. The engine must be running to operate the heated seats.
Press  to heat the driver or passenger seat cushion and seatback.
Press the control once for the highest setting. With each press of the control, the heated seat will change to the next lower setting, and then the off setting. Three lights indicate the highest setting and one light is the lowest. If the heated seats are on high, the level may automatically be lowered after approximately 30 minutes.
The passenger seat may take longer to heat up.
Remote Start Heated Seats
When it is cold outside, the heated seats can be turned on automatically during a remote vehicle start. The heated seats will be cancelled when the ignition is turned on. Press the heated seat controls to use the heated seats after the vehicle is started.
The heated seat indicator lights on the control do not turn on during a remote start.
The temperature performance of an unoccupied seat may be reduced. This is normal.
To enable or disable remote start heated seats, select Settings > Vehicle > Remote Lock, Unlock, and Start > Remote Start Auto Heat Seats > ON or OFF.
Folding Seatback
The front passenger seatback may fold flat.
Warning
If you fold the seatback forward to carry longer objects, such as skis, be sure any such cargo is not near an airbag. In a crash, an inflating airbag might force that object toward a person. This could cause severe injury or even death. Secure objects away from the area in which an airbag would inflate.
Warning
Things you put on this seatback can strike and injure people in a sudden stop or turn, or in a crash. Remove or secure all items before driving.
To fold the seatback:
- Lower the head restraint all the way.
- Move the seat as far back as possible.

- Lift the lever fully and fold the seatback forward. If necessary, move the seat belt out of the way to access the lever
- Continue lowering the seatback until it is completely folded and locks in place.
To raise the seatback:
- Lift the lever fully to unlock the seatback. Then, raise the seatback and push it rearward until it re-engages.
- Push and pull on the seatback to make sure it is locked in place.
Warning
If either seatback is not locked, it could move forward in a sudden stop or crash. That could cause injury to the person sitting there. Always push and pull on the seatbacks to be sure they are locked
Rear Seats
Rear Seat Reminder
If equipped, the message REAR SEAT REMINDER LOOK IN REAR SEAT displays under certain conditions indicating there may be an item or passenger in the rear seat. Check before exiting the vehicle. This feature will activate when a rear door is opened while the vehicle is on or up to 10 minutes before the vehicle is turned on.
There will be an alert when the vehicle is turned off. The alert does not directly detect objects in the rear seat; instead, under certain conditions, it detects when a rear door is opened and closed, indicating that there may be something in the rear seat.
The feature is active only once each time the vehicle is turned on and off, and will require reactivation by opening and closing the rear doors. There may be an alert even when there is nothing in the rear seat; for example, if a child entered the vehicle through the rear door and left the vehicle without the vehicle being shut off.
The feature can be turned on or off. Select Settings > Vehicle > Rear Seat Reminder > ON or OFF.
Folding the Seatback
Either side of the seatback can be folded for more cargo space. Fold a seatback only when the vehicle is not moving.
Warning
Folding a rear seat with the seat belts still fastened may cause damage to the seat or the seat belts. Always unbuckle the seat belts and return them to their normal stowed position before folding the rear seat.
To fold the seatback:
- Fold the head restraint.

- Make sure the seat belt is in the retainer hook

- Pull the lever on top of the seatback to unlock the seatback.
A red indicator near the seatback lever is exposed when the seatback is unlocked. - Fold the seat back down. Repeat Steps 1–3 for the other seatback, if desired.
Raising the Seatbacks
Warning
If either seatback is not locked, it could move forward in a sudden stop or crash. That could cause injury to the person sitting there. Always push and pull on the seatbacks to be sure they are locked.
Warning
A seat belt that is improperly routed, not properly attached, or twisted will not provide the protection needed in a crash. The person wearing the belt could be seriously injured. After raising the rear seatback, always check to be sure that the seat belts are properly routed and attached, and are not twisted.
To raise a seatback:
- Lift the seatback up and push it rearward to lock it in place.
A red indicator near the seatback lever retracts when the seatback is locked in place.
The center rear seat belt may lock when you raise the seat back. If this happens, let the belt go back all the way and start again. - Return the head restraint to the upright position.
- Push and pull the top of the seatback to be sure it is locked into position.
- Check if the seat belt is stowed within hook at side. If not, stow the seat belt in it appropriately.
- Repeat the steps to raise the other seatback, if necessary.
When the seat is not in use, it should be kept in the upright, locked position.
Rear Seat Armrest

The rear seat has an armrest in the center of the seatback. Lower the armrest to access the cupholders.
To fold, lift the armrest up and push it rearward until it is flush with the seatback
FAQ’s
The 2024 Buick Encore GX offers seating for up to five passengers.
Head restraints can be adjusted by pressing the release button and moving them up or down to the desired position.
To fold the rear seats, locate the release lever on the side of the seatbacks and fold them down to create additional cargo space.
The seats are upholstered in high-quality cloth or available leatherette, depending on the trim level.
The rear seat armrest includes built-in cup holders and storage, providing convenience for rear passengers.
Useful Links
View Full PDF: 2024 Buick Encore GX Owner’s Manual
2024 Buick Encore GX Specs, Price, Features, Mileage And Review