


2022 Chevrolet Traverse Fuses and Fuse Box Diagram User Guide
This tutorial covers the 2022 Chevrolet Traverse fuse box diagram and fuses. Troubleshooting electrical issues requires knowledge of the fuse layout to keep your car running smoothly. Get into the details!
2023 Chevrolet Traverse Review, Price, Features And Mileage (Brochure)
Video: 2022 Chevrolet Traverse Fuses
Electrical System
High Voltage Devices and Wiring
Warning
Exposure to high voltage can cause shock, burns, and even death. The high-voltage components in the vehicle can only be serviced by technicians with special training.
High-voltage components are identified by labels. Do not remove, open, take apart, or modify these components. High voltage cable or wiring has orange covering or labels. Do not probe, tamper with, cut, or modify high-voltage cables or wiring.
Electrical System Overload
The vehicle has fuses and circuit breakers to protect against an electrical system overload.
When the current electrical load is too heavy, the circuit breaker opens and closes, protecting the circuit until the current load returns to normal or the problem is fixed.
This greatly reduces the chance of circuit overload and fire caused by electrical problems.
Fuses and circuit breakers protect power devices in the vehicle.
If there is a problem on the road and a fuse
needs to be replaced, the same amperage fuse can be borrowed. Choose some feature of the vehicle that is not needed to use and replace it as soon as possible. To check a fuse, look at the band inside the fuse. If the band is broken or melted, replace the fuse. Be sure to replace a bad fuse with a fuse of identical size and rating.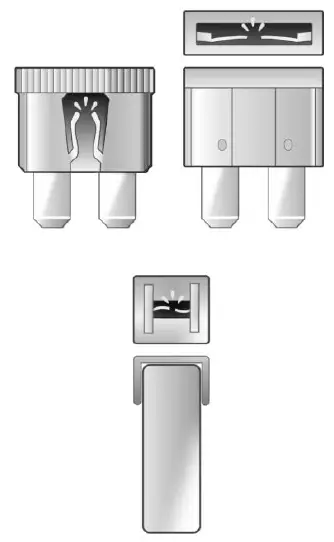
Replacing a Blown Fuse
- Turn off the vehicle.
- Locate the fuse puller in the engine compartment fuse block.
.
- Use the fuse puller to remove the fuse from the top or side, as shown above.
- If the fuse must be replaced immediately, borrow a replacement fuse with the same amperage from the fuse block. Choose a vehicle feature that is not needed to safely operate the vehicle. Repeat Steps 2-3.
- Insert the replacement fuse into the empty slot of the blown fuse.
At the next opportunity, see your dealer to replace the blown fuse.
Headlamp Wiring
An electrical overload may cause the lamps to go on and off, or in some cases to remain off. Have the headlamp wiring checked right away if the lamps go on and off or remain off.
Windshield Wipers
If the wiper motor overheats due to heavy snow or ice, the windshield wipers will stop until the motor cools and will then restart.
Although the circuit is protected from electrical overload, overload due to heavy snow or ice may cause wiper linkage damage. Always clear ice and heavy snow from the windshield before using the windshield wipers.
If the overload is caused by an electrical problem and not snow or ice, be sure to get it fixed.
Fuses and Circuit Breakers
The wiring circuits in the vehicle are protected from short circuits by a combination of fuses and circuit breakers. This greatly reduces the chance of damage caused by electrical problems.
Danger
Fuses and circuit breakers are marked with their ampere rating. Do not exceed the specified amperage rating when replacing fuses and circuit breakers. The use of an oversized fuse or circuit breaker can result in a vehicle fire. You and others could be seriously injured or killed.
Warning
Installation or use of fuses that do not meet GM’s original fuse specifications is dangerous. The fuses could fail, and result in a fire. You or others could be injured or killed, and the vehicle could be damaged.
See Accessories and Modifications 0 270 and General Information 0 270. To check or replace a blown fuse, see Electrical System Overload 0 288.
Engine Compartment Fuse Block
The underhood fuse block is in the engine compartment, on the driver’s side of the vehicle.
Caution
Do not pull the engine compartment fuse block lever, since it is intended only for service purposes. If pulled, vehicle malfunction may occur.
To remove the fuse block cover, press the clips on the cover and lift it straight up.
Caution
Spilling liquid on any electrical component of the vehicle may damage it. Always keep the covers on any electrical component.
To remove fuses, use the fuse puller and pull straight out.
The vehicle may not be equipped with all of the fuses, relays, and features shown.
| Fuses | Usage |
| F1 | Antilock Brake System Pump |
| F2 | Starter 1 |
| F3 | DC-DC Transformer 1 |
| F4 | – |
| F5 | DC-DC Transformer 2 |
| F6 | – |
| F7 | – |
| F8 | – |
| F9 | Vacuum Pump |
| F10 | Front Wiper |
| F11 | – |
| F12 | – |
| F13 | Starter 2 |
| F14 | – |
| F15 | Rear Wiper |
| F16 | – |
| F17 | – |
| F18 | – |
| F19 | – |
| F20 | – |
| F21 | – |
| F22 | Electronic Brake Control Module |
| F23 | Parking/Trailer Lamps |
| F24 | Right Trailer Stoplamp/ Turnlamp |
| F25 | Steering Column Lock |
| F26 | – |
| F27 | Left Trailer Stoplamp/ Turnlamp |
| F28 | – |
| F29 | – |
| F30 | Washer Pump |
| F31 | – |
| F32 | Left Low – Beam Headlamp |
| F33 | Daylight Running Lamps |
| F34 | Horn |
| F35 | – |
| F36 | – |
| F37 | Right Low – low-beam headlamp |
| F38 | Automatic Headlamp Leveling Motor |
| F39 | Transmission Control Module |
| F40 | Left Rear Bus Electrical Center/Ignition |
| F41 | Instrument Cluster |
| F42 | Heating, Ventilation, and Air Conditioning |
| F43 | Head-up Display/Reflective Light Auxiliary Display |
| F44 | Communication Gateway Module/Run/ Crank |
| F45 | – |
| F46 | – |
| F47 | – |
| F48 | – |
| F49 | Interior Rearview Mirror |
| F50 | Fuel Tank Zone Module/ Shifter Interface Board/ Run/Crank |
| F51 | Heated Steering Wheel |
| F52 | Folding Seats Switch |
| F53 | Coolant Pump |
| F54 | – |
| F55 | Air Conditioning Clutch |
| F56 | – |
| F57 | Engine Control Module/ Ignition |
| F58 | Transmission Control Module/Ignition |
| F59 | Engine Control Module Battery |
| F60 | Engine Control Module – Even |
| F61 | O2 Sensor 1/Air Flow |
| F62 | – |
| F63 | O2 Sensor 2/Canister/ Engine Oil/Turbo |
| F64 | Aeroshutter |
| F65 | Engine Control Module Powertrain 1 |
| F66 | Engine Control Module Powertrain 2 |
| F67 | Engine Control Module – Odd |
| F68 | – |
| F69 | – |
| F70 | – |
| F71 | – |
| F72 | – |
| F73 | – |
| F74 | – |
| F75 | – |
| F76 | – |
| F77 | – |
| Relays | Usage |
| K1 | Starter 1 |
| K2 | Run/Crank |
| K3 | Vacuum Pump |
| K4 | – |
| K5 | Air Conditioning |
| K6 | – |
| K7 | Engine Control Module |
| K8 | Folding Seats |
| K9 | – |
| K10 | Starter 2 |
Instrument Panel Fuse Block
The instrument panel fuse block is inside the centre console on the passenger side of the vehicle.
Remove the fuse access door by inserting a coin or tool into the slot of the access door.
To remove a fuse, use the fuse puller located in the Engine Compartment Fuse block.
The vehicle may not be equipped with all of the fuses, relays, and features shown.
| Fuses | Usage |
| F1 | Body Control Module 6 |
| F2 | Diagnostic Link |
| F3 | Electric Steering Column Lock |
| F4 | Rear USB Port |
| F5 | Rear Sunshade/Park/ Reverse/Neutral/ Drive/Low |
| F6 | Heating, Ventilation, And Air Conditioning |
| F7 | Body Control Module 3 |
| F8 | Adaptive Front Lighting System |
| F9 | Right Front Heated Seat |
| F10 | Airbag |
| F11 | – |
| F12 | Amplifier |
| F13 | Body Control Module 7 |
| F14 | Left Front Heated Seat |
| F15 | – |
| F16 | Sunroof |
| F17 | Communication Gateway Module |
| F18 | Instrument Cluster/ Head Up Display |
| F19 | Body Control Module 1 |
| F20 | Wireless Charger Module |
| F21 | Body Control Module 4 |
| F22 | Infotainment |
| F23 | Body Control Module 2 |
| F24 | Park/Reverse/Neutral/ Drive/Low |
| F25 | Park Assist/Shifter Interface Board |
| F26 | Communications Integration Module |
| F27 | Video |
| F28 | Radio/Heating, Ventilation, and Air Conditioning Display |
| F29 | Radio |
| F30 | Steering Wheel Controls |
| F31 | Front Blower |
| F32 | DC AC Inverter |
| F33 | Driver Power Seat |
| F34 | Passenger Power Seat |
| F35 | Feed/Body Control Module 4 |
| F36 | Electric Power Steering |
| F37 | Power Outlet/Wireless Charger/Accessory |
| F38 | Body Control Module 8 |
| F39 | – |
| Circuit Breakers/ Minifuse | Usage |
| F40 | – |
| F41 | – |
| F42 | Auxiliary Power Outlet (CB)/Lighter (Minifuse) |
2023 Chevrolet Traverse Review, Price, Features And Mileage (Brochure)
Rear Compartment Fuse Block
The rear compartment fuse block is behind a trim panel on the driver side of the rear storage compartment.
The trim panel is removed by prying along the top edge of the trim panel at two notched locations. Remove the trim panel to access the fuse block, or see your dealer.
To remove a fuse, use the fuse puller in the engine compartment fuse block.
The fuse block label is on the back of the access door in the driver-side rear trim panel
| Fuses | Usage |
| F1 | – |
| F2 | Trailer |
| F3 | Folding Seats |
| F4 | Rear Blower |
| F5 | Rear Drive Control |
| F6 | – |
| F7 | Right Window |
| F8 | Rear Defogger |
| F9 | Left Window |
| F10 | – |
| F11 | Trailer Reverse |
| F12 | USB Port/Third Row Seats |
| F13 | – |
| F14 | – |
| F15 | – |
| F16 | – |
| F17 | – /Air Quality Sensor |
| F18 | – |
| F19 | Ventilated Seats/ Massage |
| F20 | – |
| F21 | – |
| F22 | – |
| F23 | – |
| F24 | Lumbar |
| F25 | – |
| F26 | Trailer Brake Lamps |
| F27 | Massage |
| F28 | Passive Entry/Passive Start |
| F29 | – |
| F30 | Canister Vent |
| F31 | – |
| F32 | Heated Mirrors |
| F33 | USB Port/Second Row Seats |
| F34 | Liftgate Module |
| F35 | Fuel System Control Module/Fuel Tank Zone Module |
| F36 | – |
| F37 | – |
| F38 | Window Module |
| F39 | Rear Closure |
| F40 | Memory Seat Module |
| F41 | Automatic Occupancy Sensor |
| F42 | – |
| F43 | – |
| F44 | – |
| F45 | Liftgate Motor |
| F46 | Rear Heated Seats |
| F47 | – |
| F48 | – |
| F49 | – |
| F50 | – |
| F51 | – |
| F52 | Semi-Active Dampening System Module |
| F53 | – |
| F54 | External Object Calculating Remote System/Side Blind Zone Alert |
| F55 | – |
| F56 | Universal Remote System/Overhead Console/Humidity/Rain Sensor |
| F57 | Hands-Free Closure Release |
| Circuit Breakers | Usage |
| CB1 | – |
| CB2 | – |
| CB3 | Rear Auxiliary Power Outlet |
| Relays | Usage |
| K1 | – |
| K2 | – |
How to Replace the Fuse of the 2022 Chevrolet Traverse
To replace a fuse in the 2022 Chevrolet Traverse, follow these steps:
Materials:
- The new fuse of the correct amperage.
- Fuse puller or needle-nose pliers.
Instructions:
- Locate the Fuse Box: The fuse box in the 2022 Chevrolet Traverse is typically located in one of several places, such as under the dashboard on the driver’s side or the hood in the engine compartment.
- Identify the Faulty Fuse: Use the fuse diagram located on the fuse box cover to identify which fuse needs to be replaced. The diagram will show you the location and amperage rating of each fuse.
- Turn Off the Vehicle: Before replacing the fuse, make sure the vehicle’s ignition is turned off to prevent any electrical hazards.
- Remove the Fuse: Using the fuse puller tool located inside the fuse box cover or a pair of needle-nose pliers, carefully pull out the faulty fuse. Make sure to grip the fuse firmly but gently to avoid damaging it or surrounding components.
- Inspect the Fuse: Check the fuse for any signs of damage, such as a broken filament or discolouration. If the fuse appears to be blown, replace it with a new fuse of the same amperage rating.
- Insert the New Fuse: Take a new fuse of the same amperage rating and carefully insert it into the appropriate slot in the fuse box. Ensure it is pushed in securely to make a good connection.
- Test the Circuit: Once the new fuse is installed, turn the vehicle’s ignition back on and test the circuit associated with the fuse to ensure it is functioning properly. This may involve testing various electrical components or systems depending on the function of the fuse.
- Replace the Fuse Box Cover: Once you’ve confirmed that the circuit is working correctly, replace the fuse box cover and secure it in place.
- Dispose of the Old Fuse: Properly dispose of the old fuse. If it’s blown, it should not be reused.
- Record the Replacement: It’s a good idea to record the replacement in your vehicle maintenance log for future reference.
Tips:
- Always use a fuse with the correct amperage rating to prevent electrical issues or damage to the vehicle.
FAQs
Identify the blown fuse location in the fuse box.
The fuse box is typically located under the dashboard on the driver’s side.
You may need to kneel or lie down to reach under the dashboard.
A fuse puller tool or a pair of needle-nose pliers can be used.
Use a fuse puller tool or a pair of needle-nose pliers to gently pull out the fuse.
Visually inspect the fuse to see if the metal wire inside is broken.
See the fuse diagram to find the corresponding fuse for replacement.
The fuse diagram is often located on the inside of the fuse box cover.
The diagram will show the fuse locations and their corresponding functions.
Ensure the vehicle is turned off and the corresponding electrical system is not active.
No, it’s important to use a fuse with the same rating as the blown fuse.
No, as long as the replacement fuse has the same rating and fits properly.
Check for any underlying electrical issues that may be causing the fuse to blow.
Yes, replacing a fuse is a relatively simple task that doesn’t require advanced knowledge.
Regularly check and maintain the vehicle’s electrical system for any signs of wear or damage.
Useful Links
View Full PDF: 2022 Chevrolet Traverse User Manual | Auto User Guide
2023 Chevrolet Traverse Review, Price, Features And Mileage (Brochure)
Display Instructions: 2022 Chevrolet Traverse Cluster Guide