


2022 Dodge Charger Interior and Exterior Light User Guide
With its LED headlamps and distinctive racetrack tail lamps, the 2022 Dodge Charger boasts a bold exterior and an interior with ambient lighting and illuminated controls that improve visibility and style for a contemporary, high-performance driving experience day or night.
DODGE EXTERIOR LIGHTS GUIDE
HEADLIGHT SWITCH
The headlight switch is located on the left side of the instrument panel. This switch controls the operation of the headlights, parking lights, instrument panel lights, and fog lights (if equipped).
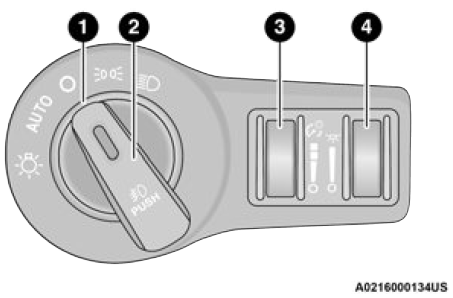 Headlight Switch
- Rotate Headlight Control
- Push Front Fog Light Control
- Instrument Panel Dimmer Control
- Ambient Light Dimmer Control
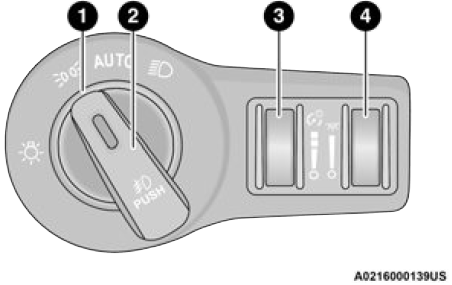
- Rotate Headlight Control
- Push Front Fog Light Control
- Instrument Panel Dimmer Control
- Ambient Light Dimmer Control
NOTE:
Vehicles sold in Canada are equipped with a head-light switch with an AUTO and ON detent but without an OFF detent. Headlights will be deacti-vated when the headlight switch is placed in the parking lights position. However, the Daytime Running Lights (DRLs) will be activated along with the front and rear marker lights. The DRLs may be deactivated when the parking brake is engaged.
To turn on the headlights, rotate the headlight switch clockwise. When the headlight switch is on, the parking lights, taillights, license plate light and instrument panel lights are also turned on. To turn off the headlights, rotate the headlight switch back to the O (off) position.
For vehicles sold in Canada, rotate the headlight switch clockwise from the parking lights and instrument panel lights position to the AUTO position for automatic headlights. Rotate to the second detent to turn on headlights, parking lights, and instrument panel lights operation.
NOTE:
- Your vehicle is equipped with plastic headlight and fog light (if equipped) lenses that are lighter and less susceptible to stone breakage than glass lights. Plastic is not as scratch resistant as glass and therefore different lens cleaning procedures must be followed.
- To minimize the possibility of scratching the lenses and reducing light output, avoid wiping with a dry cloth. To remove road dirt, wash with a mild soap solution followed by rinsing.
CAUTION!
Do not use abrasive cleaning components, solvents, steel wool or other abrasive materials to clean the lenses.
MULTIFUNCTION LEVER
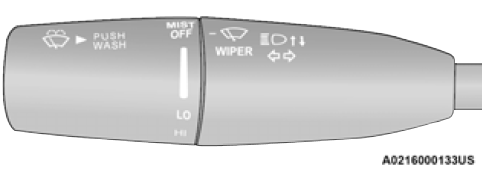
The multifunction lever is located on the left side of the steering column.
 DAYTIME RUNNING LIGHTS (DRLS) —IF EQUIPPED
The Daytime Running Lights will turn on when the engine is started and will remain on unless the headlights are turned to the on position, the parking brake is applied, or the ignition is placed in the OFF position.
NOTE:
- For vehicles sold in Canada, the Daytime Running Lights will automatically deactivate when the front fog lights are turned on.
- If allowed by law in the country in which the vehicle was purchased, the Daytime Running Lights can be turned on and off using the Uconnect system.
- On some vehicles, the Daytime Running Lights may deactivate, or reduce intensity, on one side of the vehicle (when a turn signal is activated on that side), or on both sides of the vehicle (when the hazard warning lights are activated).
HIGH/LOW BEAM SWITCH
Push the multifunction lever toward the instrument panel to switch the headlights to high beams. Pulling the multifunction lever back will turn the low beams on.
AUTOMATIC HIGH BEAM — IF EQUIPPED
The Automatic High Beam Headlamp Control system provides increased forward lighting at night by automating high beam control through the use of a digital camera mounted on the inside rearview mirror. This camera detects vehicle specific light and automatically switches from high beams to low beams until the approaching vehicle is out of view.
NOTE:
- The Automatic High Beam Headlamp Control can be turned on or off by selecting or dese-lecting “Auto High Beam” within Uconnect Settings, as well as turning the headlight switch to the AUTO position.
- Broken, muddy, or obstructed headlights and taillights of vehicles in the field of view will cause headlights to remain on longer (closer to the vehicle). Also, dirt, film, and other obstruc-tions on the windshield or camera lens will cause the system to function improperly.
- If the windshield or Automatic High Beam Head-lamp Control mirror is replaced, the mirror must be re-aimed to ensure proper performance. See a local authorized dealer.
FLASH-TO-PASS
You can signal another vehicle with your headlights by lightly pulling the multifunction lever toward you. This will cause the high beam headlights to turn on, and remain on, until the lever is released.
AUTOMATIC HEADLIGHTS
This system automatically turns the headlights on or off according to ambient light levels. To turn the system on, rotate the headlight switch counterclockwise to the AUTO position. When the system is on, the headlight time delay feature is also on. This means the headlights will stay on for up to 90 seconds after placing the ignition in the OFF position. The headlight time delay can be programmed 0/30/60/90 seconds within Uconnect Settings.
To turn the automatic system off, move the headlight switch out of the AUTO position.
NOTE:
The engine must be running before the headlights will come on in the automatic mode.
PARKING LIGHTS
To turn on the parking lights and instrument panel lights, rotate the headlight switch clockwise. To turn off the parking lights, rotate the headlight switch back to the O (off) position.
NOTE:
Vehicles sold in Canada are equipped with a head-light switch with an AUTO and ON detent but without an OFF detent. Headlights will be deacti-vated when the headlight switch is placed in the parking lights position. However, the Daytime Running Lights (DRLs) will be activated along with the front and rear marker lights. The DRLs may be deactivated when the parking brake is engaged.
AUTOMATIC HEADLIGHTS ON WITH WIPERS — IF EQUIPPED
If your vehicle is equipped with Automatic Headlights, it also has this
customer-programmable feature. When your headlights are in the automatic mode and the engine is running, they will automatically turn on when the wiper system is on. This feature is programmable through the Uconnect system
NOTE:
When your headlights come on during the daytime, the instrument panel lights will automatically dim to the lower nighttime intensity.
HEADLIGHT DELAY
To aid in your exit, your vehicle is equipped with a headlight delay that will leave the headlights on for approximately 90 seconds. This delay is initiated when the ignition is placed in the OFF position while the headlight switch is on, and then the headlight switch is cycled off. Headlight delay can be canceled by either turning the headlight switch on then off, or by placing the ignition in the ON position.
NOTE:
The headlight delay time is programmable through Uconnect Settings.
LIGHTS-ON REMINDER
If the headlights or parking lights are on after the ignition is placed in the OFF position, the vehicle will chime when the driver’s door is opened.
FOG LIGHTS — IF EQUIPPED
The fog lights are turned on by rotating the headlight switch to the parking light or headlight position and pushing in the headlight rotary control.
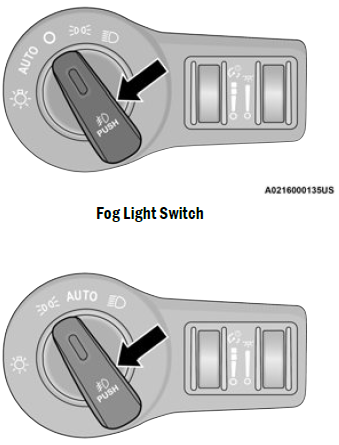 Fog Light Switch (Vehicles Sold In Canada Only)
The fog lights will operate only when the parking lights are on or when the vehicle headlights are on low beam. An indicator light located in the instrument cluster will illuminate when the fog lights are on. The fog lights will turn off when the switch is pushed a second time, when the headlight switch is rotated to the off position, or the high beam is selected.
TURN SIGNALS
Move the multifunction lever up or down to activate the turn signals. The arrows on each side of the instrument cluster flash to show proper operation.
NOTE:
If either light remains on and does not flash, or there is a very fast flash rate, check for a defective outside light bulb.
LANE CHANGE ASSIST — IF EQUIPPED
Lightly push the multifunction lever up or down, without moving beyond the detent, and the turn signal will flash three times then automatically turn off.
BATTERY SAVER
Timers are set to both the interior and exterior lights to protect the life of your vehicle’s battery.
After 10 minutes, if the ignition is in the OFF position and any door is left open or the dimmer control is rotated all the way up to the dome light on position, the interior lights will automatically turn off.
NOTE:
Battery saver mode is canceled if the ignition is ON.
If the headlights remain on while the ignition is placed in the OFF position, the exterior lights will automatically turn off after eight minutes. If the headlights are turned on and left on for eight minutes while the ignition is OFF, the exterior lights will automatically turn off.
INTERIOR LIGHTS
The interior lights come on when a door is opened.
Courtesy and dome lights are turned on when the front doors are opened, or when the dimmer control is rotated to its farthest upward position. If your vehicle is equipped with Remote Keyless Entry and the unlock button is pushed on the key fob, the courtesy and dome lights will turn on. When a door is open and the interior lights are on, rotating the dimmer control all the way down, to the O (off) detent, all of the interior lights will turn off. This allows the doors to stay open for extended periods of time without discharging the vehicle’s battery.
INTERIOR COURTESY LIGHTS
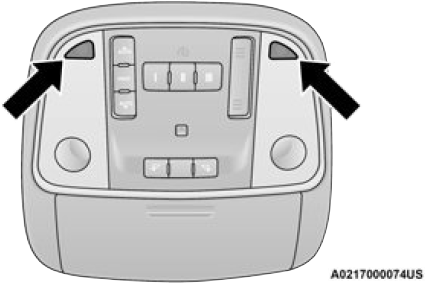
The courtesy lights can be turned on by pushing the top corner of the lens. To turn the lights off, push the lens a second time.
The front map/reading lights are mounted in the overhead console.
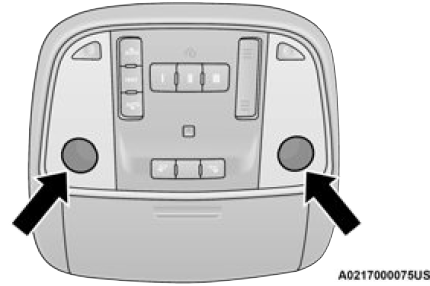 Front Map/Reading Lights
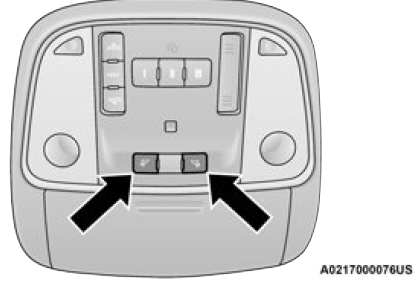
Each light can be turned on by pushing a switch on either side of the console. These buttons are backlit for nighttime visibility. To turn the lights off, push the switch a second time. The lights will also turn on when the unlock button on the key fob is pushed.
 Ambient Light — If Equipped
The overhead console is equipped with an ambient light feature. This light illuminates for improved visibility of the floor and center console area.
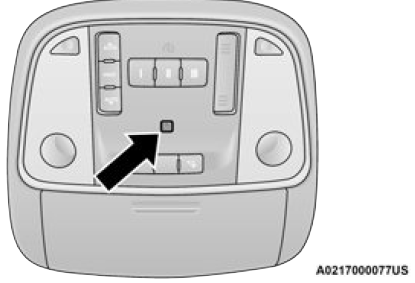
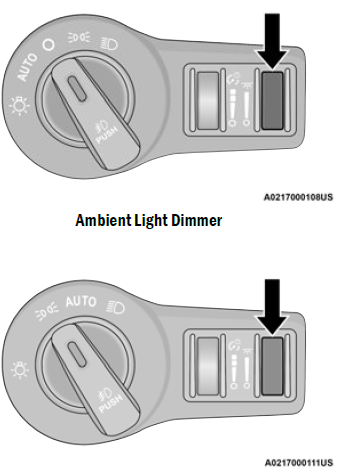
Rotate the right dimmer control upward or downward to increase or decrease the brightness of the door handle lights, map pocket lights, and ambient light located in the overhead console.
 Dimmer Controls
The brightness of the instrument panel lighting and lighted cupholders (if equipped) can be regulated by rotating the left dimmer control up (brighter) or down (dimmer). When the headlights are on you can supplement the brightness of the instrument cluster display, radio and overhead console by rotating the control to the first detent up until you hear a click. This feature is useful when headlights are required during the day. Rotating the dimmer control up to the second detent, the farthest position up, turns on the courtesy lights regardless if the doors are opened or closed.
Useful Links:
View Full PDF: 2022 Dodge Charger User Manual | Auto User Guide
2023 Dodge Charger Specs ,Price, Features, Mileage and Review