
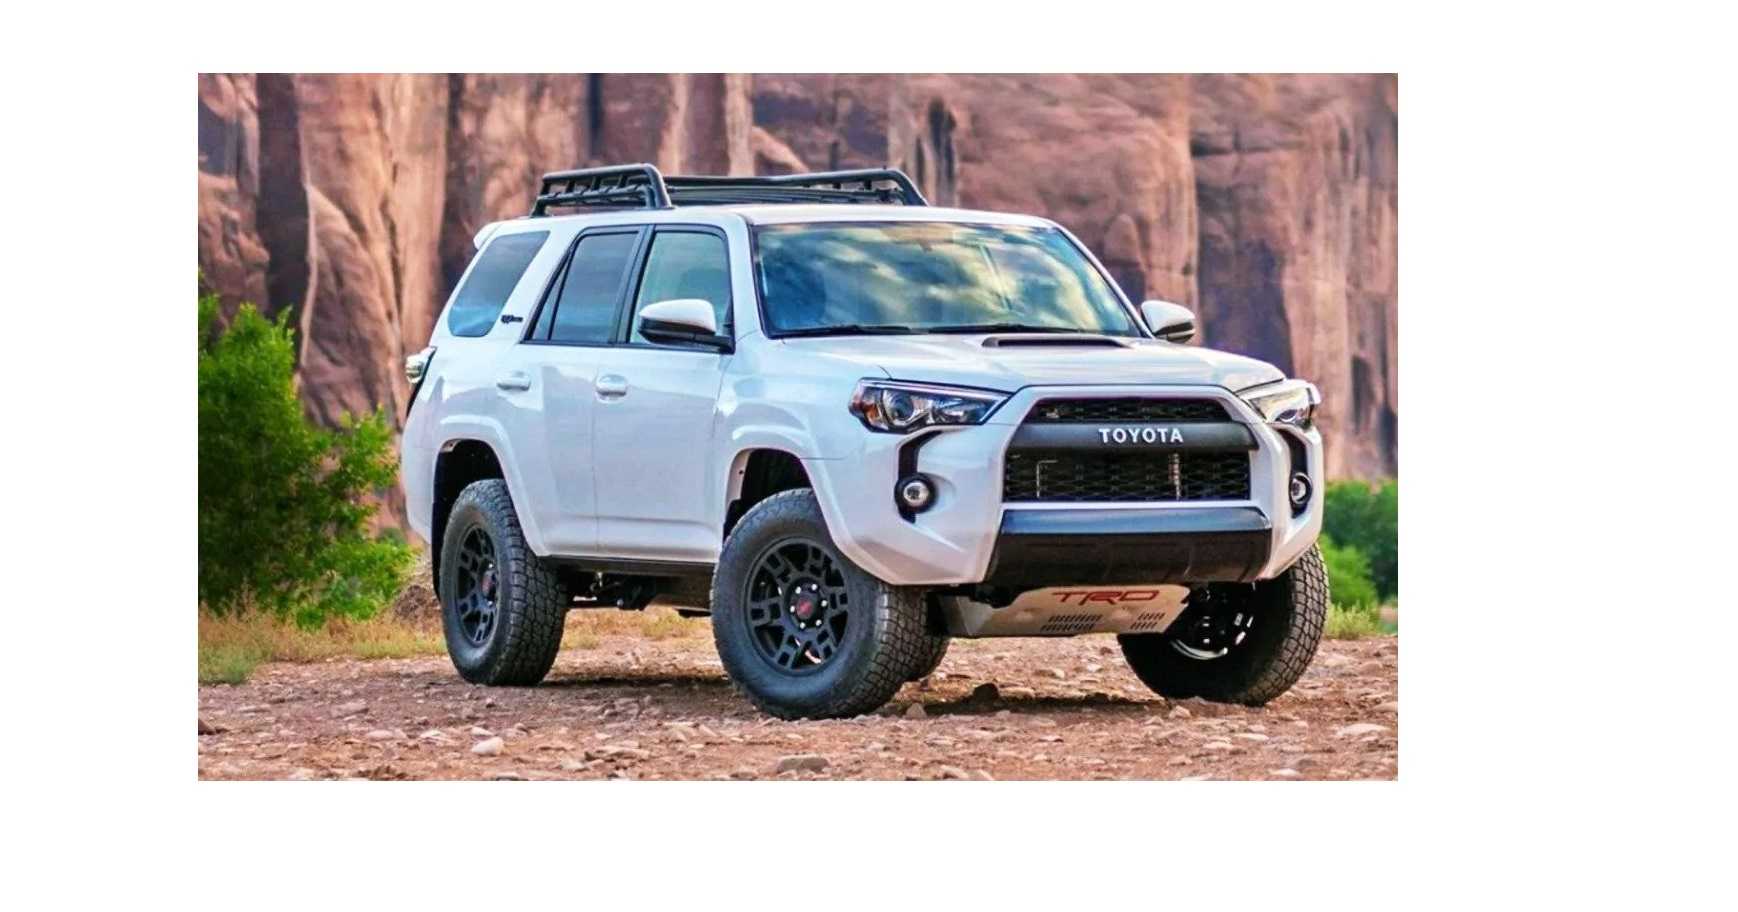

Toyota 4Runner 2023 Adjusting the seats
In the rough terrain of the 2023 Toyota 4Runner, where versatility and excitement meet, the art of fine-tuning the driving experience starts with the seats, which are a collection of ergonomic marvels that combine comfort and control. These seats were made with the careful driver and passenger in mind. They offer a wide range of adjustment options so that each person can find their right driving position. In the driver’s seat, there are easy-to-use settings that let you move the seat forward or backward, up or down, flat or upright, and even adjust the lumbar support for your own comfort. The passenger seat does the same, matching what the driver wants. Even though the back seats don’t move as easily as the front ones, they are also an important part of the car and fold or recline easily to make room for cargo or people. With this dance of seat adjustments, the 4Runner invites you to go on trips, knowing that comfort and control are always at your fingertips and ready to fit into the symphony of adventure that makes this SUV so famous.Front seats
Adjustment procedure
Power seat- Seat position adjustment switch
- Seatback angle adjustment switch
- Seat cushion (front) angle adjustment switch (driver’s side only)
- Vertical height adjustment switch (driver’s side only)
- Lumbar support adjustment switch (driver’s side only)

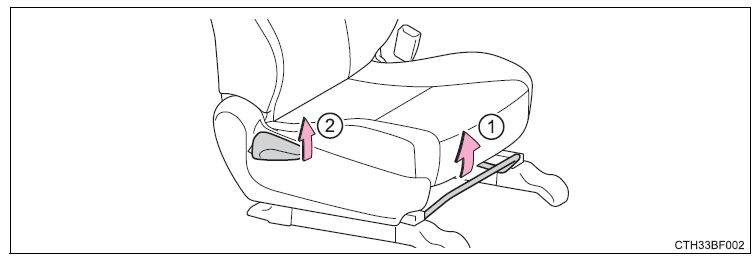
- Seat position adjustment lever
- Seatback angle adjustment lever
Active head restraints
When the occupant’s lower back presses against the seatback during a rear-end collision, the head restraint moves slightly forward and upward to help reduce the risk of whiplash to the seat occupant. The auto away function for exiting the driver seat
If the seat is already close to the rearmost position, the auto away function may not operate when the driver exits the vehicle.
Active head restraints
Even small forces applied to the seatback may cause the head restraint to move. Pushing up a locked head restraint forcibly may appear the head restraint inner structure. These do not indicate problems.
The auto away function for exiting the driver seat
If the seat is already close to the rearmost position, the auto away function may not operate when the driver exits the vehicle.
Active head restraints
Even small forces applied to the seatback may cause the head restraint to move. Pushing up a locked head restraint forcibly may appear the head restraint inner structure. These do not indicate problems. WARNING
- When adjusting the seat position
- Take care when adjusting the seat position to ensure that other passengers are not injured by the moving seat.
- Do not put your hands under the seat or near the moving parts to avoid injury.
- Fingers or hands may become jammed in the seat mechanism.
- Seat adjustment
- To reduce the risk of sliding under the lap belt during a collision, do not recline the seat more than necessary.
- If the seat is too reclined, the lap belt may slide past the hips and apply restraint forces directly to the abdomen, or your neck may contact the shoulder belt, increasing the risk of death or serious injury in the event of an accident.
- Adjustments should not be made while driving as the seat may unexpectedly move and cause the driver to lose control of the vehicle.
- After adjusting the seat, make sure that the seat is locked in position. (manual seat only)
- When adjusting the seat positions
- Make sure to leave enough space around the feet so they do not get stuck.
Rear seats
Adjustment procedures
- Vehicles without third row seats
- Rear seat
- Pull up the seatback angle adjustment lever until the lock is released.

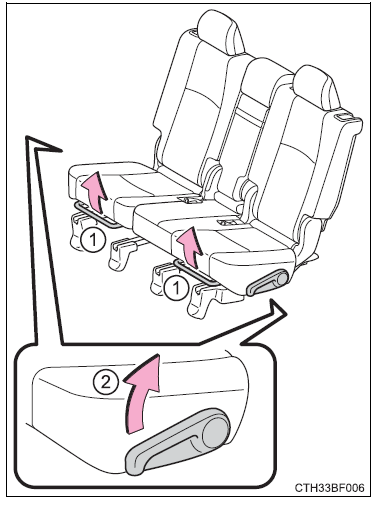
- Vehicles with third row seats
- Seat position adjustment lever
- Seatback angle adjustment lever
- Adjust the head restraints to the downmost position.

- Fold down the head restraints. When returning the head restraints to their original positions, make sure they are locked securely.

- Stow the rear seat belt buckles.

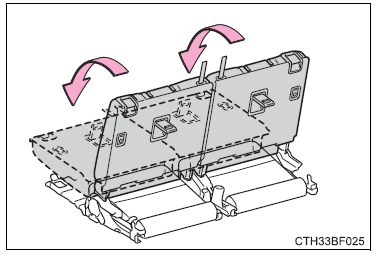
- Swing the bottom cushions up by pulling the lock release strap. When returning the rear seat cushions to their original positions, make sure they are locked securely.

- Push the lock release button and fold down the seatbacks. To return the rear seatbacks to their original positions, lift them up until they lock.

- Pull the center seatback angle lever behind the seatback and fold the seatback down. To return the rear center seatback to its original position, lift it up until it locks.

- 2023 Toyota 4Runner Specs, Price, Features and Mileage
Folding down the second row seats (vehicles with third row seats)
Before folding down the second row seats- Adjust the head restraints to the downmost position.

- Stow the second row seat belt buckles.

 Folding down the second row center seatback only
Pull the center seatback angle lever behind the seatback and fold the seatback down. To return the second row center seatback to its original position, lift it up until it locks.
Folding down the second row center seatback only
Pull the center seatback angle lever behind the seatback and fold the seatback down. To return the second row center seatback to its original position, lift it up until it locks.
Moving a second row seat for access to the third row seats (vehicles with third row seats)
Getting in the vehicle (right side only)- Pull up the lever and fold down the seatback. The seat will slide forward. Move the seat to the front-most position.

- Getting out of the vehicle (right side only) Lift the lever on the back of the seatback and fold down the seatback. The seat will slide forward. Move the seat to the front-most position.

- After passengers have entered/exited the vehicle
- Lift up the seatback and slide the seat backward until it locks.
Folding down the third row seats (vehicles with third row seats)
Before folding down the third row seats Pass the seat belts through the seat belt hangers and secure the seat belt plates. This prevents the shoulder belts from being damaged. Make sure that the seat belts are removed from the hangers before using them. Folding down the third row seats
From inside
Folding down the third row seats
From inside
- Pull the strap to fold down the head restraint.

- Pull the lever up.
- The seat cushion will slide backward.

- The seat cushion will slide backward.
- Pull the lever to unlock the seatback and then fold the seatback down.

-
- Pull the strap to fold down the head restraint.

- Pull the lever up. The seat cushion will slide backward and the seatback will be unlocked.

- Fold the seatback down.
- Pull the strap to fold down the head restraint.
-
- Raise the seatbacks to their original positions. Make sure they are locked securely.

- Pull the seat cushions forward.

- Raise the head restraints.
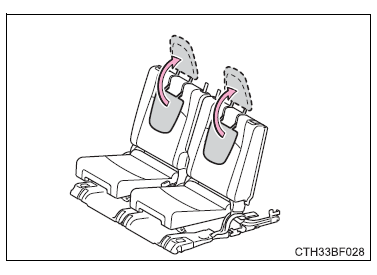
- Raise the seatbacks to their original positions. Make sure they are locked securely.
- Observe the following precautions. Failure to do so may result in death or serious injury.
- Do not fold the seatbacks down while driving.
- Stop the vehicle on level ground, set the parking brake and shift the shift lever to P.
- Do not allow anyone to sit on a folded seatback or in the luggage compartment while driving.
- Do not allow children to enter the luggage compartment.
- To reduce the risk of sliding under the lap belt during a collision, do not recline the seat more than necessary.
- If the seat is too reclined, the lap belt may slide past the hips and apply restraint forces directly to the abdomen, or your neck may contact the shoulder belt, increasing the risk of death or serious injury in the event of an accident.
- Adjustments should not be made while driving as the seat may unexpectedly move and cause the driver to lose control of the vehicle.
- Take care when adjusting the seat position to ensure that other passengers are not injured by the moving seat.
- Do not put your hands under the seat or near the moving parts to avoid injury. Fingers or hands may become jammed in the seat mechanism.
- Observe the following precautions. Failure to do so may result in death or serious injury.
- Make sure the seatback is securely locked by pushing it forward and rearward on the top.
- Check that the seat belts are not twisted or caught in the seatback.
- Stowing the seat belts
- The seat belts and the buckles must be stowed before you fold down the rear seatbacks
Driving position memory
This feature automatically adjusts the driver’s seat to suit your preferences.Driving position memory
Your preferred driving position (the position of the driver’s seat) can be recorded and recalled by pressing a button. Two different driving positions can be recorded into memory. Recording procedure- Check that the shift lever is in P.
- Turn the engine switch to IGNITION ON mode.
- Adjust the driver’s seat to the desired positions.
- While pressing the “SET” button, or within 3 seconds after the “SET” button is pressed, press button “1” or “2” until the buzzer sounds.

- Check that the shift lever is in P.
- Turn the engine switch to IGNITION ON mode.
- Press one of the buttons for the driving position you want to recall until the buzzer sounds.

- Press the “SET” button.
- Press button “1” or “2”.
- Operate any of the seat adjustment switches (only cancels seat position recall).
- All adjusted positions can be recorded.
- Operating the driving position memory after turning the engine switch off
- Recorded seat positions can be activated up to 180 seconds after the driver’s door is opened and another 60 seconds after it is closed again.
- In order to correctly use the driving position memory function
- If a seat position is already in the furthest possible position and the seat is operated in the same direction, the recorded position may be slightly different when it is recalled.
Memory recall function
Each electronic key can be registered to recall your preferred driving position. Registering procedure Record your driving position to button “1” or “2” before performing the following: Carry only the key you want to register, and then close the driver’s door. If 2 or more keys are in the vehicle, the driving position cannot be recorded properly.- Check that the shift lever is in P.
- Turn the engine switch to IGNITION ON mode.
- Recall the driving position that you want to record.
- While pressing the recalled button, press and hold the door lock switch (either lock or unlock) until the buzzer sounds. If the button could not be registered, the buzzer sounds continuously for approximately 3 seconds.

- The driving position will move to the recorded position.
- If the driving position is in a position that has already been recorded, the seat will not move.
- Turn the engine switch to IGNITION ON mode.
- While pressing the “SET” button, press and hold the door lock switch (either lock or unlock) until the buzzer sounds twice.
- Different driving positions can be registered for each electronic key. Therefore, the driving position that is recalled may be different depending on the key being carried.
- If a door other than the driver’s door is unlocked with the smart system, the driving position cannot be recalled. In this case, press the driving position button which has been set.
Head restraints
Head restraints are provided for all seats.Front seats
Vertical adjustment- Up
- Pull the head restraints up.
- Down
- Push the head restraint down while pressing the lock release button.

- Push the head restraint down while pressing the lock release button.
Second seats
Vertical adjustment- Up
- Pull the head restraints up.
- Down
- Push the head restraint down while pressing the lock release button.

- Push the head restraint down while pressing the lock release button.
- To use
- Lift up the head restraint until it locks.
- To fold
- Pull the head restraint lock release lever to fold the head restraint.

- Pull the head restraint lock release lever to fold the head restraint.
- To use
- Lift up the head restraint until it locks.
- To fold
- Pull the strap to fold the head restraint.
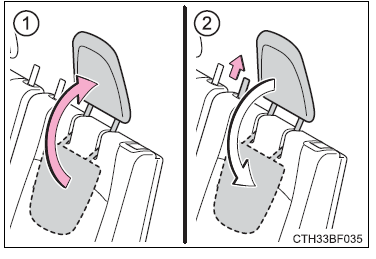
- Pull the strap to fold the head restraint.
 Installing the head restraints (except third row seats)
Align the head restraint with the installation holes and push it down to the lock position. Press and hold the lock release button when lowering the head restraint.
Installing the head restraints (except third row seats)
Align the head restraint with the installation holes and push it down to the lock position. Press and hold the lock release button when lowering the head restraint. Adjusting the height of the head restraints (except third row seats)
Make sure that the head restraints are adjusted so that the center of the head restraint is closest to the top of your ears.
Adjusting the height of the head restraints (except third row seats)
Make sure that the head restraints are adjusted so that the center of the head restraint is closest to the top of your ears.
- Observe the following precautions regarding the head restraints. Failure to do so may result in death or serious injury.
- Use the head restraints designed for each respective seat.
- Adjust the head restraints to the correct position at all times.
- After adjusting the head restraints, push down on them and make sure they are locked in position.
- Do not drive with the head restraints removed.
FAQ
The 2023 Toyota 4Runner typically has seating for five to seven passengers, depending on the trim level and configuration.
The 2023 4Runner usually comes with front bucket seats and a rear bench seat, with options for leather-trimmed seats on higher trim levels.
To adjust the driver’s seat, locate the seat adjustment controls on the side of the seat and use them to move the seat forward, backward, up, down, and to recline or upright positions.
Many models of the 2023 4Runner offer lumbar support adjustment for the driver’s seat, allowing you to customize your seating comfort.
Yes, you can typically adjust the front passenger seat in the same way as the driver’s seat.
The rear seats in the 4Runner are usually not adjustable for position but can be folded down or reclined in some models for added cargo space or passenger comfort.
Seatback angle adjustment allows you to recline or sit upright to find a comfortable seating position while driving.
To fold down the rear seats, typically locate the release levers or buttons in the cargo area or on the seat itself, and fold the seatbacks down.
Yes, you can usually adjust the headrests in the 4Runner seats for optimal comfort and safety.
Seat height adjustment allows you to raise or lower the seat to achieve a comfortable driving position and better visibility.
Some higher trim levels of the 2023 4Runner may offer memory seats that allow you to save and recall your preferred seat positions.
Yes, you can typically adjust the steering wheel position in the 4Runner for both tilt and telescopic adjustments to find the ideal driving posture.
Yes, it’s essential to follow the manufacturer’s guidelines and safety standards for child safety seat installation, typically located in the owner’s manual.
Second-row seats in 4Runner models with a third-row option can usually be adjusted for forward and backward positioning to create more legroom or cargo space in the third-row area.
If you encounter issues with seat adjustments in the 4Runner, it’s advisable to consult the owner’s manual for troubleshooting tips or seek assistance from a Toyota dealership or certified mechanic for repairs.
Useful Link
Read Full User Guide: Toyota 4Runner 2023 User Guide Download User Guide PDF: https://www.toyota.com/owners/resources/warranty-owners-manuals 2023 Toyota 4Runner Specs, Price, Features and Mileage