

2025 Volkswagen Caddy Fuses and Fuse Box User Guide
The 2025 Volkswagen Caddy includes a contemporary fuse and fuse box system to protect its electrical components. Understanding the fuse arrangement and operations allows for faster troubleshooting and safer maintenance of the vehicle’s different systems and electronic equipment.
Video: 2025 Volkswagen Caddy Fuses
Volkswagen Fuses in the dash panel Guide
Left-hand drive vehicles: Opening and closing the fuse box in the dash panel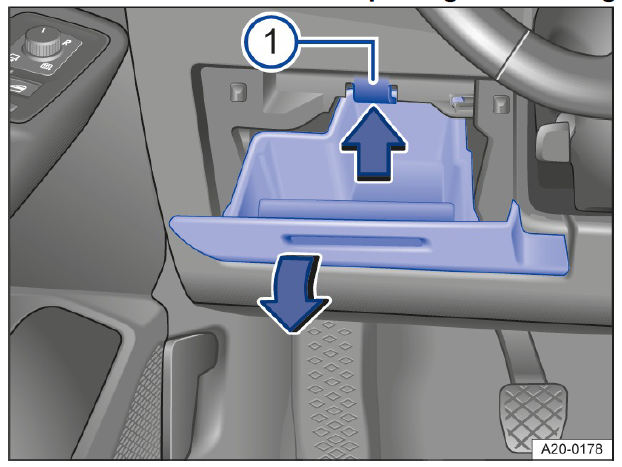
Fig. 1 On the left next to the steering wheel: cover of the fuse box in the dash panel.
Lug.
Opening the cover
- Open the storage compartment and empty it if necessary.
- Push the retaining lug upwards in the direction of the arrow and at the same time open the stowage compartment further and remove in the direction of the arrow until you can access the fuse carrier.
Closing the cover
- Press the stowage compartment into the mounts on the dash panel until it audibly clicks into place on both sides.
- Close the stowage compartment.
Right-hand drive vehicles: Opening and closing the fuse box in the dash panel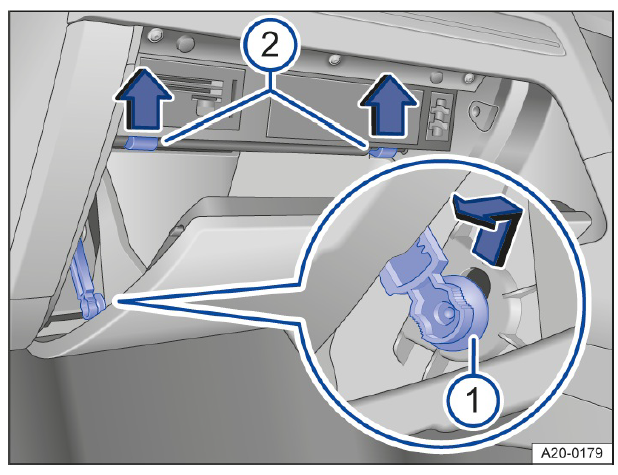
Fig. 2 On the front passenger side: cover of the fuse box in the dash panel (illustration).
- Restrictor.
- Catch.
Opening the cover
- Open the glove box and empty if necessary .
- Push restrictor upwards into the opening of the holder and pull out to the side .
- Push catches upwards in the direction of the arrow at the same time open the stowage compartment further
Closing the cover
- Move the glove box into position.
- Insert the restrictor into the opening of the holder and push down until you hear it engage.
- Carefully push the glove box forwards past the resistance of the stop pin
Fuse in the dash panel
The overview shows the fuse locations of the electrical consumers relevant for the driver. The first column in the overview contains the location. The other columns contain the amp rating, the fuse type and the electrical consumer protected by the fuse.
Depending on country and on the equipment of your vehicle, the fuse numbers and positions may differ to those given in the overview. If necessary, ask a suitably qualified workshop for the exact fuse layout.
Fuse assignment
Fig. 1 In the dash panel: Fuse assignment.
Fuse location
| F6 | 30 amps, ATO®, interior lighting. |
| F7 | 30 amps, ATO®, seat heating. |
| F8 | 25 amps, ATO®, control unit for special vehicles (depending on the equipment). |
| F12 | 40 amps, MAXI+®, right exterior lighting |
| F13 | 40 amps, MAXI+®, central locking. |
| F20 | 7.5 amps, MINI®, telephone |
| F30 | 20 amps, ATO®, Infotainment system. |
| F35 | 40 amps, MAXI+®, left exterior lighting. |
| F36 | 40 amps, MAXI+®, blower regulator |
| F40 | 7.5 amps, MINI®, anti-theft alarm. |
| F42 | 7.5 amps, MINI®, selector mechanism for automatic gearbox |
| F43 | 10 amps, MINI®, control unit for air conditioning system or heating and fresh air system, rear window heating relay. |
| F44 | 7.5 amps, MINI®, light switch (dipped beam), rain/light sensor, electronic parking brake. |
| F46 | 7.5 amps, MINI®, display, Infotainment system control panel. |
| F52 | 20 amps, ATO®, cigarette lighter, sockets (observe installation position – the fuse is factory-fitted asp ermanent live). |
| F66 | 15 amps, ATO®, rear window wiper. |
| F67 | 30 amps, MAXI+®, rear window heating. |
Fuse locations for vehicles with factory-fitted towing bracket
| F3 | 25 amps, ATO®, trailer control unit, left. |
| F11 | 15 amps, ATO®, trailer control unit. |
| F29 | 15 amps, ATO®, trailer charging cable. |
| F31 | 25 amps, ATO®, trailer control unit, right. |
Electric windows and electrically adjustable seats may be protected by circuit breakers or control units that switch on again automatically a few seconds after the overload (e.g. window frozen shut) has been rectified.
Fuses in the bonnet space
Fuse box in the bonnet space
Fig. 1 In the bonnet space: Fuse box with plastic pliers.
- Fuse box.
- Plastic pliers.
There may be a pair of plastic grippers for removing fuses in the fuse box .
Removing the cover
- Open the bonnet.
- To release, press the catches in the direction of the arrows.
- Lift off the cover .
Installing the cover
- Place the cover over the fuse box.
- Press the cover downwards until it audibly engages on both sides.
- Close the bonnet.
Fuse overview of fuses in the bonnet space
The overview shows the fuse locations of the electrical consumers relevant for the driver. The first column in the overview contains the location. The other columns contain the amp rating, the fuse type and the electrical consumer protected by the fuse.
Depending on the market and specification of your vehicle, the fuse numbers and locations may differ to those given in the overview. If necessary, ask a suitably qualified workshop for the exact fuse assignment.
Fuse assignment
Fig. 1 In the bonnet space: Fuse locations.
Fuse location :
| F9 | 15 amps, ATO®, horn. |
| F10 | 30 amps, ATO®, front wipers. |
| F31 | 7.5 amps, ATO®, brake light sensor. |
Fuse locations for vehicles with factory-fitted auxiliary heater and ventilation
| F14 | 20 amps, ATO®, auxiliary heater. |
Replacing blown fuses
Preparations
- Switch off the ignition, the lights and all electrical consumers.
Detecting a blown fuse
Fig. 1 Blown fuse: flat blade fuse, cartridge fuse
- Shine a torch onto the fuse.
You can see if a fuse is blown from the top and side through the transparent housing due to the melted metal strip.
Fuse types
- Standard flat blade fuse (ATO®).
- Small flat blade fuse (MINI®).
- Large flat blade fuse (MAXI® or MAXI+®).
Colour coding of fuses
Fuses (ATO® – MINI® – MAXI® and MAXI+®)
| Colour | Amp rating |
| Black | 1 amps |
| purple | 3 amps |
| light brown | 5 amps |
| Brown | 7.5 amps |
| Red | 10 amps |
| Blue | 15 amps |
| Yellow | 20 amps |
| White or transparent | 25 amps |
| Green | 30 amps |
| Orange | 40 amps |
| Red | 50 amps |
Replacing a fuse
Fig. 2 Removing or inserting fuse (illustration).
Plastic pliers.
You can damage another position in the electrical system by using a fuse with a higher amp rating.
- Never replace a fuse with a fuse that has a higher rating.
- If applicable, take the plastic pliers → Fig. 2 1 out of the fuse box cover.
- Push the plastic grippers clip suitable for the fuse type onto the fuse from the top→ Fig. 2 A or the side
- Remove the fuse.
- If the fuse has blown, replace it with a new fuse of the same amp rating (same colour and same markings) and same size .
- Once the new fuse has been inserted, put the plastic grippers back in the cover.
- Insert the cover again or close the fuse box cover.
How to Replace the Fuses of the 2025 Volkswagen Caddy
To replace the fuses in a 2025 Volkswagen Caddy, follow these steps:
Materials:
- The new fuse of the correct amperage.
- Fuse puller or needle-nose pliers.
Step-by-Step Instructions:
-
Turn Off the Vehicle: Ensure the ignition is off and the key is removed to prevent any electrical mishaps.
-
Access the Appropriate Fuse Box: Depending on the malfunctioning component, identify and open the relevant fuse box.
-
Locate the Faulty Fuse: Using the fuse diagram, pinpoint the fuse associated with the malfunctioning component.
-
Inspect the Fuse: A blown fuse will have a broken filament or appear blackened.
-
Remove the Faulty Fuse: Use a fuse puller or a pair of needle-nose pliers to gently extract the damaged fuse.
-
Insert a New Fuse: Replace it with a fuse of the same amperage rating. Using a fuse with a higher rating can cause electrical damage.
-
Test the Component: Turn on the vehicle and check if the component is functioning correctly.
- Tips:
Always replace fuses with one of the same amperage to prevent electrical issues.
Useful Links:
2024 Volkswagen Atlas Specs, Price, Features, Mileage and Review
2025 Volkswagen Caddy Warning and Indicator Lights User Guide