


2026 Chevrolet Colorado Fuse Box Diagram & Location User Guide
The 2026 Chevrolet Colorado fuse box diagram and placement is here. Learn where each fuse is, its function, and how to properly identify and replace them to keep your vehicle’s electrical systems running smoothly.
Video: 2026 Chevrolet Colorado Fuse
Electrical System
Electrical System Overload
The vehicle has fuses and circuit breakers to protect against an electrical system overload. When the current electrical load is too heavy, the circuit breaker opens and closes, protecting the circuit until the current load returns to normal or the problem is fixed. This greatly reduces the chance of circuit overload and fire caused by electrical problems. Fuses and circuit breakers protect power devices in the vehicle.
If there is a problem on the road and a fuse needs to be replaced, the same amperage fuse can be borrowed. To check a fuse, look at the band inside the fuse. If the band is broken or melted, replace the fuse. Be sure to replace a bad fuse with a fuse of identical size and rating.
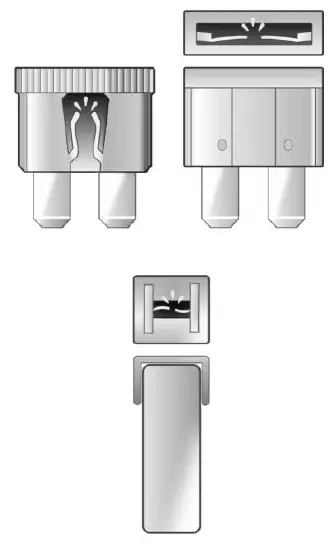
Replacing a Blown Fuse
- Turn off the vehicle.
- Locate the fuse puller in the engine compartment fuse block.

- Use the fuse puller to remove the fuse from the top or side.
- If the fuse must be replaced immediately, borrow a replacement fuse with the same amperage from the fuse block. Choose a vehicle feature that is not needed to safely operate the vehicle. Repeat Steps 2-3.
- Insert the replacement fuse into the empty slot of the blown fuse.
At the next opportunity, see your dealer to replace the blown fuse.
Headlamp Wiring
An electrical overload may cause the lamps to go on and off, or in some cases to remain off. Have the headlamp wiring checked right away if the lamps go on and off or remain off?
Windshield Wipers
If the wiper motor overheats due to heavy snow or ice, the windshield wipers will stop until the motor cools and will then restart. Although the circuit is protected from electrical overload, overload due to heavy snow or ice may cause wiper linkage damage. Always clear ice and heavy snow from the windshield before using the windshield wipers. Vehicle Care If the overload is caused by an electrical problem and not snow or ice, be sure to get it fixed.
Fuses and Circuit Breakers
The wiring circuits in the vehicle are protected from short circuits by a combination of fuses and circuit breakers. This greatly reduces the chance of damage caused by electrical problems.
Danger
Fuses and circuit breakers are marked with their ampere rating. Do not exceed the specified amperage rating when replacing fuses and circuit breakers. The use of an oversized fuse or circuit breaker can result in a vehicle fire. You and others could be seriously injured or killed.
Warning
Installation or use of fuses that do not meet GM’s original fuse specifications is dangerous. The fuses could fail, and result in a fire. You or others could be injured or killed, and the vehicle could be damaged.
Engine Compartment Fuse Block
The engine compartment fuse block is in the engine compartment.
 Caution
Spilling liquid on any electrical component of the vehicle may damage it. Always keep the covers on any electrical component.
Lift the cover to access the fuse block.
The vehicle may not be equipped with all of the fuses, relays, and features shown.
Engine Compartment Fuse Block
A fuse puller is available inside this fuse block.
| Fuses | Usage |
| F01 | ICCM – Integrated Chassis Control Module |
| F02 | FUEL TANK ZONE MDL – Fuel Tank Zone Module |
| F03 | – |
| F04 | Cooling Fan 2 |
| F05 | – |
| F06 | – |
| F07 | MTAOP – Transmission Auxiliary Oil Pump Motor |
| F08 | – |
| F09 | – |
| F10 | – |
| F11 | SECONDARY AXLE MTR – Front Drive Axle Actuator |
| F12 | – |
| F13 | Trailer Connector |
| F14 | – |
| F15 | SBZA/CVS – Side Blind Zone Alert/Canister Vent Solenoid |
| F16 | – |
| F17 | – |
| F18 | – |
| F19 | EBCM – Electronic Brake Control Module |
| F20 | Cooling Fan 1 |
| F21 | – |
| F22 | – |
| F23 | – |
| F24 | Cooling Fan 3 |
| F25 | ENG MISC 1 & 2 – Wide Range Air Fuel Oxygen Sensor/Canister Purge/ Turbo Bypass/Step Cam Intake-Exhaust Solenoids Block Coolant Valve Actuator/Mass Air Flow/Humidity/ Induction Air Temperature/Throttle Inlet Pressure Sensors |
| F26 | A/C CLUTCH – Air Compressor Clutch |
| F27 | Park Lamps |
| F28 | TIM 2 – Trailer Interface Module 2 |
| F29 | Spare |
| F30 | – |
| F31 | POWER TRAIN IGN 1 – Power Train Ignition 1 & 2 |
| F32 | – |
| F33 | TRLR REVERSE LAMPS – Trailer Reverse Lamps |
| F34 | TIM 1 – Trailer Interface Module 1 |
| F35 | Spare |
| F36 | ENGINE CONTROL MDL – Engine Control Module |
| F37 | IGNITION COILS |
| F38 | TRLR STOP LAMP LT – Trailer Stop Lamp Left |
| F39 | TRLR STOP LAMP RT – Trailer Stop Lamp Right |
| F40 | TCCM – Transfer Case Control Module |
| F41 | Starter Pinion |
| F42 | Starter |
| F43 | – |
| F44 | Spare |
| F45 | Spare |
| F46 | Spare |
| F47 | Spare |
| F48 | Spare |
| F49 | TBPM/TRLR WRG – Trailer Brake Power Module/Trailer Wiring Provisions |
| F50 | Spare |
| F51 | CHMSL – Center High Mounted Stop Lamp |
| F52 | Side Markers |
| F53 | Spare |
| F54 | – |
| F55 | REAR WNDW DEFOGGER – Rear Window Defogger |
| F56 | – |
| F57 | – |
| F58 | Front Wipers |
| F59 | MISC WINDOWS LEFT – Driver Door Panel Switch (Express-Up/ Down)/Window Motor Left Front (Express-Up/Down) Window Switch Left Rear (Express Down) Window Motor Left Rear (Express Down) |
| F60 | – |
| F61 | Spare |
| F62 | Amplifier |
| F63 | – |
| F64 | – |
| F65 | ELM 4 – Exterior Lighting Module 4 – Right Front Park Lamp/ Daytime Running Lamp/ Left Trailer Stop/Turn Lamp/Left Rear Park Lamp/Right High Beam |
| F66 | LOW BEAMS – Front LED Low Beams |
| F67 | – |
| F68 | HTD ST MDL 1 – Heated Seat Module 1 – Front Heated Seats |
| F69 | U/B CAMERA WASHER – Underbody Camera Washer |
| F70 | – |
| F71 | DC/AC INVERTER – Direct Current to Alternate Current Inverter |
| F72 | Spare |
| F73 | Aeroshutter |
| F74 | ELM 6 – Exterior Lighting Module 6 – Left Low Beam/Right Rear Stop/Turn Lamp |
| F75 | Spare |
| F76 | HTD ST MDL 2 – Heated Seat Module 2 – Front Heated Seat |
| F77 | – |
| F78 | – |
| F79 | – |
| F80 | – |
| F81 | – |
| F82 | – |
| F83 | LED Cargo Lamp |
| F84 | ELM 7 – Exterior Lighting Module 7 – Left Front Park Lamp/ Daytime Running Lamp/ Left Front Turn Lamp/ Center High Mounted Stop Lamp/Right Rear Park Lamp/Reverse Lamps |
| F85 | – |
| F86 | Horn |
| F87 | Front Washer Pump |
| F88 | – |
| F89 | – |
| F90 | MISC WINDOWS RIGHT – Passenger Door Panel Switch (Express Down) Window Motor Right Front (Express-Up/Down) Window Switch Right Rear (Express Down) Window Motor Right Rear (Express-Up/Down) |
| F91 | – |
Accessory Fuse Block
If equipped, the accessory fuse block powers electrical accessories.
| Fuse | Usage |
| F01 | AUX – Center Stack Auxiliary Switch 6 |
| F02 | AUX 1– Auxiliary Switch 1 |
| F03 | AUX 2– Auxiliary Switch 2 |
| F04 | AUX 3– Auxiliary Switch 3 |
| F05 | – |
| F06 | – |
| Relay | Usage |
| K01 | AUX – Center Stack Auxiliary Switch 6 |
| K02 | AUX 1– Auxiliary Switch 1 |
| K03 | AUX 2– Auxiliary Switch 2 |
| K04 | AUX 3– Auxiliary Switch 3 |
| K05 | – |
| K06 | – |
Instrument Panel Fuse Block
 The instrument panel fuse block is behind a side trim panel. Unclip the sides of the trim, then pull the cover away from the trim panel to access the fuse block.

There is a cover on the instrument panel fuse block. Press the clips on the side to remove the cover.
 The vehicle may not be equipped with all of the fuses, relays, and features shown.
| Fuse | Usage |
| F01 | FRONT HVAC BLOWER – Front HVAC Module |
| F02 | ELM 1 – Exterior Lighting Module 1 |
| F03 | TRANS CNTRL MODULE – Transmission Control Module |
| F04 | ELM 2 – Exterior Lighting Module 2 |
| F05 | DRIVER SEAT MISC – Memory Seat Module/Seat Position Switch (SPS) LIN Switch |
| F06 | BODY CNTRL MODULE 1 – Body Control Module 1 |
| F07 | STR/WHL/CONTROLS – Steering Wheels Controls |
| F08 | – |
| F09 | VCM MDL/SPARE – Vehicle Control Module/Spare |
| F10 | MISCELLANEOUS 1 – Electric Park Break Switch/ Automatic Occupant Sensing Display |
| F11 | AUX JACK/TPC – Auxiliary Audio/Video Jack/ Telematics Control Platform |
| F12 | – |
| F13 | CGM & SDM/AOS – Central Gateway Module/Sensing and Diagnostic Module/ Automatic Occupant Sensing Module |
| F14 | MISCELLANEOUS 2 – Transmission Control Module/Transfer Case Control/Electronic Brake Control Module/Integrated Chassis Control Module/ Trailer Interface Module |
| F15 | MISCELLANEOUS 3 – Exterior Lighting Module/ DC-AC Inverter Module/ Vented Module |
| F16 | – |
| F17 | WCM/DATA LINK CONN – Wireless Charger Module/ Data Link Connector |
| F18 | MISCELLANEOUS 4 – E-Stop/Driver Mode Switch/Reflective Light Auxiliary Display/Sensing and Diagnostic Module/ Inside Rear View Mirror/ Humidity Sensor |
| F19 | ENGINE CNTRL MODULE – Engine Control Module |
| F20 | RFA/RPA – Remote Function Antenna/Park Assist AMP – Amplifier |
| F21 | DISPLAYS/VPM –Video Processing Module/Display |
| F22 | SUNROOF – Sunroof |
| F23 | – |
| F24 | TRLR BRK CNTRL SW – Trailer Break Control Switch |
| F25 | AUX USB FLOOR CNSL – Auxiliary USB Power Outlet |
| F26 | BODY CNTRL MODULE 2 – Body Control Module 2 |
| F27 | DOOR PANEL SW LF/MISC 1 FRONT DSP – Door Panel Switch Left/Front Display |
| F28 | BODY CNTRL MODULE 3 – Body Control Module 3 |
| F29 | ELM 3 – Exterior Lighting Module 3 |
| F30 | FRONT CAMERA – Front Camera Module |
| F31 | VCU MDL/SPARE – Virtual Cockpit Unit Module |
| F32 | HTD STR WHL – Heated Steering Wheel Module |
| F33 | ELM 5 – Exterior Lighting Module 5 |
| F34 | BODY CNTRL MODULE 4 – Body Control Module 4 |
| F35 | DC/DC Converter 2 |
| F36 | DC/DC Converter 1 |
| F37 | FRT SEATS LMBR SWS – Seat Lumbar Switch |
| F38 | – |
| F39 | DRIVER POWER SEAT – Power Seat Driver |
| F40 | PASSENGER POWER SEAT – Power Seat Co-Driver |
| F41 | APO CONSOLE – Auxiliary DC Power Outlet Row 1 |
| F42 | – |
How to Replace the Fuse of the 2026 Chevrolet Colorado
To replace the fuses in a 2026 Chevrolet Colorado, follow these steps:
Materials:
- The new fuse of the correct amperage.
- Fuse puller or needle-nose pliers.
Step-by-Step Guide:
- Turn Off the Vehicle
- Shut off the engine and remove the key from the ignition for safety.
- Locate the Fuse Box
-
Interior fuse box: Usually found under the dashboard on the driver’s side.
-
Engine-bay fuse box: Located near the battery under the hood (left-hand side).
-
- Access the Fuse Panel
- Open the fuse box cover. On the backside of the cover, you’ll find a diagram identifying each fuse and its purpose.
- Find the Faulty Fuse
-
Identify the fuse linked to the malfunctioning component (e.g., radio, lights).
-
Use the fuse puller (often stored inside the cover) to gently remove the fuse.
-
- Inspect the Fuse
- A blown fuse will have a broken or burned metal strip inside the transparent casing.
- Insert the New Fuse
-
Replace with a new fuse of the exact same amperage rating.
-
Example: If it’s a 15-amp fuse, only replace it with another 15-amp.
-
-
- Reinstall the Cover & Test
-
Close the fuse box.
-
Start the vehicle and test the component to ensure it works.
-
Tips:
- Always replace fuses with one of the same amperage to prevent electrical issues.
Useful Links:
2024 Chevrolet Colorado Review, Specs, Price and Mileage (Brochure)
2026 Chevrolet Colorado Cluster Display & Dashboard Warning Indicators User Guide