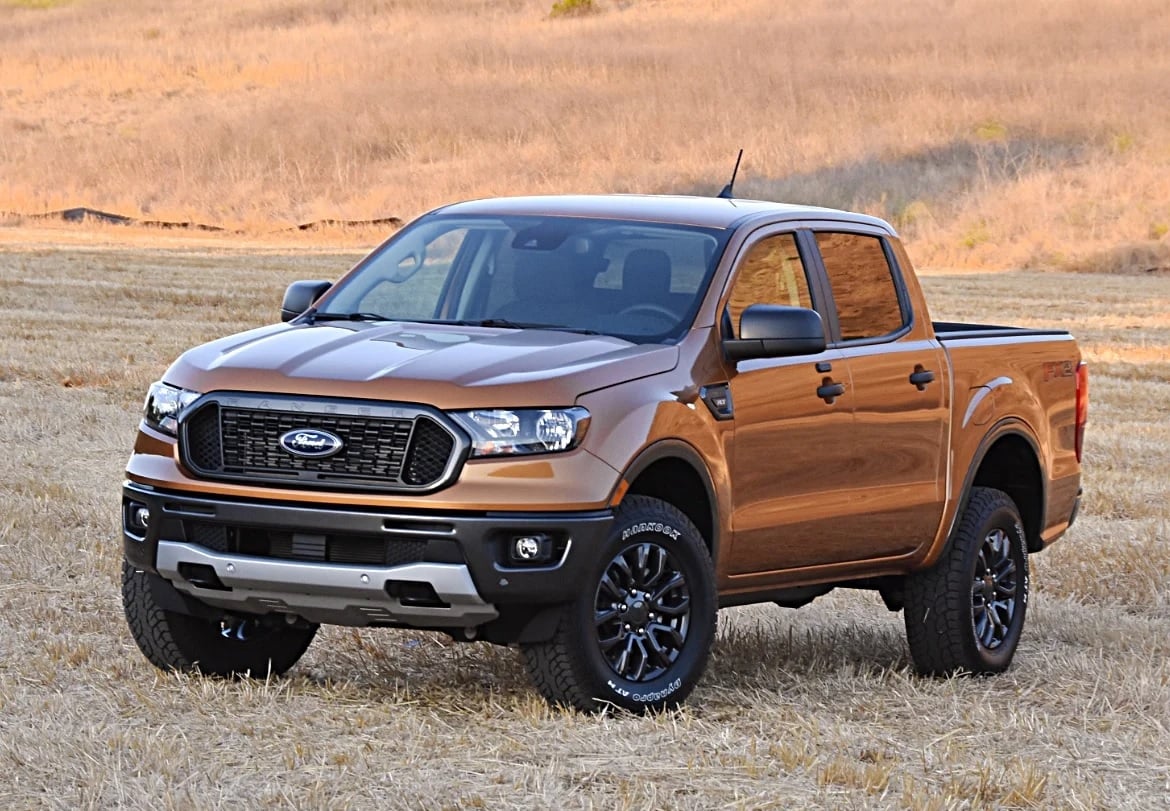

2020 FORD Ranger Keys and Doors Key User Guide
This blog will assist owners in understanding the 2020 Ford Ranger key and door key systems, including operation, security features, and everyday use. It describes access techniques, locking mechanisms, and key kinds, allowing drivers to confidently handle entry, security, and convenience during ownership, maintenance, and daily driving.
Keys and Remote Controls
GENERAL INFORMATION ON RADIO FREQUENCIES
This device complies with Part 15 of the FCC Rules and with Industry Canada license-exempt RSS standard(s). Operation is subject to the following two conditions: (1) This device may not cause harmful interference, and (2) This device must accept any interference received, including interference that may cause undesired operation.
WARNING: Changes or modifications not expressively approved by the party responsible for compliance could void the user’s authority to operate the equipment. The term “IC:” before the radio certification number only signifies that Industry Canada technical specifications were met.
The typical operating range for your transmitter is approximately 33 ft (10 m). Vehicles with the remote start feature will have a greater range. One of the following could cause a decrease in operating range:
- Weather conditions.
- Nearby radio towers.
- Structures around the vehicle.
- Other vehicles parked next to your vehicle.
The radio frequency used by your remote control can also be used by other radio transmitters, for example amateur radios, medical equipment, wireless headphones, wireless remote controls, cell phones, battery chargers and alarm systems. If the frequencies are jammed, you will not be able to use your remote control. You can lock and unlock the doors with the key.
Note: Make sure to lock your vehicle before leaving it unattended.
Note: If you are in range, the remote control will operate if you press any button unintentionally.
Note: The remote control contains sensitive electrical components. Exposure to moisture or impact may cause permanent damage.
Intelligent Access
The system uses a radio frequency signal to communicate with your vehicle and authorize your vehicle to unlock when one of the following conditions are met:
- You activate the front exterior door handle switch.
- You press the luggage compartment button.
- You press a button on the transmitter.
If excessive radio frequency interference is present in the area or if the transmitter battery is low, you may need to mechanically unlock your door. You can use the mechanical key blade in your intelligent access key to open the driver door in this situation.
REMOTE CONTROL
Integrated Keyhead Transmitter
Use the key blade to start your vehicle and unlock or lock the driver door from outside your vehicle. The integrated keyhead transmitter functions as a programmed ignition key that operates all the locks and starts your vehicle, as well as a remote control.
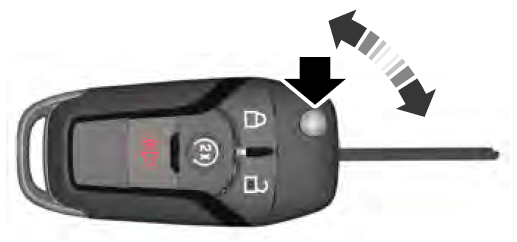
Press the button to release the key blade. Press and hold the button to fold the key blade back in when not in use.
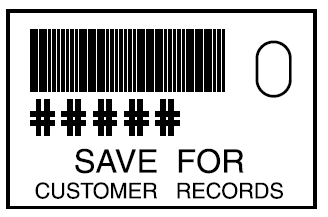
Note: Your vehicle keys came with a security label that provides important key cut information. Keep the label in a safe place for future reference.
Intelligent Access Key
Note: You may not be able to shift out of park (P) unless the intelligent access key is inside your vehicle.

The remote control operates the power locks. The remote control must be in your vehicle to use the push button start.
Removable Key Blade
The remote control also contains a removable key blade that you can use to unlock your vehicle.
Replacing the Battery
WARNING: Keep batteries away from children to prevent ingestion. Failure to follow this instruction could result in personal injury or death. If ingested, immediately seek medical attention.
WARNING: If the battery compartment does not securely close, stop using the remote control and replace it as soon as possible. In the meantime, keep the remote control away from children. Failure to follow this instruction could result in personal injury or death.
Note: Refer to local regulations when disposing of remote control batteries.
Note: Do not wipe off any grease on the battery terminals or on the back surface of the circuit board.
Note: Replacing the battery does not erase the programmed key from your vehicle. The remote control should operate normally.
A message appears in the information display when the remote control battery is low. See General Information (page 96).
Integrated Keyhead Transmitter
The remote control uses one coin-type three-volt lithium battery.
Press the button to release the key blade before beginning the procedure.

Press the release button and pull the key blade out.
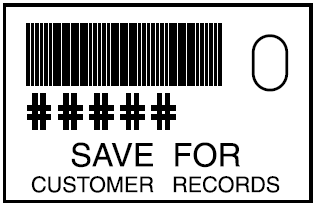
Note: Your vehicle keys came with a security label that provides important key cut information. Keep the label in a safe place for future reference.
Replacing the Battery
WARNING: Keep batteries away from children to prevent ingestion. Failure to follow this instruction could result in personal injury or death. If ingested, immediately seek medical attention
WARNING: If the battery compartment does not securely close, stop using the remote control and replace it as soon as possible. In the meantime, keep the remote control away from children. Failure to follow this instruction could result in personal injury or death.
Note: Refer to local regulations when disposing of remote control batteries.
Note: Do not wipe off any grease on the battery terminals or on the back surface of the circuit board.
Note: Replacing the battery does not erase the programmed key from your vehicle. The remote control should operate normally.
A message appears in the information display when the remote control battery is low. See General Information
Integrated Keyhead Transmitter
The remote control uses one coin-type three-volt lithium battery.
Press the button to release the key blade before beginning the procedure
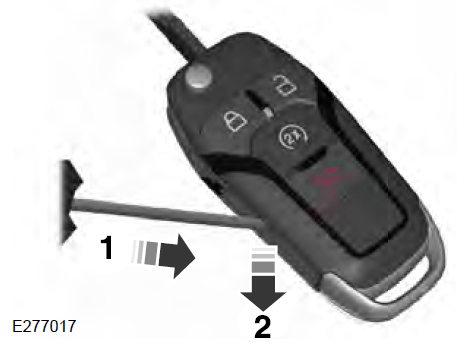
- Insert a suitable tool, for example a screwdriver, in the position shown and gently push the clip.
- Press the clip down to release the battery cover.
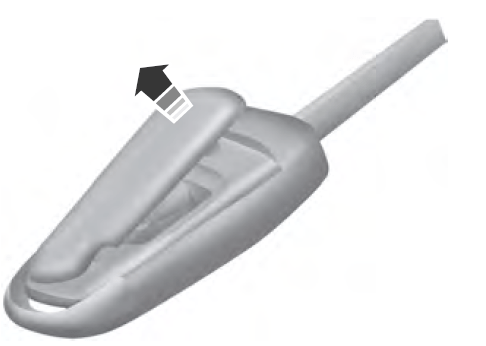
- Carefully remove the cover.
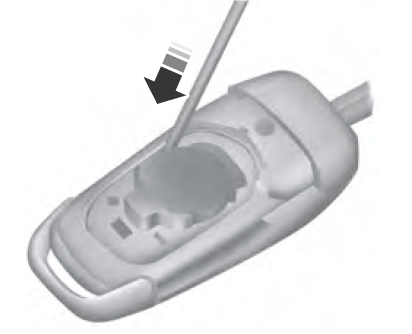 Note: Do not touch the battery contacts or the printed circuit board with the screwdriver.
- Insert a screwdriver as shown to release the battery.
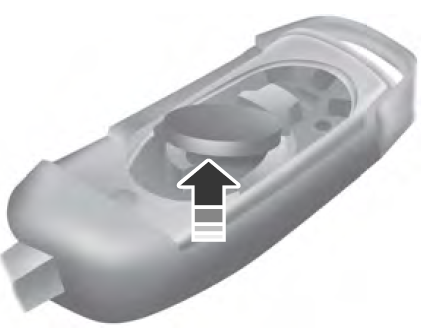
- Remove the battery.
- Install a new battery with the + facing up.
- Replace the battery cover.
Intelligent Access Key
The remote control uses one coin-type three-volt lithium battery.
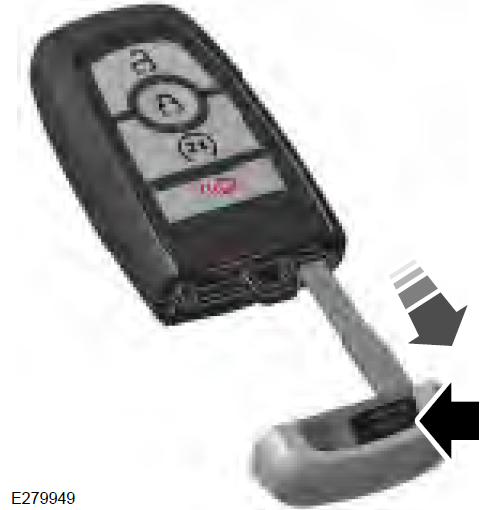
- Push the release button and pull the key blade out.
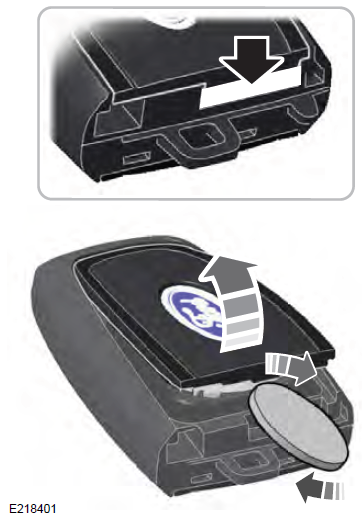
- Twist a thin coin under the tab hidden behind the key blade head to remove the battery cover.
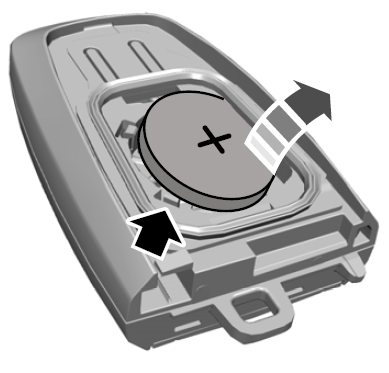
- Insert a suitable tool, for example a screwdriver, in the position shown and carefully remove the battery.
- Install a new battery with the + facing upward.
- Reinstall the battery housing cover onto the remote control and install the key blade.
Car Finder
 Press the button twice within three seconds. The horn sounds and the direction indicators flash.
Sounding a Panic Alarm
Note: The panic alarm only operates when the ignition is off.

Remote Start
WARNING: Do not start the engine in a closed garage or in other enclosed areas. Exhaust fumes are toxic. Always open the garage door before you start the engine. Failure to follow this instruction could result in personal injury or death.
Note: Do not use remote start if your fuel level is low.
 The remote start button is on the remote control.
This feature allows you to start your vehicle from the outside. The remote control has an extended operating range. If your vehicle has automatic climate control, you can configure it to operate when you remote start your vehicle. A manual climate control system will run at the setting it was set to when you switched your vehicle off.
Many states and provinces have restrictions for the use of remote start. Check your local and state or provincial laws for specific requirements regarding remote start systems. The remote start system does not work if:
- The ignition is on.
- The alarm system triggers.
- You disable the feature.
- The hood is open.
- The transmission is not in park (P).
- The vehicle battery voltage is too low.
- The service engine soon light is on.
Remote Control Feedback
An LED on the remote control provides status feedback of remote start or stop commands.
| LED | Status |
| Solid green | Remote start successful |
| Solid red | Remote stop successful |
| Blinking red | Request failed or status not received |
| Blinking green | Status incomplete |
Remote Starting Your Vehicle
Note: You must press each button within three seconds of each other. If you do not follow this sequence, your vehicle does not start remotely, the direction indicators do not flash twice and the horn does not sound.
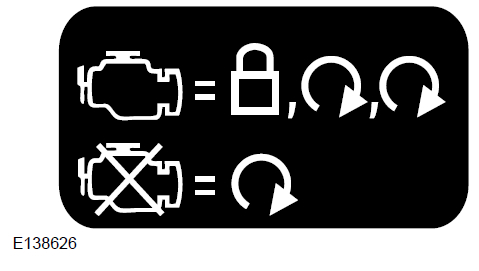
To remote start your vehicle:
- Press the lock button to lock all the doors.
- Press the remote start button twice. The exterior lamps flash twice.
The horn sounds if the system fails to start.
Note: You must press the push button ignition switch on the instrument panel once while applying the brake pedal before driving your vehicle.
The power windows do not work during remote start and the radio does not turn on automatically. The parking lamps remain on and your vehicle will run for 5, 10 or 15 minutes, depending on the setting.
Extending the Engine Running Time
To extend the engine running time duration of your vehicle during remote start, repeat steps 1 and 2 while the engine is running. If the duration is set to 15 minutes, the duration extends by another 15 minutes. For example, if your vehicle had been running from the first remote start for 10 minutes, your vehicle continues to run now for a total of 30 minutes. You can extend the engine running time duration to a maximum of 30 minutes. Wait at least five seconds before remote starting after the engine stops running.
Turning Your Vehicle Off After Remote Starting

You may have to be closer to your vehicle than when starting due to ground reflection and the added noise of your running vehicle. You can switch this feature on or off in the information display.
REPLACING A LOST KEY OR REMOTE CONTROL
Replacement keys or remote controls can be purchased from an authorized dealer. Authorized dealers can program remote controls for your vehicle.
PASSIVE KEY BACKUP POSITION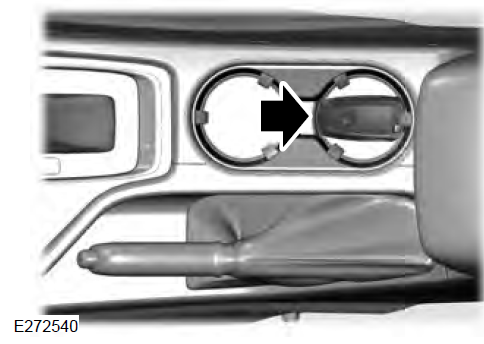
Place the passive key in the position shown, with the buttons facing upward. Make sure that you place the key fob in the center of the cup holder.
The top or bottom end of the key must be pointing towards the front or rear of the vehicle.
With the key in this position, press the brake or clutch pedal, then press the start button to switch on your vehicle.
PRINCIPLE OF OPERATION
MyKey allows you to program keys with restricted driving modes to promote good driving habits. You can program the restrictions to all keys except one. Any keys that you did not program are administrator keys or admin keys.
You can use admin keys to:
- Create a MyKey with certain vehicle restrictions.
- Program certain MyKey settings.
- Clear all MyKey restrictions.
After you program a MyKey, you can view the following information through the information display:
- The total number of admin keys and MyKeys for your vehicle.
- The total distance a MyKey driver traveled with your vehicle.
Note: Every MyKey receives the same restrictions and settings. You cannot program them individually.
Note: For vehicles equipped with a push-button start switch: When both a MyKey and an admin key are present when you start your vehicle, the system recognizes the admin key only.
Standard Settings
Not every vehicle includes the features listed below. If your vehicle has this equipment, then you cannot change the following settings when using a MyKey:
- Seatbelt reminder or Belt-Minder™. MyKey mutes the audio system until drivers, and in some instances, passengers, fasten their seatbelts. Note: If your vehicle includes an AM/FM radio or a very basic audio system, then the radio may not mute.
- Earlier low-fuel warning. The low-fuel warning activates earlier for MyKey drivers, giving them more time to refuel.
- Certain driver alerts, stability systems or parking aids turn on automatically when you use the MyKey system. For example, Blind Spot Information System (BLIS), cross traffic alert, lane departure warning or forward collision warning. Note: MyKey drivers may be able to turn the lane departure warning feature off, but this feature turns back on automatically with every new key cycle.
- Restricted touchscreen operation in some markets. For example, MyKey may prevent manual navigation destination input while the vehicle is in any gear other than park (P) or when the vehicle reaches a certain rate of speed.
- Satellite radio adult content restrictions, if this feature is available in your market.
Note: MyKey drivers may be able to switch the lane departure warning feature off, but this feature turns back on automatically with every new key cycle.
Note: If your vehicle includes an AM/FM radio or a very basic audio system, then the radio may not mute.
Optional Settings
You can configure certain vehicle feature settings when you first create a MyKey. You can also change the settings afterward with an admin key.
Note: Not every feature applies to every vehicle in every market. When they are available for your vehicle, then they appear in your information display, providing choices to switch them on or off, or to select a more specific setting.
- Various vehicle speed limits so the MyKey driver cannot exceed certain speeds. The information display shows warnings followed by an audible tone when the MyKey driver reaches the set speed. You cannot override the set speed by fully depressing the accelerator pedal.
WARNING: Do not set MyKey maximum speed limit to a limit that will prevent the driver from maintaining a safe speed considering posted speed limits and prevailing road conditions. The driver is always responsible to drive in accordance with local laws and prevailing conditions. Failure to do so could result in accident or injury.
- Various vehicle speed reminders so MyKey drivers know when their vehicle speed approaches the limits. Warnings appear in your information display and a tone sounds when the MyKey drivers exceed the set vehicle speed.
- The audio system’s maximum volume limits to 45% so MyKey drivers can concentrate on the road. A message appears in the information display when MyKey drivers attempt to exceed the limited volume. MyKey also disables the automatic volume control.
- Always on setting. This setting forces certain features to remain on and active for MyKey drivers. For example, E911 or emergency assistance and the do not disturb features stay on even if a MyKey driver uses the feature’s control to switch it off.
Note: If your vehicle includes an AM/FM radio or a very basic audio system, then the radio may not mute.
CREATING A MYKEY
Use the touchscreen to create a MyKey:
- Switch the ignition on using the key or the transmitter you want to program. If your vehicle has a push-button start, place the transmitter into the backup slot.
- Access the main menu in the information display and then scroll through the menus to begin programming your MyKey.
- Follow the instructions in the display.
- A confirmation message appears in the display after you finish programming your MyKey. The programmed restrictions apply when you key off, open and close driver door and restart your vehicle with the programmed key or transmitter.
Note: Make sure you label the programmed MyKey so you can distinguish it from the admin keys.
You can also program the optional MyKey settings.
Programming or Changing Configurable Settings
Use the information display to program or change your optional MyKey settings.
- Switch the ignition on using the key or the transmitter you want to program.
- Access the main menu in the information display and then scroll through the menus to change the settings of your MyKey.
- Follow the instructions in the display.
- A confirmation message appears in the display after you finish programming your MyKey. The programmed restrictions apply when you key off, open and close the driver door and restart your vehicle with the programmed key or transmitter.
Note: You can clear or change your MyKey settings at any time during the same key cycle as you created the MyKey. If you switch the engine off, you must use an admin key to change or clear your optional MyKey settings.
CLEARING ALL MYKEYS
When you clear your MyKeys, you remove all restrictions and return all MyKeys to their original admin key status at once. To clear all MyKeys of all MyKey settings, use the touchscreen.
- Switch the ignition on using an admin key.
- Access the main menu in the touchscreen and then scroll through the menus to begin clearing your MyKey programming.
- Follow the instructions in the display.
- A confirmation message appears in the display after you finish clearing your MyKeys.
Note: When you clear your MyKeys, you remove all restrictions and return all MyKeys to their original admin key status. You cannot remove the MyKey restrictions individually.
CHECKING MYKEY SYSTEM STATUS
You can find information about your programmed MyKeys by using the information display.
MyKey Distance
Tracks the distance when drivers use a MyKey. The only way to delete the accumulated distance is by using an admin key to clear all MyKeys. If the distance does not accumulate as expected, then the intended user is not using the MyKey, or an admin key user recently cleared and then recreated a MyKey.
Number of MyKeys
Indicates the number of MyKeys you have programmed to your vehicle. Use this feature to detect how many MyKeys you have for your vehicle and determine when you have deleted all MyKeys.
Number of Admin Keys
Indicates how many admin keys you have programmed to your vehicle. Use this feature to determine how many admin keys you have for your vehicle, and detect if an additional MyKey has been programmed.
USING MYKEY WITH REMOTE START SYSTEMS
MyKey is not compatible with non Ford-approved, aftermarket remote start systems. If you choose to install a remote start system, see an authorized dealer for a Ford-approved remote start system.
MYKEY – TROUBLESHOOTING
| Condition | Potential Causes |
| I cannot create a MyKey. | The key or transmitter used to start the vehicle does not have admin privileges. Vehicles with keyless start: Make sure you place the transmitter into the backup slot. The key or transmitter used to start the vehicle is the only admin key. There always has to be at least one admin key. The passive anti-theft system is disabled or in unlimited mode. |
| I cannot program the configurable settings. | The transmitter used to start your vehicle does not have admin privileges. There are no MyKeys programmed to the vehicle. |
| I cannot clear the MyKeys. | The key or transmitter used to start the vehicle does not have admin privileges. No MyKeys are created. |
| I lost the only admin key. | Purchase a new key or transmitter from an authorized dealer. |
| I lost a key. | Program a spare key or transmitter. You may need to see an authorized dealer. |
| The MyKey distance does not accumu- late. | The MyKey user is not using the MyKey. An admin key holder cleared the MyKeys and created new MyKeys. The key system has been reset. |
| No MyKey functions with the trans- mitter. | An admin transmitter is present at vehicle start. There are no MyKeys programmed to your vehicle. |
LOCKING AND UNLOCKING
You can use the power door lock control or the remote control to lock and unlock your doors and tailgate.
Note: Do not use the door latch assembly to attach any accessory, such as handles or steps, as this can cause damage to your vehicle.
Power Door Locks (If Equipped)
The power door lock control is on the driver and front passenger door panels.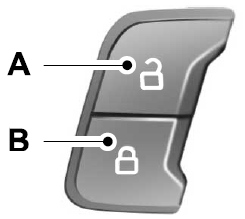
- Unlock.
- Lock.
Remote Control
You can use the remote control at any time your vehicle is not running.
Unlocking the Vehicle (Two-Stage Unlock)

mode applies to the remote control,keyless entry keypad and intelligent access.
Press and hold both the lock and unlock buttons on the remote control for four seconds to disable or enable two-stage unlocking. Disabling two-stage unlocking allows your entire vehicle to unlock with one press of the button. Intelligent access at the driver door unlocks your entire vehicle when you disable two-stage unlocking.
Locking the Vehicle Press the button to lock all doors. The direction indicators flash. Press the button again within three seconds to confirm that all the doors are closed. The doors lock again, the horn sounds and the direction indicators flash if all the doors are closed.
Mislock
If any door is open, or if the hood is open on vehicles with an anti-theft alarm or remote start, the horn sounds twice and the direction indicators do not flash.
Activating Intelligent Access (If Equipped)
General Information
You can unlock and lock the vehicle without taking the keys out of your pocket or purse when your intelligent access key is within 3 ft (1 m) of your vehicle. Intelligent access uses a sensor on the back of the door handle for unlocking and a separate sensor on the face of each door handle for locking.
The system does not function if:
- Your vehicle battery has no charge.
- The key battery has no charge.
- The key frequencies are jammed.
Note: The system may not function if the key is close to metal objects or electronic devices, for example keys or a cell phone.
Note: If the system does not function, use the key blade to lock and unlock your vehicle.
Unlocking Using Intelligent Access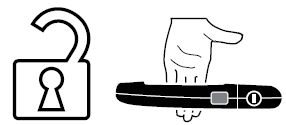 With your intelligent access key within 3 ft (1 m) of your vehicle, touch the unlock sensor on the back of the door handle for a brief period and then pull on the door handle to unlock, being careful to not touch the lock sensor at the same time or pulling the door handle too quickly. The intelligent access system requires a brief delay to authenticate your intelligent access key fob.
Locking Using Intelligent Access
Note: Do not use the outside door handle as a roof cargo strap.
KEYLESS ENTRY (IF EQUIPPED)
SECURICODE™ KEYLESS ENTRY KEYPAD
The keypad is near the driver window and illuminates when you touch it.
Note: If you enter your entry code too fast on the keypad, the unlock function may not work. Re-enter your entry code more slowly.
You can use the keypad to:
- Lock or unlock the doors and liftgate.
- Program and erase user codes.
- Arm and disarm the anti-theft alarm. You can operate the keypad with the factory-set five-digit entry code. The code is located on the owner’s wallet card in the glove box and is available from an authorized dealer. You can also create up to five of your own five digit personal entry codes.
Programming a Personal Entry Code
To create your own personal entry code:
- Enter the factory-set code.
- Press 1·2 on the keypad within five seconds.
- Enter your personal five-digit code.
- Press 1·2 on the keypad to save personal code one.
The doors will lock then unlock to confirm that programming was successful. To Program additional personal entry codes, repeat Steps 1-3, then for Step4:
- Press 3·4 to save personal code two.
- Press 5·6 to save personal code three.
- Press 7·8 to save personal code four.
- Press 9·0 to save personal code five.
Tips:
- Do not set a code that uses five of the same number.
- Do not use five numbers in sequential order.
- The factory-set code will work even if you have set your own personal code.
Erasing a Personal Code
- Enter the factory-set five-digit code.
- Press and release 1·2 on the keypad within five seconds.
- Press and hold 1·2 for two seconds.
This must be done within five seconds of completing Step 2.
All personal codes erase and only the factory-set five-digit code will work.
Anti-Scan Feature
The keypad will go into an anti-scan mode if you enter the wrong code seven times (35 consecutive button presses). This mode disables the keypad for one minute and the keypad lamp will flash.
The anti-scan feature will turn off after:
- One minute of keypad inactivity.
- Pressing the unlock button on the remote control.
- Switching the ignition on.
- Unlocking the vehicle using intelligent access.
Unlocking and Locking the Doors
To Unlock the Driver Door
Enter the factory-set five-digit code or your personal code. You must press each number within five seconds of each other. The interior lamps illuminate.
Note: All doors unlock if you disable the two-stage unlocking feature.
To Unlock All Doors
Enter the factory-set code or your personal code, then press 3·4 control within five seconds.
To Lock All Doors
Press and hold 7·8 and 9·0 at the same time with the driver door closed. You do not need to enter the keypad code first.
To Release the Tailgate (If Equipped)
Enter the factory-set code or your personal code, then press 5·6 control within five seconds.
Useful Links:
2023 – 2024 Ford Ranger Review, Price, Features and Mileage (Brochure)