

2021 Jeep Compass Light Bulbs User Guide
The 2021 Jeep Compass Light Bulbs guide includes headlights, tail lights, and interior lighting bulbs. It includes replacement instructions for appropriate lighting and driving safety.
2023 JEEP COMPASS Review, Specs, Price and Mileage (Brochure)
BULB REPLACEMENT
Replacement Bulbs
NOTE: See an authorized dealer for LED bulb replacement.
| Interior Bulbs | |
| Lamps | Bulb Number |
| Front Courtesy Light | C5W |
| Front Courtesy Lights (Sun Visors) | C5W |
| Rear Dome Light (Models Without Retractable roof) | C5W |
| Rear Interior Lights (Models With Retractable roof) | C5W |
| Interior Lights | HT-168 |
| Dome Light (Glove Box) | HT-168 |
| Exterior Bulbs | |
| Lamps | Bulb Number |
| Low Beam Headlamps (Halogen) | H11LL |
| High Beam Headlamps (Halogen) | 9005LL |
| Front Position/Daytime Running Lights (DRL) | PSX24W |
| Front Direction Indicator Lamps | 7444NA |
| Front Position – Premium LED | LED (Serviced at an authorized dealer) |
| Front Fog Lamps | H11LL |
| Low Beam / High Beam Headlamps (HID) | D3S (HID) (Serviced at an authorized dealer) |
| Side Indicators (Front – Halogen) | W5W |
| Side Indicators (Front – HID) | LED (Serviced at an authorized dealer) |
| Side Indicators (Side View Mirror) | LED (Serviced at an authorized dealer) |
| Tail/Brake Lights | Premium Tail Lights: LED (Serviced at an authorized dealer) Base Tail Lights: W21/5WLL |
| Turn Indicators | W21WLL For Premium Tail Lamps W21/5WLL For Base Tail Lamps |
| Center High Mounted Stop Lamp (CHMSL) | LED (Serviced at an authorized dealer) |
| License Plate Lamp | LED (Serviced at an authorized dealer) |
| Liftgate Lamp Reverse | W21WLL |
| Liftgate Lamp Tail | LED (Serviced at an authorized dealer) |
High Intensity Discharge (HID)
Headlamps — If Equipped
The headlamps contain a type of high voltage discharge light source. High voltage can remain in the circuit even with the headlamp switch off. Because of this, you should not attempt to service a HID headlamp light source yourself. If an HID headlamp light source fails, take your vehicle to an authorized dealer for service.
NOTE: On vehicles equipped with HID headlamps, when the headlamps are turned on, there is a blue hue to the lights. This diminishes and becomes more white after approximately 10 seconds, as the system charges.
WARNING: A transient high voltage occurs at the bulb sockets of HID headlamps when the headlamp switch is turned ON. It may cause serious electrical shock or electrocution if not serviced properly. See an authorized dealer for service.
Replacing Exterior Bulbs
Headlamps
Hi/Lo Beam Light Halogen
The bulbs can be accessed from behind the front wheel liners with the following procedure:
- Turn the front wheels completely.
- Remove the wheel liner.
- Remove the headlamp bulb cap.
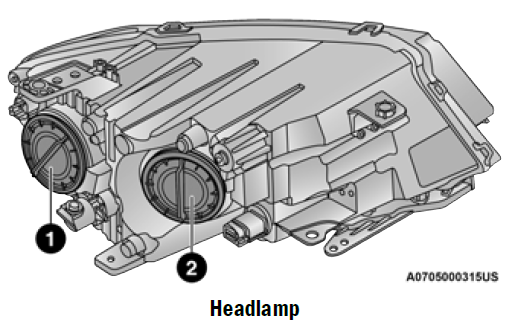
- Low Beam Bulb Cap
- High Beam Bulb Cap
- Rotate the headlamp bulb socket counterclockwise then pull outwards.
- Push on the locking tab on the headlamp bulb connector and remove the bulb and socket.
- Install the new headlamp bulb making sure it’s properly locked.
- Install the headlamp bulb and socket; turn it clockwise making sure it is properly locked.
- Reinstall the wheel liner.
NOTE: We advise referring to an authorized dealer.
WARNING: Carry out the operation of replacing lamps only with the engine off. Also make sure that the engine is cold, to avoid the danger of burns.
Turn Signal Light/Position Lights/Daytime Running Lights
To replace the bulbs proceed as follows:
- Turn the front wheels completely.
- Remove the wheel liner.
- Remove the electrical connectors.
- For the DRL bulb, grip the bulb at the top and bottom locking tabs and squeeze to and remove the bulb.
- To replace the DRL bulb gently push bulb towards the housing. Be sure to hear both the top and bottom locking tabs “CLICK” to ensure the bulb is properly seated.
- For the turn signal bulb, rotate in a counterclockwise direction and remove the bulb and bulb socket. Pull the bulb axially to remove it from the socket.
- Install the bulb and sockets and rotate them clockwise making sure that it is properly locked.
- Reconnect the electrical connectors.
- Reinstall the wheel liner.
NOTE: It is advised referring to an authorized dealer.
Front Fog Lights
To replace the bulbs proceed as follows:
- Turn the front wheels completely.
- Remove the wheel liner.
- By pushing the electrical connector tab remove the electrical connector.
- Rotate the bulb counterclockwise, and then replace the bulb.
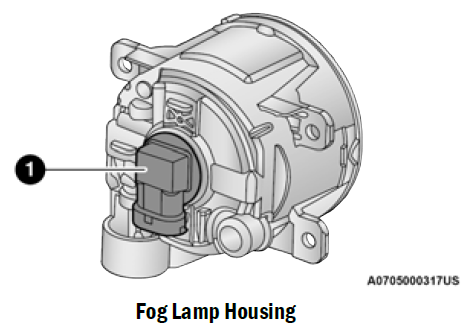
- Bulb
- Insert the new bulb in the socket, making sure the bulb is locked into place.
- Reconnect the electrical connector.
- Reinstall the wheel liner.
NOTE: It is advised referring to an authorized dealer.
Side Indicators
- The Side Indicators are LED. See an authorized dealer for replacement.
Rear Body Side Tail Lamps
Contain the following:
- Position lights
- Stop lights
- Direction indicator
To replace the bulbs proceed as follows:
- Open the liftgate.
- Using a suitable tool remove fasteners.

- Fasteners Caps
- Disconnect the electrical connector by pushing the release.
- Remove the rear body side tail lamp, sliding it away from the back of the vehicle.

- Rear Body Side Tail Lamp
- Ball Stud
- Replace the bulb as necessary by turning and removing the bulb housing.

- Direction Indicator Bulb / Stop Lamp Bulb
- Electrical Connector
- Ball Studs
- Insert the new bulb, making sure it is properly locked.
- Reposition the rear body side lamp assembly on the car.
- Reconnect the electrical connector.
- Reinstall the body side lamp making sure to align the ball studs.

- Rear Body Side Tail Lamp
- Ball Stud
- Install fasteners and tighten body side lamp assembly.
- Finally close the tailgate.
NOTE: It is advised referring to an authorized dealer.
Reverse Lamps
- Open the liftgate.
- Using a suitable tool remove the access panel for body side lamps, remove lift gate access cover for lift gate lamps.

- Lift Gate Access Covers
- Disconnect the electrical connector by pushing the release.
- Remove bulb and replace making sure it is properly locked.
- Reconnect the electrical connector.
- Reinstall the access panels making sure they are locked in correctly.
- Finally close the tailgate.
3rd Stop Lamp
- The CHMSL is LED. See an authorized dealer for replacement.
License Plate Lights
- The License Plate light is LED. See an authorized dealer for replacement.
Replacing Interior Bulbs
Front Courtesy Light
To replace the bulbs proceed as follows:

- Using a suitable tool remove the front courtesy light assembly.
- Release the retainer clips and bulb housing as shown.

- Retaining Clips
- Bulb Housing
- Replace the bulbs by pulling straight out of bulb housing.

- Insert the new bulbs, making sure that they are properly locked.
- Reassemble the bulb housing and courtesy light housing making sure that they are properly locked.
- Install the front courtesy light, making sure that it is properly locked.
Dome Light Vanity Mirror — If Equipped
To replace the bulbs proceed as follows:
- Lift the cover of the mirror and pull out the mirror frame with the mirror light cover attached.
- Replace the bulb, releasing it from the side contacts, and then insert the new bulb, making sure that it is properly locked between the contacts.

- Visor Mirror Cover
- Visor Mirror Light
- Reinstall the visor mirror light cover making sure that it is properly locked.
- Finally lower the visor mirror cover to the mirror.
Dome Light Glove Compartment
To replace the bulb proceed as follows:
- Open the glove compartment.

- Place your fingers inside the light assembly, pull the bulb to replace it.
- Insert the new bulb, making sure it is properly locked.
Dome Light
To replace the bulbs proceed as follows:

- Lower the handle in the direction shown; remove the dome light.

- Replace the bulb by removing it from the side contacts.
- Insert the new bulb, locking it between the contacts.
- Reinstall the dome light.
Interior Cargo Lights
To replace the bulbs proceed as follows:

- Using thumb with slight pressure – push bulb holder to the side.

- Fully disengage the bulb holder from the housing.

- Rotate bulb holder to replace bulb.
WARNING
- Modifications or repair of the electrical system performed incorrectly and without taking into account the technical characteristics can cause malfunctions with the risk of fire.
- Halogen lamps contain gas under pressure, in the event of breakage be careful of the projection of fragments of glass.
- Halogen lamps must be handled by touching only the metallic part. If the transparent bulb is in contact with the fingers, reduces the intensity of the emitted light and you can also affect the life of the lamp. In case of accidental contact, rub the bulb with a cloth dampened with alcohol and allow to dry.
NOTE: It is recommended to have your bulbs replaced by an authorized dealer.
Useful Link
View Full PDF: 2021 Jeep Compass Owner’s Manual | Auto User Guide
2023 JEEP COMPASS Review, Specs, Price and Mileage (Brochure)