
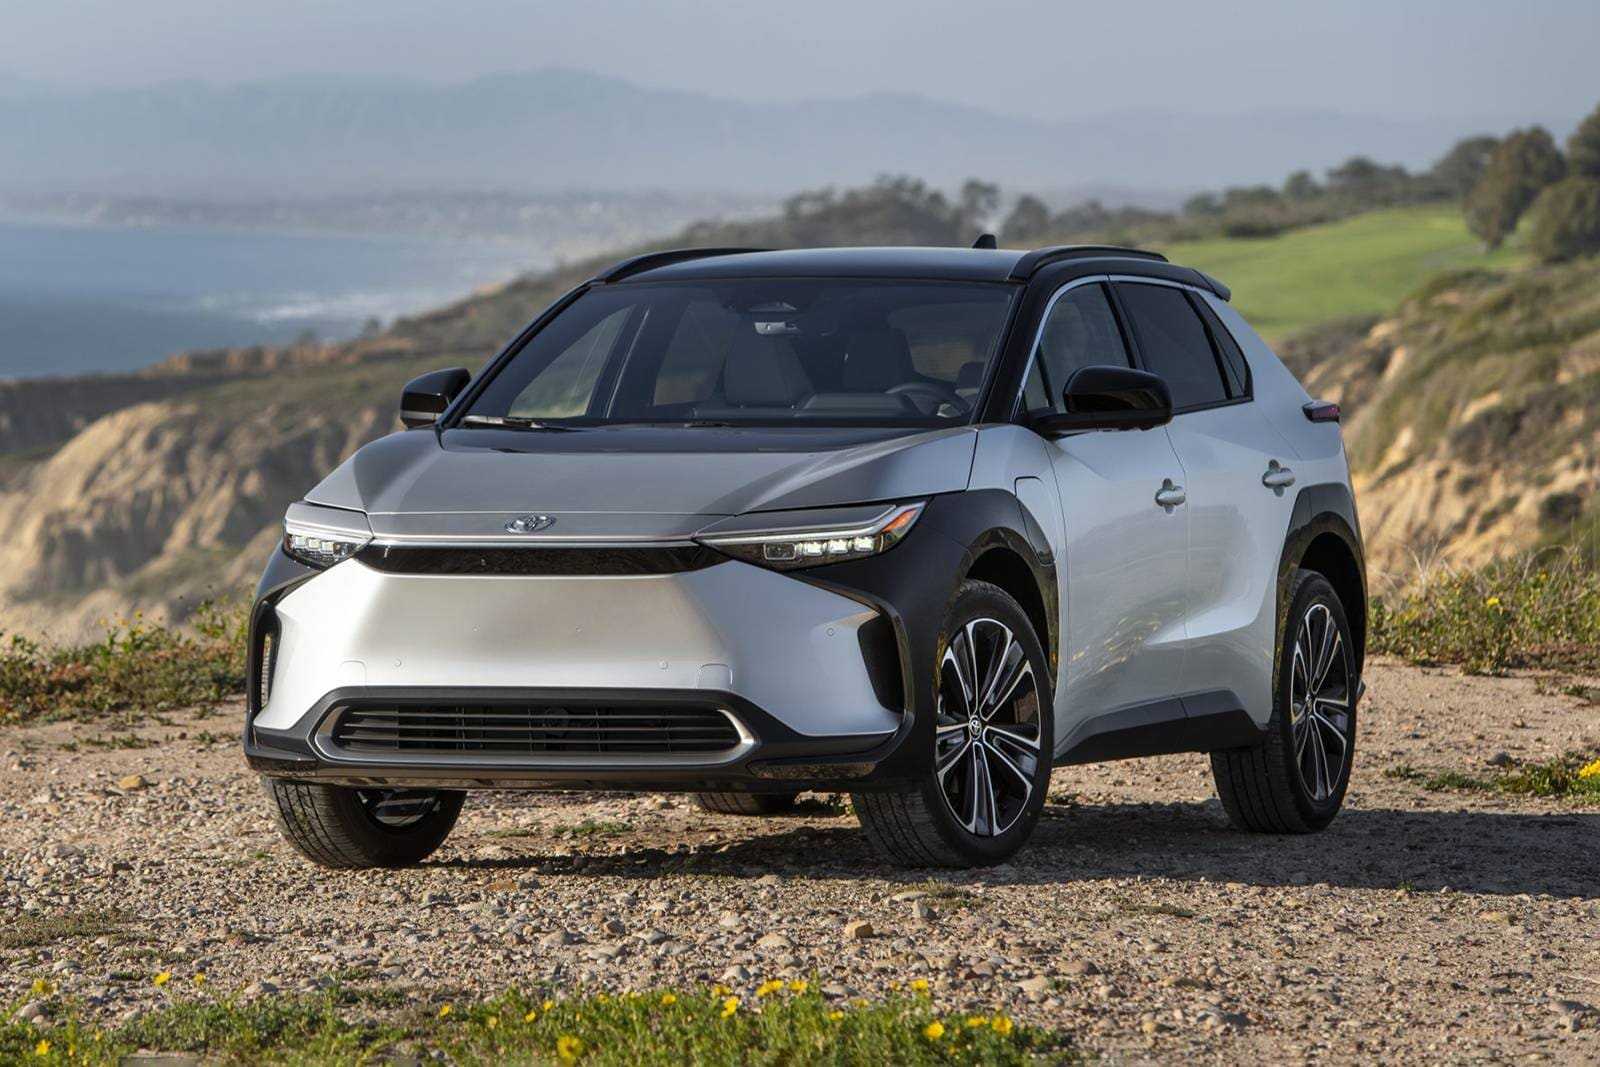

2023 Toyota BZ4X Charging Instructions
This tutorial covers 2023 Toyota BZ4X charging. To keep your BZ4X functioning smoothly and ready for your next excursion, learn about charging alternatives, anticipated charging times, and charging recommendations.
Charging equipment
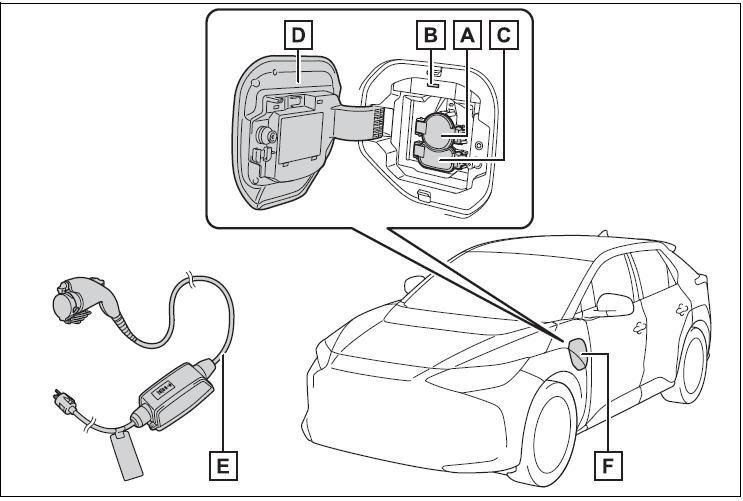
Charging equipment and names
- AC charging inlet
- Charging indicator and Charging inlet light
- DC charging inlet
- Charging port lid
- AC charging cable
- Charging port
Opening/closing the charging port lid
Open
Slightly open the charging port lid by pressing the rear edge of it (the position shown in the illustration) Fully open the charging port lid by hand.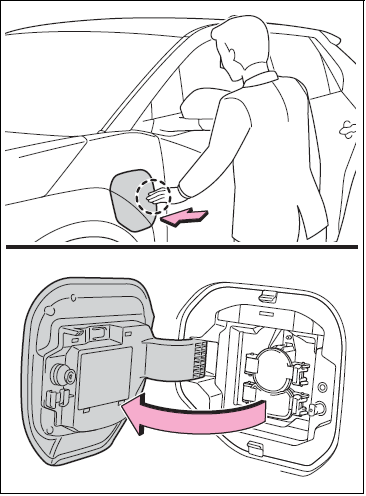
Close
Move the charging port lid to the slightly open position and then press the rear edge (the position shown in the illustration) to close it.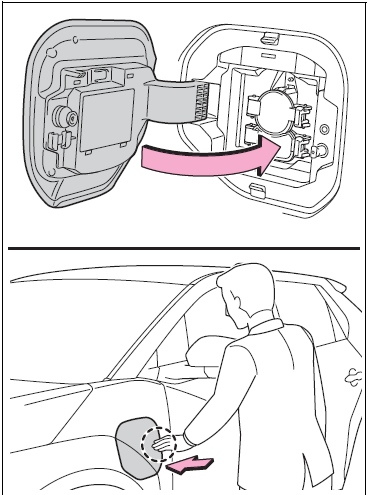
Lid lifter
The charging lid is not closed if the lifter is pushing in before closing the charging lid. In that case, while unlocking the door, push again and release the lid lifter, and close the charging lid again.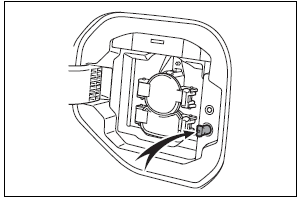
Charging port lid open/close detection switch
When the charging port lid is open, do not touch the charging port lid open/close detection switch (Position shown in the figure). If you touch it by mistake, the vehicle may incorrectly display the opened/closed status of the charging port lid, or the charging connector may not be able to lock/unlock normally.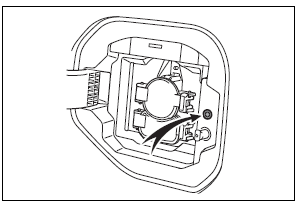
Charging indicator
The illumination/flashing pattern changes to inform the user of the charging status in the following ways.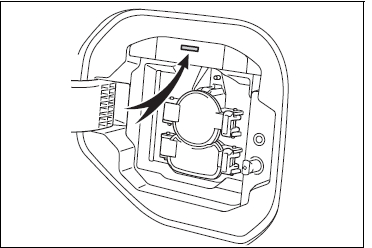
| Illumina- tion/flashi ng pattern |
Vehicle condition |
|
Illumi- nated |
· Charging is in prog- ress*1
· Battery heater is operating |
| Flashes nor- mally*2 | When the charging schedule is registered and AC charging cable is connected to the vehicle |
|
Flashes rapidly*2 |
When charging cannot be carried out due to malfunction in a power source or the vehicle, etc. |
- The indicator is dimmed when the charging is done
- Flashes for a certain period of time, and then turn off.
AC charging cable
The function, correct operating procedure, etc., of the AC charging cable, are explained
WARNING
- When using the AC charging cable and CCID (Charging Circuit Interrupting Device) Observe the following precautions. Failure to do so may cause an unexpected accident, resulting in death or serious injury
- Do not attempt to disassemble or repair the AC charging cable, charging connector, plug or CCID (Charging Circuit Interrupting Device). If a problem arises with the AC charging cable or the CCID (Charging Circuit Interrupting Device), stop charging immediately and contact your Toyota dealer.
- Do not subject the AC charging cable, charging connector, plug or CCID (Charging Circuit Interrupting Device) to strong force or impact.
- Do not apply excessive force to the AC charging cable by forcefully folding, twisting, pulling or dragging the AC charging cable.
- Do not damage the AC charging cable with sharp objects.
- Do not fold the charging connector or plug or insert foreign objects into them.
- Do not put the charging connector and plug into the water
WARNING
- Do not bring the AC charging cable to a high-temperature item such as a heating device.
- Do not apply a load to the AC charging cable and plug cord (such as wrapping the AC charging cable around the CCID (Charging Circuit Interrupting Device) and the charging connector).
- Do not use or leave the AC charging cable in situations where a load is applied to the outlet and the plug (such as when the CCID (Charging Circuit Interrupting Device) is hanging in the air without contacting the ground).
NOTICE
Precautions when handling AC charging cable Make sure to observe the following precautions.
Failure to observe these precautions may result in damage to the AC charging cable and AC charging inlet.
- Insert the charging connector straight into the AC charging inlet.
- After inserting the charging connector, do not apply excessive force to or twist the connector. Also, do not lean on the connector or hang any objects from it.
- Do not step on or trip over the AC charging cable.
- Before removing the charging connector, make sure that it is unlocked.
- After removing the AC charging cable, promptly return it to its proper location.
- After removing the charging connector, securely install the AC charging inlet cap.
- When using the AC charging cable and related parts
Precautions for low temperatures
In low temperatures, the AC charging cable and plug cord may become hard. Therefore, make sure to not apply excessive force when they are hard. If excessive force is applied to the hardened AC charging cable and plug cord, they may be damaged.
The names of each part of the AC charging cable
- Charging connector
- Latch release button
- Plug
- Plug-cord
- CCID (Charging Circuit Interrupting Device)
- Power indicator
- Charging indicator (CCID)
- Error warning indicator

Safety functions
The CCID (Charging Circuit Interrupting Device) has the following safety features.
Electrical leakage detection function
If an electrical leakage is detected during charging, the power source will be automatically interrupted, thus preventing fires or electrical shocks caused by electrical leakage. If the power source is interrupted, the error warning indicator flashes. If the power source is interrupted:
Automatic check function
This is an automatic system check that is run before charging begins to check for problems in the operation of the electrical leakage detection function. If a malfunction is found in the electrical leakage detection function as a result of the check, the error warning indicator flashes to inform the user.
Temperature detection function
A temperature detection function is equipped to the plug. While charging, if heat is generated due to looseness on the outlet side etc., this function suppresses heat by controlling the charging current.
Conditions for supplying current to the vehicle
The CCID (Charging Circuit Interrupting Device) is designed to prevent electrical current from being supplied to the charging connector when it is not connected to the vehicle, even if the plug is inserted into the outlet.
CCID (Charging Circuit Interrupting Device) indicators
Indicator operation
3 indicators are used to indicate the following conditions.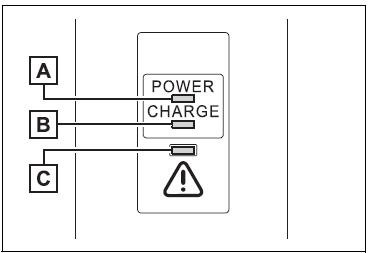
- Power indicator
- Illuminates when electricity is flowing to the CCID (Charging Circuit Interrupting Device).
- Charging indicator
- Illuminates when charging is in progress.
- Error warning indicator
- Flashes when there is an electrical leakage or when a malfunction occurs in the CCID (Charging Circuit Interrupting Device)
When a malfunction occurs during charging
The indicators on the CCID (Charging Circuit Interrupting Device) use a combination of different statuses (not illuminated, illuminated or flashing) to inform the user of internal malfunctions. When the error warning indicator is illuminated or flashing, temporarily remove the plug from the outlet and then reconnect it to check if the error indicator turns off. If the error warning indicator turns off, charging is now possible. If it does not turn off, perform the correction procedure in the following chart.
| Status | Power indica- tor | Error warning indicator | Details/Correction procedure |
|
Charging sys- tem error |
Not illumi- nated | Not illumi- nated or illu- minated | An electrical leakage is detected and charging is canceled, or there is a mal- function in the AC charging cable. ® Consult your Toyota dealer |
|
Illuminated |
Flashes |
||
|
Plug tempera- ture detection malfunction |
Flashes |
Flashes |
There is a malfunction in the plug temperature detection part.
® Consult your Toyota dealer |
|
Plug temperature increase detection |
Flashes |
Not illumi- nated |
An increase in the tem- perature of the plug is detected due to an improper connection between the outlet and plug.
® Check that the plug is securely connected to the outlet |
|
AC charging cable life span notice |
Illuminated |
Flashes |
The number of charges using the AC charging cable is nearing the end of its usable life span.
® Consult your Toyota dealer |
|
AC charging cable life span |
Illuminated |
Illuminated |
The number of charges using the AC charging cable has exceeded its usable number of charges.
® Consult your Toyota dealer |
Inspecting the AC charging cable
For safety, inspect the AC charging cable on a routine basis.
WARNING
- Routine inspection
- Check the following points regularly. Failure to do so may cause an unexpected accident, resulting in death or serious injury.
- The AC charging cable, plug, charging connector, CCID (Charging Circuit Interrupting Device), etc., have not been damaged
- The outlet has not been damaged.
- The plug can be securely inserted into the outlet.
- The plug does not get extremely hot during use
- The tip of the plug has not been deformed.
- The plug is not dirtied by dust, etc.
- Remove the plug from the outlet before inspecting it. If any abnormalities are found in the AC charging cable as a result of the inspection, immediately stop use and consult your Toyota dealer.
Maintaining the AC charging cable
- When the AC charging cable is dirty, first remove the dirt with a hard, wringed cloth, and then wipe the cable with a dry cloth. However, never wash it with water. If the AC charging cable is washed with water, fire or electric shock may occur during charging, possibly resulting in death or serious injury.
When not using the AC charging cable for a long time
- Remove the plug from the outlet. Dust could accumulate on the plug or in the outlet, possibly causing overheating which could lead to a fire. Also, keep the cable in a place free from moisture.
Locking and unlocking AC charging connector
The AC charging connector will be locked when it is connected to the AC charging inlet, preventing the AC charging cable from being disconnected while charging.
Locking and unlocking the AC charging connector
Locking the charging connector
The AC charging connector will be automatically locked when inserting it into the AC charging inlet.
Unlocking the charging connector
The AC charging connector will be unlocked when the doors are unlocked using the smart key system or wireless remote control. The AC charging connector locks when connected and unlocks when the door is unlocked, so locking/unlocking the AC charging connector does not necessarily correspond to locking/unlocking the door. If the door is unlocked and the AC charging connector is locked, you can unlock it by doing the following:
- When using the smart key system, lock the door once and then unlock it again.
- When using the wireless remote control, press the unlock button to unlock the door.
Changing the AC charging connector lock settings
The method for locking and unlocking the AC charging connector can be changed on the multi-information display or multimedia. The charging connector lock settings cannot be changed when the AC charging cable is connected to the vehicle. The settings cannot be changed when the power switch is in ACC.
Multi-information display operation
- Press
 of the meter control switches to select
 .
- Press of the meter control switches to select “Vehicle Settings”, and then press and hold
- Press of the meter control switches to select “Charging Settings”, and then press . The “Charging Settings” screen will be displayed.
- Press of the meter control switches to select “Connector Lock”, and then press . The “Connector Lock” screen will be displayed.
Multimedia operation
- Selecton the main menu.
- Select “Vehicle customize”.
- Select “Charging”.
- Select “Connector lock”.
AC charging connector locking/ unlocking settings can be changed as follows.
| Setting | Operation description |
|
“Auto Lock” (Default setting) |
The AC charging connector is automatically locked when the AC charging connector is connected. |
|
“Auto Lock & Unlock” |
The AC charging connector is automatically locked when the AC charging connector is connected and automatically unlocked when charging is com- pleted.*1, 2, 3 |
|
“OFF” |
Not using the AC charging connector locking system |
- The AC charging connector will be unlocked if the power supply is interrupted due to a power outage, etc. after the AC charging connector is automatically locked.
- The AC charging connector can be unlocked by similar operations to that of “Auto Lock” (Default setting).
- When the stop time of the charging schedule “Start-Stop” setting is reached, the AC charging connector is unlocked even if it is not fully charged.
AC charging connector lock function
If the AC charging connector is locked/unlocked repeatedly, it may not work temporarily due to protect the system by AC charging system. In this case, wait for a while before connecting the AC charging connector to the AC charging inlet again. The AC charging connector lock function does not guarantee that theft of the AC charging cable will be prevented, and is not necessarily effective for all mischiefs.
Security function for unlocking
If the AC charging connector is not removed within approximately 30 seconds after the vehicle is unlocked, the security function automatically locks the connector again.
When the AC charging connector cannot be inserted into the AC charging inlet
If the connector lock pin is extended, the connector lock is operating. Unlock the doors using the smart key system or wireless remote control and unlock the AC charging connector lock and check that the connector lock pin is not extended.
If the AC charging connector cannot be unlocked
The AC charging connector can be unlocked by operating the emergency release wire.
- Open the hood.
- Pull the emergency release wire.
- The AC charging connector is unlocked and can be removed.

- After unlocking the AC charging connector, fix the handle of the emergency release wire to the attachment.

This method is a temporary correction procedure for emergency use only. If the problem persists, have the vehicle inspected by your Toyota dealer immediately. Do not operate the emergency release wire when the charging connector can be unlocked in the normal procedure
WARNING
- When connecting the AC charging connector to the AC charging inlet
- Do not insert your hand into the connector lock portion. A hand may be caught in the connector lock pin, resulting in an injury.

NOTICE
- When locking the AC charging connector Observe the following precautions. Failure to do so may cause a malfunction in the charging connector locking system.
- Check that the AC charging connector is compatible with this vehicle. A charging connector of a different type or a charging connector with damaged or deformed insertion part may not be locked.
- Do not apply excessive force to the AC charging connector when the AC charging connector is locked. When removing the AC charging connector, make sure to unlock the AC charging connector.
Power sources that can be used
An external power source that fulfills the following criteria is necessary for charging this vehicle. Confirm this before charging
WARNING
Warnings for electrical faults Make sure to observe the precautions in this Owner’s Manual when charging the vehicle. Failure to use a power source that fulfills the requirements, or failure to observe regulations while charging could lead to an accident, possibly resulting in death or serious injury.
Power sources
- Connect to an AC 120 V outlet (NEMA 5-15R) with a
- Ground-Fault Circuit-Interrupter (GFCI) and a circuit breaker. The use of a 15A individual circuit is strongly recommended to ensure AC charging cable will operate properly.
- When charging outdoors, make sure to connect to a weatherproof outlet that is certified for outdoor use.
- Checking Ground-Fault Circuit- Interrupter (GFCI) operation before its use is recommended
Outlets that can be connected
NEMA 5-15R outlet
The illustration is an example shown for demonstration purposes and may differ from the actual configuration.
The charging environment
For safe charging, the following charging equipment and settings are recommended.
Weatherproof outlet
When charging outdoors, connect the plug to a weatherproof outlet, and ensure that the plug remains waterproof while plug is connected.
Dedicated circuit
- To reduce the risk of fire, connect only to at least 15A branch circuit with over-current protection in accordance with the National Electric Code, ANSI/NFPA 70.
- To reduce the risk of electric shock when working with the plug, connect to an outlet with a Ground-Fault Circuit-Interrupter (GFCI) or that has an Earth Leakage Circuit Breaker installed.
WARNING
Power sources precautions
Observe the following precautions. If you do not follow them, fire, electrical shock or damage may occur, possibly resulting in death or serious injury.
- Connect to an AC 120 V outlet (NEMA 5-15R) with a Ground-Fault Circuit-Interrupter (GFCI) and supplied by a circuit breaker per your local code. Use of a 15A individual circuit is strongly recommended.
- Do not connect the AC charging cable to a multi-outlet adaptor, multi-plugs, or conversion plug.

- Connecting the AC charging cable to an extension cord is strictly prohibited. The extension cord may overheat and does not contain a Ground-Fault Circuit-Interrupter (GFCI). The leakage detection function of the CCID (Charging Circuit Interrupting Device) may not operate correctly.

WARNING
- Do not connect to a power strip.

- Use of a block heater for charging is prohibited.
- Make sure to connect the charging connector and AC charging inlet directly. Do not connect a converting adaptor or extension cord between the charging connector and AC charging inlet.
2023 toyota BZ4x Specs, Price, Features and Mileage (Brochure)
Charging methods
The following methods can be used to charge the traction battery.
Types of charging methods
AC charging
This is a charging method used when charging from an AC outlet with the AC charging cable or charging that uses an AC charger. By setting a charging schedule, it is also possible to charge at the desired date and time.
DC charging
This is a charging method that uses a DC charger that complies with SAE J 1772. The traction battery can be charged in a shorter time than AC charging. SAE is an abbreviation for an industrial standard issued by the Society of Automotive Engineers.
Charging-linked functions
This vehicle is equipped with several functions that are linked with charging.
My Room Mode
When the charging cable is connected to the vehicle, electrical components such as the air conditioning system and audio system can be used by the power supply from an external power source Depending on the situation, the electricity of the traction battery may be consumed.
Traction battery heater
When the outside temperature is low and the charging cable is connected to the vehicle, this function automatically warms the traction battery until it reaches or exceeds a certain temperature.
- The operation of this function is stopped automatically when the charging cable is disconnected or if the charging cable is left connected to the vehicle for approximately 3 days.
- When the charging schedule is used this function will operate according to the schedule settings.
Traction battery warming control
This control operates after the charging cable remains connected to the vehicle for approximately 3 days and the traction battery heater automatically stops. It automatically insulates the traction battery in extremely low temperatures.
- This control stops 31 days after the charging cable is connected, even if it is still connected to the vehicle.
- When this control operates, charging schedule settings are ignored and charging starts immediately.
Traction battery cooler
When the traction battery is hot and the AC charging cable is connected to the vehicle, this function cools the traction battery to protect it. The function may operate when continuously driving at high speeds such as driving on highways or freeways, or during DC charging.
Using My Room Mode during DC charging
Traction battery heater
- The traction battery heater may operate when charging is not being performed.
- When the Traction battery heater is operating, the charging indicator will illuminate.
- When the Traction battery heater is operating during charging, the charging may take longer than normal.
The remaining charge of the traction battery declines when the traction battery heater operates, it might be necessary to recharge the traction battery again in order to supplement the remaining charge.
Traction battery cooler
- For AC charging: Traction battery cooler settings can be changed on the multi-information display.
- The AC charging indicator will illuminate when the traction battery cooler is on standby or operating.
- When the charge level of the traction battery is low, the traction battery cooler may not operate, even if the temperature of the traction battery is high.
- When the following conditions are met while the traction battery cooler is operating, the cooling operation will stop.
- The hood is opened
- The power switch is turned to ACC or ON.
- The shift position is changed to any position other than P
- The Remote Air Conditioning System is operated
- The remaining charge of the traction battery drops below a certain amount
- The traction battery cooler operates using power supplied by the traction battery and an external power source.
- While the traction battery cooler is operating, the charge of the traction battery will increase and decrease within a certain range, and will not increase as during AC charging.
- When the traction battery cooler operates, the charger will recognize it as the battery being charged. If this function operates while a charger which charges a charging fee is connected to the vehicle, AC charging fees will apply.
Changing the traction battery cooler setting
The setting can be changed
Charging tips
This section explains methods for using the charging function for this vehicle and checking information related to charging.
Systematically charging
To enable the use of battery electric vehicles, we recommend systematically charging the vehicle.
Before leaving home
In order to use the battery electric vehicle, charge the traction battery at home before leaving.
On the way to the destination or at the destination
When the remaining charge of the traction battery gets low, recharge the battery at the nearest charging station.
Checking information related to charging
Information related to charging is displayed and can be checked on the multi-information display.
While charging
When any door is opened during charging with the power switch off, the current charging condition and approximate time remaining until charging is complete are displayed for a certain period of time. The actual charging time may differ depending on conditions such as the remaining capacity of the traction battery, outside temperature, and specifications of the AC/DC charger. The time until charging completed may not be displayed if the charging current to the traction battery becomes smaller and the charging time becomes longer.
After charging is complete
When any door is opened with the power switch off after charging is complete, a message detailing the results of the charging is displayed for a while. Also, a message is displayed if an operation that stops charging is performed or a situation where charging cannot be performed occurs. When a message is displayed, follow the instructions displayed on the screen.
Things to know before charging
Make sure to read the following precautions before charging the traction battery.
Safety functions
- The EV system will not start while the charging cable is attached to the vehicle, even if the power switch is operated.
- If the charging cable is connected while the “READY” indicator is illuminated, the EV system will stop automatically and driving will not be possible.
WARNING
Caution when charging
People with implantable cardiac pacemakers or cardiac resynchronization therapy pacemakers should not carry out the charging procedure. Ask someone else to do it.
- Do not approach the charger and charging cable while charging. The charging procedure may affect the operation of such devices.
- Do not remain in the vehicle during charging. The charging procedures may affect the operation of such devices.
- Do not enter the vehicle even to take something out of the luggage compartment. The charging procedure may affect the operation of such devices.
When the charging cable is connected to the vehicle
Do not change the shift position from P. In the unlikely event that the charging cable has been damaged, the shift position may change from P to another position and the vehicle could move, possibly leading to an accident.
Charging precautions
This vehicle has been designed to allow charging from an external power source using an AC charging cable for exclusive use with standard household AC outlets. However, the vehicle differs greatly from standard household electrical goods in the following ways, and incorrect usage could cause fire or electric shock, possibly leading to death or serious injury
- When 240V charging, a large amount of current will flow for a long time.
- Charging can be conducted outdoors.
NOTICE
Charging precautions
- To charge properly, follow the procedure after reading the explanation below. Charging is intended to be carried out by licensed drivers only who properly understand the charging procedure.
- Do not allow people who is not used to charging, such as children, to perform charging without supervision. Also, keep the AC charging cable out of reach of infants
NOTICE
When charging with a charger, follow the procedures for using each charger.
Confirm the following before charging
Before charging, always check the following items.
- The parking brake is applied.
- The power switch is turned to OFF.
- Lights such as the headlights, emergency flashers, and interior lights, etc. are turned off.
If these light switches are turned on, then these features will consume electricity, and charging time will increase.
Inspecting the AC charging cable
For safety, inspect the AC charging cable on a routine basis.
Before charging, make sure that each part of the AC charging cable is in good condition.
During charging
- The charging starting time may differ depending on the state of the vehicle, but this does not indicate a malfunction.
- During charging, sounds may be heard from near the traction battery in accordance with the operation of the air conditioning system or “Battery Cooler”
- During and after charging, the motor compartment and its surrounding area in which the onboard traction battery charger is installed may get warm.
- The surface of the CCID (Charging Circuit Interrupting Device) may become hot, but this does not indicate a malfunction.
- Depending on radio wave conditions, interference may be heard on the radio.
When charging using a public charging facility
- When charging using a public charging facility, check the setting of the charging schedule function.
- When the charging schedule is registered, temporarily turn off the function or turn “Charge Now” on.
- When the charging schedule is set to on, charging will not start even if the AC charging cable is connected. Also, a charging fee may occur due to the connection of the AC charging cable.
Capacity reduction of the traction battery
The capacity of the traction battery will decline gradually when the traction battery is in use. The rate at which it declines will differ in accordance with environmental conditions and the way in which the vehicle is used. Observing the following can help suppress the decline in the traction battery capacity.
- Avoid parking the vehicle in high-temperature areas, under direct sunlight when the traction battery is fully charged.
- Avoid accelerating and decelerating frequently and suddenly.
- Avoid frequent driving at high speed.
- Use the charging schedule function as much as possible in order to fully charge the traction battery before starting off.
- Avoid frequent DC charging Also, if the capacity of traction battery capacity reduces, the distance that can be driven decreases. However, vehicle performance does not significantly become worse
When the remaining charge of the traction battery is low after charging
In the following situations, the remaining charge of the traction battery after charging completes may be less than normal in order to protect the traction battery (the driving range after the battery is fully charged may be shorter).
- Charging is performed when the outside temperature is low or high
- Charging is performed immediately after high-load driving or in extreme heat
In any other situation, if the remaining charge of the traction battery is significantly lower than normal after charging completes, have the vehicle inspected by your Toyota dealer. When this occurs, even if the remaining charge display of the traction battery shows that it is fully charged, the remaining charge rapidly decreases faster than normal.
When the charging amount sent to the traction battery decreases
When the amount of power supplied by the charger is low or the operation of the battery heater, etc., reduces the charging power sent to the traction battery, the charging amount sent to the traction battery may decrease.
Certification
This device complies with Part 15 of the FCC Rules. Operation is subject to the following two conditions:
- this device may not cause harmful interference, and
- this device must accept any interference received, including interference that may cause undesired operation.
Charging time may increase
In the following situations, charging time may become longer than normal:
- In very hot or very cold temperatures.
- When the traction battery becomes hot, such as immediately after high-load driving.
- The vehicle is consuming a lot of electricity, for example, when the headlights are on, etc.
- When using “My Room Mode”
- There is a power outage during charging.
- There is an interruption in the electrical supply.
- There is a drop in the voltage of the external power source.
- The charge in the 12-volt battery is low, for example, due to the vehicle being left unused for a long period of time.
- When the upper limit of the charging current is changed in the charging current setting of the vehicle
- When the battery heater operates.
- When the “Battery Cooler” is operated before charging.
- When the plug generates heat due to a loose outlet connection, etc..
- When adjusting the power supply with the charger.
- When frequently and repeatedly using DC charging.
- When selecting the “DC charging power” setting other than “MAX”.
- When the temperature of charging-related parts is high.
Charging electricity
This vehicle can be charged up to approximately 7 kW. However, depending on the used charger or AC charging cable, charging electricity may be limited.
How to use AC charging
This section explains the procedure for charging the traction battery with an AC charging cable. When using an AC charger, make sure to check the operation instructions of the AC charger. When the charging schedule is registered, make sure “Charge Now” is turned on before charging.
NOTICE
- When using the AC charging cable and related parts To prevent damage to the AC charging cable and related parts, observe the following precautions.
- When interrupting or canceling charging, remove the charging connector before removing the plug.
- When removing the AC charging cable, check that the charging connector is unlocked.
- Do not forcefully pull the charging connector cap and AC charging inlet cap.
- Do not apply a vibration to the charging connector while charging. Charging may be stopped.
- Do not insert anything but the charging connector into the AC charging inlet
NOTICE
- When inserting the plug into or removing the plug from the outlet, make sure to hold the body of the plug.
- Do not damage the AC charging inlet cap with a sharp object.
- Do not forcefully pull the AC charging cable that is caught or entangled. If the cable is entangled, disentangle it before using.
- AC charging inlet Do not disassemble, repair or modify the AC charging inlet. When the AC charging inlet needs to be repaired, consult your Toyota dealer.
Charging precautions
When charging
-
- Prepare the AC charging cable.

- Prepare the AC charging cable.
Insert the plug of the AC charging cable into the outlet of the external power source.
- Open the charging port lid. The charging inlet light will illuminate.

- Open the AC charging inlet cap.
- Remove the charging connector cap and secure it to the cable.

- Insert the charging connector into the AC charging inlet.

Align the guide position on the bottom of the charging connector, and push the charging connector straight into the AC charging inlet as far as possible. Once a click sound is heard, check that the charging connector is securely locked. When the charging connector is inserted straight as far as possible, it will automatically lock.

- Confirm that the charging indicator of the charging port is illuminated.
Charging will not start if the charging indicator does not illuminate when the charging connector is inserted. If the charging indicator is flashing, the charging schedule is registered. If the error warning indicator on the CCID (Charging Circuit Interrupting Device) flashes during charging, check and follow the correction procedure. The charging indicator will turn off when charging is completed. The charging indicator will also turn off when charging is interrupted. In this case,
When connecting the AC charging connector
If the door is opened or the power switch is turned to ON with the AC charging connector connected, the charging cable indicator turns on to notify that the AC charging connector is connected.
If the charging indicator of the charging port flashes after connecting the AC charging cable
The charging schedule is registered and charging cannot be performed. To cancel charging using charging, perform any of the following procedures.
- Turn “Charge Now” on
- While the charging indicator is flashing, remove and reconnect the charging connector immediately
When the charging connector cannot be inserted into the AC charging inlet
Safety function
If the latch release button is pressed, charging will not begin even if the AC charging cable is connected. Also, charging will be stopped if the latch release button is pressed and held for several seconds during charging. When restarting charging, reinsert the charging connector after pulling it out, and check that the charging indicator of the charging port illuminates.
Charging time may increase
When your circuit breaker trips during charging
The upper limit of the charging current can be changed on the multi-information display or multimedia.
Setting operations on the multi-information display
- Press of the meter control switches to select
- Press of the meter control switches to select “Vehicle Settings”, and then press and hold.
- Press of the meter control switches to select “Charging Settings”, and then press. The “Charging Settings” screen will be displayed.
- Press of the meter control switches to select “Charging Current”, and then press. The “Charging Current” screen will be displayed.
- Press of the meter control switches to select “16A” or “8A” and then press .
Setting operations on multimedia
- Select
- Select “Vehicle customize”.
- Select “Charging”.
- Select “Charging current”.
- Select “16A” or “8A”.
The maximum charging current is limited to less than or equal to the selected current.* If the breaker still trips while charging, even after changing the upper limit of the charging current, check if the connected power source meets the specified charging conditions. Restricting the charging current will lengthen the charging time.
Changing the “Charging Limit” settings
The upper limit of the charge capacity can be changed on the multi-information display or multimedia. The selected upper limit value is common to AC charging and DC charging.
Setting operations on the multi-information display
- Press of the meter control switches to select.
- Press of the meter control switches to select “Vehicle Settings”, and then press and hold.
- Press of the meter control switches to select “Charging Settings”, and then press. The “Charging
- Settings” screen will be displayed.
- Press of the meter control switches to select “Charging Limit”, and then press.
- The “Charging Limit” screen will be displayed.
- Select “Full”, “90%”, “80%”, “70%”, “60%” or “50%” and then press.
Setting operations on multimedia
- Select
- Select “Vehicle customize”.
- Select “Charging”.
- Select “Charging limit”.
- Select “Full”, “90%”, “80%”, “70%”, “60%” or “50%”.
If the setting is changed during DC charging, charging may stop due to the operation of the DC charger timer and the traction battery cannot be fully charged.
Protection function of AC charging inlet overheating
By installing a temperature sensor to the AC charging inlet, prevents parts from melting when the temperature rises due to foreign matter entering the charging connector. When a certain temperature increase is detected, charging is stopped immediately. After this, when the power switch is off, a message will be displayed on the multi-information display
WARNING
When charging
Observe the following precautions. Failure to do so may cause an unexpected accident, resulting in death or serious injury.
- Connect to a power source suitable for charging.
- Check that the AC charging cable, plug, and outlet are free of foreign matter.
- Before charging, check that the AC charging inlet is not deformed, damaged or corroded, and check that the inlet is free of foreign matter such as dirt, snow and ice. If there is dirt or dust in these areas, remove it completely before inserting the charging connector.
- Do not get the terminals of the AC charging inlet wet.
- Only use outlets where the plug can be securely inserted.
- Do not bundle or wind the AC charging cable while charging, as doing so may result in overheating.
- Do not touch the terminals of the charging connector and AC charging inlet with sharp metal objects (needles, etc.,) or hands, or short them with foreign objects.
WARNING
- When charging outdoors, make sure to connect to a weatherproof outlet for outdoor use. Ensure the weatherproof outlet cover closes completely. If the weatherproof outlet cover cannot be closed, install a weatherproof outlet cover that will close.
- In order to stop charging at the charging station, follow the instructions of the charger.
- If any heat, smoke, odors, noise or other abnormalities are noticed during charging, stop charging immediately.
- Do not insert the plug if the outlet is submerged in water or snow.
- When charging while it is raining or snowing, do not connect or disconnect the plug if your hands are wet. Also, do not get the plug or outlet wet.
- Do not charge the vehicle during a lightning storm.
- Prevent the AC charging cable from being caught in the door or back door.
- Do not let the wheels on the AC charging cable, plug, charging connector and CCID (Charging Circuit Interrupting Device).
- Firmly insert the plug into the outlet.
- Do not use an extension cord and converting adaptor. Close the hood before using the charging system. The cooling fan may start operating suddenly. Touching or getting close to rotating parts such as the fan may cause your hands or clothes (especially a necktie or scarf) to become caught and result in a serious injury.
- After connecting the charging cable, confirm that it is not wound around anything.
- If the power indicator on the CCID (Charging Circuit Interrupting Device) does not illuminate after plugging the AC charging cable into the outlet, unplug it immediately.
- If the error warning indicator on the CCID (Charging Circuit Interrupting Device) illuminates or flashes during charging There may be an electrical leakage in the power source path, or there may be a malfunction in the AC charging cable or CCID (Charging Circuit Interrupting Device). Refer to P.90 and follow the correction procedure. If the error warning indicator does not turn off even after performing the correction procedure, immediately stop charging, remove the AC charging cable and contact your Toyota dealer. Continuing to charge the vehicle in that condition may lead to unforeseen accidents or serious injury.
WARNING
- Onboard traction battery charger The onboard traction battery charger is located in the motor compartment. Make sure to observe the following precautions regarding the onboard traction battery charger. Failure to observe these precautions may result in death or serious injury such as burns and electric shocks.
- The onboard traction battery charger is hot during charging. Do not touch the onboard traction battery charger, as doing so may result in burns.
- Do not disassemble, repair or modify the onboard traction battery charger. When the onboard traction battery charger needs to be repaired, consult your Toyota dealer.
NOTICE
- When charging Do not insert the plug into the AC charging inlet. The AC charging inlet may be damaged.
- Using private power generators Do not use private power generators as a power source for charging. Doing so may make charging unstable, the voltage may be insufficient, and the charging operation may stop.
- Charging station Due to the environment in which the power equipment is located, charging may be unstable due to noise, the voltage may be insufficient, and the charging operation may stop
After charging
- Unlock the doors to unlock the charging connector.
- The charging connector will be unlocked and the AC charging inlet light will illuminate when the doors are unlocked.
- Pull the charging connector towards you while pressing the latch release button.
- If the latch release button is pressed during charging (while the charging indicator is illuminated), charging will be interrupted.

- Attach the charging connector cap.

- Close the AC charging inlet cap and close the charging port lid.
- Remove the plug from the outlet when the charging equipment will not be used for a prolonged period of time.

- Hold the body of the plug when removing. Make sure to put the cable away immediately after disconnecting. When leaving the plug inserted, inspect the plug and connector once a month to check if dirt or dust has accumulated.
 When the outside temperature is low or high
The level shown on the SOC (State of Charge) gauge may drop slightly when the power switch is turned to ON, even if charging has been completed and the traction battery is fully charged. However, this does not indicate a malfunction.
When removing the charging connector
Press the latch release button, check that the lever raises up, and then pull the charging connector towards you. If the lever does not raise up even after the latch release button is pressed, the charging connector is locked. If this occurs, unlock the doors using the smart key system or wireless remote control to unlock the charging connector.

If the charging connector cannot be unlocked
WARNING
After charging Remove the plug if it will not be used for a long time. Dirt and dust may accumulate plug or outlet, which could cause a malfunction or fire, possibly leading to death or serious injury.
NOTICE
- After charging
- Store the AC charging cable out of reach from infants and children.
NOTICE
- After removing the plug from the outlet, keep it in a safe place free from moisture and dust. The AC charging cable or plug may be damaged if the cable is stepped on or ridden over by the vehicle.
- After disconnecting the charging connector from the AC charging inlet, make sure to close the AC charging inlet cap and close the charging port lid. If the AC charging inlet cap is left open, water or foreign objects may enter the AC charging inlet, which could lead to vehicle damage.
How to use DC charging
This section explains the DC charging procedure for the traction battery. When using a DC charger, make sure to check the operating instructions of the DC charger
WARNING
When using a DC charger
- Observe the following precautions. Failure to do so may cause an unexpected accident, resulting in death or serious injury.
- Use an SAE J 1772 compliant DC charger.
- Do not use the charging cable longer than 30 meters.
Confirm the following before charging
When charging
- Open the charging port lid.
- The charging inlet light will illuminate.

- Open the AC charging inlet cap, and then open the DC charging inlet cap.

- Insert DC charging connector firmly and fully into the charging inlet

- Insert the DC charging connector and it will lock automatically. The DC charging connector shape and treatment will differ depending on the type of DC charger. Perform the operations in accordance to the handling procedures of the DC charger.
- Operate the DC charger and start the charging. Follow the handling procedures of the DC charger to start charging. Charging starts after a system check is done.
- Confirm that the charging indicator on the charging port lights up.
- When the charging indicator is not lit, charging has not started. Stop the charging in accordance to the handling procedures of the DC charger when it is desired to interrupt the DC charging.
Charging time may increase when
When the DC charging connector cannot be inserted into the DC charging inlet
If a message indicating vehicle error on the DC charger side is displayed
Even if a message indicating vehicle error on the DC charger side (ex. vehicle error found, vehicle error occurred, etc.) is displayed, there is no vehicle fault but possibly a communication error between the DC charger and vehicle. In this case, there may be terminal damage (bad contact) in the DC charging connector. If there is no error with the vehicle, contact the facility manager of the DC charger.
During DC charging
- The current charging condition can be checked on the multi-information display.
- The actual charging time may differ from that displayed on the DC charger during charging.
- There may be occasions the radio cannot be heard due to noise occurrence during DC charging
- As the battery approaches full charge, the charging speed will decrease and it will take longer to complete charging.
- The time to complete charging may change, or charging may stop before reaching the upper limit of the charge capacity, due to the remaining charge of the traction battery, the outside temperature, the specifications of the charger (stand), etc.
- It is recommended to avoid frequent DC charging to prevent a decline in the traction battery capacity.
- Quickly move from the DC charging space for other users after the DC charging is completed.
2023 toyota BZ4x Specs, Price, Features and Mileage (Brochure)
How to set the DC charging power
You can change the DC charging power limit on the multi-information display or multimedia.
Setting operations on the multi-information display
- Press of the meter control switches to select
- Press of the meter control switches to select “Vehicle Settings”, and then press and hold .
- Press of the meter control switches to select “Charging Settings”, and then press . The “Charging Settings” screen will be displayed.
- Press of the meter control switches to select “DC charging power”, and then press . The “DC charging power” screen will be displayed.
- Press of the meter control switches to select the charging power from “MAX”, “125kW”, “100kW”, “75kW”, “50kW” and then press .
*The maximum power when charging is limited to the selected power or less. If “MAX” is selected, the vehicle will be charged with the maximum power that can be charged.
Setting operations on multimedia
- Select
- Select “Vehicle customize”.
- Select “Charging”.
- Select “DC charging power”.
- Select from “MAX”, “125kW”, “100kW”, “75kW”, “50kW”.
The maximum power when charging is limited to the selected power or less. If “MAX” is selected, the vehicle will be charged with the maximum power that can be charged.
Changing the “Charging Limit” settings
If “Check Charging System Close Charging Port Lid See Owner’s Manual” is displayed on the multi-information display
If the system check after DC charging is not completed successfully, the EV system will not start even if the power switch is pressed while depressing the brake pedal. Perform a system check with the following procedures.
- Be sure to engage the parking brake and then turn the power switch off.
- Close the charging inlet cap, close the charging port lid.
- Check if “Checking Charging System” is displayed on the multi-information display when the power switch is turned to ON.
Do not open the charging port lid while the charging system is checking. When the system check is completed, the power switch automatically turns off.
- Press the power switch while depressing the brake pedal. The “READY” indicator turns on.
Contact your Toyota dealer if the charging system check is done and the message on the multi-information display does not go off.
WARNING
Warnings for DC charging
- Be sure to observe the following when using DC charging. Failure to do so may cause an accident that could lead to death or serious injury.
- Check that the DC charger and DC charging inlet are not damaged. If there is any damage to the DC charging inlet, do not perform a DC charge and have it inspected immediately at your Toyota dealer.
- Do not touch the terminals of the DC charging connector or inlet with metallic sharp tips (wires and needles), or allow a short circuit to occur with foreign objects.
- Do not insert anything other than the DC charging connector into the DC charging inlet
- Check that the DC charging cable is not coiled up or pinned underneath heavy objects.
- Be sure the DC charging inlet makes direct contact with the DC charging connector. Do not connect conversion adapters, extension cords, etc., between the DC charging connector and DC charging inlet.
- When DC charging is interrupted, follow the handling procedures of the DC charger. Immediately stop the DC charging when there is an outbreak of heat, smoke, strange noises or smells, etc., during charging.
- Check that the DC charging connector and DC charging inlet do not have foreign objects or snow or ice attached to it. If anything is attached to the inlet, be sure to completely remove the material before connecting the DC charging connector.
- Do not charge the vehicle when there is a possibility of lightning. If you notice lightning while charging the vehicle, do not touch the vehicle and the DC charging cable.
- Do not get the DC charging inlet terminals wet.
- Close the hood when using DC charging. The cooling fan may suddenly start to run. Keep hands and clothing (especially a tie, a scarf or a muffler) away from the fan. Failure to do so may cause the hands or clothing to be caught, resulting in serious injury.
WARNING
When connecting the DC charging connector
- Follow the handling procedures of the DC charger to connect the DC charging connector. If the connector is not connected properly, the system cannot recognize the connection, and it may be possible to start the EV system. After charging is completed, make sure to remove the DC charging connector from the DC charging inlet before starting the EV system. If the vehicle is started off with the connector still connected, it could lead to an accident, possibly resulting in death or serious injury.
- Do not remove the DC charging connector from the DC charging inlet during DC charging. After operating the DC charger to stop charging, remove the DC charging connector from the DC charging inlet.
NOTICE
When using DC charging Make sure to follow the handling procedures of the DC charger. If the procedures are not followed properly, the vehicle and the DC charger may be damaged.
After charging
- Operate the DC charger to stop the charging.
- DC charging connector will be unlocked automatically when charging is completed
- Remove the DC charging connector.

- The DC charging connector shape and treatment will differ depending on the type of DC charger.
- Perform the operations in accordance with the handling procedures of the DC charger.

- Return the removed DC charging connector to its original position.
- Close the AC charging inlet cap and close the DC charging inlet cap, and then close the charging port lid.
When DC charging cannot be stopped
If charging cannot be stopped from the DC charger side due to a malfunction, etc. You can also stop DC charging by pressing the door unlock button (on the electronic key, or driver’s door) three times at 1 to 2 seconds intervals.
If the DC charging connector cannot be unlocked
After DC charging
Even if the traction battery is charged to the upper limit value that is set, the level of charge displayed on the DC charger may be lower than the actual one.
NOTICE
Caution after DC charging Be sure to attach the DC charging inlet cap to the DC charging inlet and then close the charging port lid after removing the DC charging connector from the inlet. If the DC charging inlet cap is not closed, foreign materials may get into the inlet and the EV system may be malfunctioning
Using the charging schedule function
AC charging can be carried out at the desired time by registering the charging schedule.
Calendar settings
Charging schedule is performed according to the date and time shown on the multi-information display. Refer to the “Settings display” If the calendar settings check screen is displayed when an attempt was made to register a charge schedule, check that the correct date is set. If it is incorrect, be sure to correct it. If the calendar information is wrong, the charging schedule function will not operate normally.
Settings of the charging schedule function
When registering the charging schedule, the following settings can be changed.
Select the charging mode
One of the two following charging modes can be selected.
- “Start”
- Starts charging at the set time* and finishes charging when fully charged.
- “Start-Stop”
- AC charging is performed according to the set start time and stop time.
There might be a slight error in the timing when charging starts due to the state of the traction battery.
Repeated setting
The periodic charging schedule can be set by selecting your desired day of the week. Select one or more day of the week to do the charging schedule.
Turning “Charge Now” on and off
To start charging without changing the charging schedule setting, turn “Charge Now” on to temporarily cancel the charging schedule and enable charging after connecting the AC charging connector.* *: If the charging connector is removed during charging while the charging schedule is registered and “Charge Now” is on, “Charge Now” turns off.
“Next Event”
Of the registered charging schedules, the closest charging schedule after the current time is called the “Next Event”. For charging schedule, AC charging will be performed according to the Next Event
Registering the charging schedule
The charging schedule can be registered on the multi-information display or multimedia.
- Multi-information display operation:
- Multimedia operation:

Charging schedule
- The charging schedule cannot be set while driving.
- A maximum of 15 charging schedules can be registered.
If the charging mode is set to “Start- Stop” and the start time and stop time are set to the same time, charging will be performed for 24 hours from the start time. The charging schedule function can not be used when using DC charging.
To make sure that the charging schedule function operates correctly
Check the following items.
- Adjust the clock to the correct time
- The calendar is set to the correct date
- Check that the power switch is turned off
- After registering the charging schedule, connect the AC charging connector The charging start time is determined based on the charging schedule at the time that the AC charging connector was connected.
- Connect the AC charging connector before the start time When the charging mode is set to “Start”, if you connect the AC charging connector after the set start time, the next charging schedule will be referenced. When the charging mode is “Start- Stop”, if you connect the AC charging connector after the start time, charging will start immediately and charging will be performed until the stop time.
- After connecting the AC charging connector, check that the charging indicator of the charging port flashes
- Do not use an outlet that has a power cut off function (including a timer function)
Use an outlet that constantly supplies electricity. For outlets where the power is cut off due to a timer function, etc., charging may not be carried out according to plan if the power is cut off during the set time.
When the AC charging connector remains connected to the vehicle
- When the charging mode is set to “Start”, even if multiple consecutive charging schedules are registered, the next charge will not be carried out according to the charging schedule until the AC charging connector is removed and reconnected after charging completes. Also, when the traction battery is fully charged, charging according to the charging schedule will not be carried out.
- If the charging stop time is reached before the traction battery is fully charged and the charging mode is set to “Start- Stop”, the nearest charging schedule after the stop time is updated as the next charging schedule, and charging is repeated until the battery is fully charged.
Smartphone-linked operation
After applying to Toyota App, it is possible to use the smartphone application to change charging schedule settings.
When charging schedules are ignored
When the following operations are performed while the charging schedule is on standby, charging schedule is temporarily canceled and charging is started.
- When the Remote Air Conditioning System is operated
- When turning “My Room Mode” on
- When turning “Charge Now” on
- When an operation that temporarily cancel charging using the charging schedule
Battery heater/“Battery Cooler”
Depending on the temperature of the traction battery, the traction battery heater or traction battery cooler may be activated and the charging indicator may light up while the timer is waiting for charging.
Setting operations on the multi-information display
When operating charging schedule, use the meter control switches.
- Meter control switches
- Multi-information display
Registering the charging schedule
- Press of the meter control switches to select
- Press of the meter control switches to select “Vehicle Settings”, and then press and hold .
- Press of the meter control switches to select “Charging Settings”, and then press .
- The “Charging Settings” screen will be displayed.
- Press of the meter control switches to select “Charging Schedule”, and then press .
- The “Charging Schedule” screen will be displayed.
- Press of the meter control switches to select “Scheduled Events”, and then press .
- The “Scheduled Events” screen will be displayed.

- Press of the meter control switches to select “+add”, and then press .
- The “Charging Mode” screen will be displayed.

- Press of the meter control switches to select the item to change with the cursor, and then press or to change the setting.
- When the charging mode is “Start”, set the charging start time.
- When the charging mode is “Start-Stop”, set the charging start time and stop time.
- After changing the settings to the desired settings, press .
- Press of the meter control switches to select the desired day to activate for the repeated setting, and then press .
- Each time is pressed, the repeated setting switches between on and off.
- When set to on, the charging schedule is repeated on that day. It is possible to set more than one day to on. After changing the settings to the desired settings, select “Done”, and then press. A screen where the settings can be saved will be displayed.
- Select “Save” and press to save the settings.
- The settings will be saved. If you wish to change the settings, press and perform the setting procedure again. After setting operations are complete, when the AC charging connector is connected to the vehicle, charging will be carried out according to the charging schedule settings.
Switching charging schedules between on and off
The registered charging schedules can be turned on and off.
- Perform step 1 to 5 of the “Registering the charging schedule” procedure and display the “Scheduled Events” screen.
- A list of the registered charging schedule will be displayed.

- Pressof the meter control switches to select the item to turn ON/OFF, and then press
- Each time is pressed, the selected charging schedule switches between on and off. When set to off, a charging schedule is ignored and charging according to the charging schedule is not carried out.

Changing the registered charging schedules
The registered charging schedules can be modified or deleted.
- Perform step 1 to 5 of the “Registering the charging schedule” procedure and display the “Scheduled Events” screen.
- A list of the registered charging schedule will be displayed

- Press of the meter control switches to select the item to change, and then press and hold .
- The “Edit Event” screen will be displayed.
- Press of the meter control switches to select the item to operate, press and perform the necessary operation.
“Edit”
Change the desired settings as described starting from step 7 of the “Registering the charging schedule” procedure.Press to return to the previous screen.
“Delete”
- A deletion confirmation screen will be displayed.
- Press
 of the meter control switches to select “Yes”, and then press to delete the selected charging schedule.
- To cancel deletion, select “No” and Press or of the meter control switches to select the item to change, and then press and hold . The “Edit Event” screen will be displayed.
- Press of the meter control switches to select the item to operate, press and perform the necessary operation
Displaying “Next Event”
- Perform step 1 to 4 of the “Registering the charging schedule” procedure and display the “Charging Schedule” screen.
- Press or of the meter control switches to select “Next Event”, and then press . The “Next Event” screen will be displayed.
When charging schedule setting operations are canceled
- When the vehicle is in the following conditions, charging schedule setting operations are canceled.
- The power switch is operated before the settings are confirmed
- The vehicle starts off
- A display with a higher priority than that of the charging schedule setting is shown.
NOTICE
- While performing the setting operation
- When performing the setting operation while the EV system is stopped, be careful that the 12-volt battery will not be discharged.
Setting operations on multimedia
For details on how to operate the audio system screen, refer to “MULTIMEDIA OWNER’S MANUAL”. Setting operations related to the charging schedule are performed on the “Charging schedule” screen.
Displaying the “Charging schedule” screen
Turn the power switch ON and display the menu screen. It is not possible to control the
How to read the “Charging schedule” screen
Charging Schedule settings in Accessory Mode.
- “POWER ON”
- Select and “Charging schedule”, in that order. The “Charging schedule” screen will be displayed.

- Select and “Charging schedule”, in that order. The “Charging schedule” screen will be displayed.
- Charging schedules
- Displays the week-long registered charging schedule in a list using icons.
- “Add” button
- Press to add a new item to the charging schedule.
- “Edit” button
- Press to change or delete registered items on the charging schedule.
- “Charge now” button
- Each time the button is pressed, “Charge now” switches between on and off.
- Return button
- Press to close the “Charging schedule” screen.
Registering the charging schedule
- Display the “Charging schedule” screen.
- Press “Add”.
- The “Add event” screen will be displayed on the screen.
- Change the schedule to the desired time.
Charging mode
Press “Start at set time” or “Start and stop at set times” to set the desired charging mode.
- When “Start at set time” is selected
- Set the charging start time, and press “OK”.

When “Start and stop at set times” is selected
Set the charging start time and stop time, and press “OK”.
Repeated settings
- Select the day of the week and press OK.

- When turned on, the charging schedule is repeated on that day. It is possible to turn more than one day on.
- After setting operations are complete, press “Save”.
The charging schedule is registered and an icon is added to the schedule. To cancel registration of the charging schedule, press the return button. After setting operations are complete, when the power switch is turned off and the AC charging connector is connected to the vehicle, charging is carried out according to the charging schedule settings.
Switching charging schedules between on and off
- Display the “Charging schedule” screen.
- Press “Edit”. The “Events” screen will be displayed on the screen.
- From the items displayed on the screen, press on or off in the row of the charging schedule you wish to change.
If the charging schedule you wish to change is not displayed on the screen, scroll the list up and down to display it. Each time the button is pressed, the charging schedule switches between on and off.

Changing the registered charging schedules
- Display the “Charging schedule” screen.
- Press “Edit”.
- The “Events” screen will be displayed on the screen.
- Press “Edit” on the “Events” screen.

- From the items displayed on the screen, press the charging schedule you wish to change.

Changing registered items:
Change the desired settings as described in step 3 to step 4 of the “Registering the charging schedule” procedure. When a setting is changed, its icon on the calendar also changes.
Deleting registered items: Press “Delete”.
A deletion confirmation message will be displayed. Press “Delete” to delete the selected charging schedule. To cancel deletion, press “Cancel” or the return button. When a charging schedule is deleted, its icon is also deleted from the calendar.
Turning “Charge now” on
- Display the “Charging schedule” screen
- Press “Charge now”.
Each time the button is pressed, “Charge now” switches between on and off. After setting operations are complete, charging starts when the AC charging connector is connected.
Changing Next Event
If the multimedia customize content “ACC customize” is not set to OFF, the ending screen will not be displayed. If it is this case, check the settings of the multimedia. Turn the power switch off. Next event will be displayed according to the charging schedule settings. When press “OK”, close Next charging event screen. When press “Charge Now”, charge now is turned on.
When all charging schedules are turned off
The icon is not displayed on the “Charging schedule” screen. The icon will be displayed by turning it ON on the “Events” screen.
When charging schedule setting operations are canceled
- When the vehicle is in the following conditions, charging schedule setting operations are canceled.
- The power switch is turned off before the settings are confirmed
- The vehicle starts off
- A display with a higher priority than that of the charging schedule setting is shown
NOTICE
While performing the setting operation When performing the setting operation while the EV system is stopped, be careful that the 12-volt battery will not be discharged.
Using My Room Mode
When the charging cable is connected to the vehicle, electrical components such as the air conditioning system and audio system can be used by the power supply from an external power source.
Starting My Room Mode
- Connect the charging cable to the vehicle to start charging.
- AC Charging:
- DC Charging:
- Turn the power switch to ON while charging. My Room Mode settings is automatically displayed on the multi-information display.
- Operate the meter control switches to select “Yes”, and then press “OK”.
My Room Mode is started and it is possible to use the air conditioning system, audio system, etc. Select “No” and press “OK” when My Room Mode is not being used. To disable My Room Mode, turn the power switch off. My Room Mode will automatically be off when DC charging is completed.
Display information for electric power balance during My Room Mode
When starting My Room Mode, the electric power balance will be automatically displayed on the multi-information display, and an approximation of the electricity balance (the balance between the amount of electricity provided and electricity consumed) during My Room Mode can be checked.
- Discharging (-)
- Charging (+)
The size of the arrow symbol changes depending on the power supply and electricity consumption amounts. If the electricity consumption is more than the power supply, is displayed more than . If the power supply and electricity consumption amounts are equal, and are displayed as the same size.
Meter display while charging
After turning the power switch to ON while charging, the power switch automatically turns off if My Room Mode is not selected within approximately 100 seconds.
When using My Room Mode the following may occur
- When the remaining charge of the traction battery drops to the lower limit, the air conditioning system automatically stops. In that case, the air conditioning system can not operate until the remaining charge of the traction battery increases. Turn off the power switch once, then use My Room Mode after the remaining charge of the traction battery increases.
- The charging time of the traction battery gets longer.
- Noise may be heard from the radio depending on the conditions of the radio wave.
- The surrounding area of the onboard traction battery charger in the motor compartment may become hot.
- The electric power steering system warning light (yellow) may turn on, but this is not a malfunction.
Using My Room Mode during DC charging
When using My Room mode during DC charging, the state of charge completion will be lower than when not using My Room Mode.
When “My Room Mode” is used while the traction battery is fully charged
When the power switch is turned on while the traction battery is fully charged and the charging connector that supplies power is connected, “Charging Port Lid is Open” is displayed on the multi-information display. In this case, press on the meter control switches to display the setting screen of “My Room Mode”, and then select “My Room Mode”. When “My Room Mode” is used while the traction battery is fully charged, the electric power of the traction battery may be consumed. In this case, charging may be performed again.
Warning message display
When trying to start My Room Mode or My Room Mode is being used, if a message is displayed on the multi-information display, refer to the corresponding table and perform the appropriate correction procedures.
| Message | Correction procedure |
| “Traction Battery is too Low for “My Room Mode”” | There is no remaining charge of the traction bat- tery to start My Room Mode. Wait until the remaining charge of the traction battery increases, start My Room Mode. |
| ““My Room Mode” has stopped due to low traction battery level” | The remaining charge of the traction battery is insufficient. Stop using My Room Mode and charge the traction battery. |
|
““My Room Mode” will stop when traction battery level is too low Reduce power usage to continue using “My Room Mode”” |
When My Room mode electricity consumption exceeds the charge amount, the traction battery charge level becomes too low.*
• If the electricity consumption of the vehicle can not be improved, My Room Mode will be off. • When My Room Mode continuation is desired, turn off the air conditioning system, audio sys- tem, etc., to increase the remaining charge of the traction battery. |
Warnings for using My Room
- Mode Observe the following precautions. Failure to do so may result in death or a serious health hazard.
- Do not leave children, people who need care, or pets inside the vehicle.
- The temperature inside the vehicle may become high or low due to features such as the automatic shut-off.
- The children, people who need care, or pets left inside the vehicle may suffer heatstroke dehydration or hypothermia. Also, since the wipers, etc., can be operated, there may be accidental operation, possibly leading to an accident.
- Use the mode after sufficiently checking the vicinity of the vehicle for safety hazards.
When charging cannot be carried out
When charging does not start, even though the normal procedure is followed, check each of the following items. If a message is shown on the multi-information display, also refer to
When charging cannot be carried out
Refer to the following table and carry out the appropriate correction procedure.
The error warning indicator on the CCID (Charging Circuit Interrupting Device) flashes
| Likely cause | Correction procedure |
|
Electrical leakage detection function or self-diagnostic function operates and power is cut off |
When the voltage is insufficient, the error warning indicator may flash when there is noise interference.
Perform a reset and connect to a proper power source. If charging does not start, immedi- ately stop charging and contact your Toyota dealer. |
Charging indicator of the charging port does not illuminate, even though charging connector is connected
| Likely cause | Correction procedure |
| Plug is not properly connected to outlet | Check that the plug is properly con- nected to the outlet. |
| Power is out | After power is restored, carry out the charging procedure again. |
| Remote switch is off | If the remote switch is equipped, turn the switch on. |
| Likely cause | Correction procedure |
|
Building breaker is tripped and power is cut off |
Check that the breaker is connected and if there is no malfunction, check if the vehicle can be charged through another outlet.
If charging is possible, the first outlet may have a malfunction. Contact the building or facility manager, or an electrician. |
| Short circuit between CCID (Charging Circuit Interrupting Device) and plug | Immediately stop charging and con- tact your Toyota dealer. |
|
AC charging connector is not securely connected to AC charging inlet |
Check the connection status of the AC charging connector.
• When connecting the AC charging connector, make sure not to touch the latch release button. Insert the AC charging connector securely until you hear a click. The AC charging connector may not be connected correctly if the latch release button is pressed while inserting. • After connecting the AC charging connector, check that the latch release button is not pressed and the charging indicator of the charging port is turned on. If the charging indicator of the charging port does not illuminate, even though the AC charging con- nector is securely connected, there may be a malfunction in the system. Immediately stop charging and con- tact your Toyota dealer. |
| Traction battery is already fully charged | When the traction battery is fully charged, charging is not performed. |
|
The AC charger does not operate |
Please contact the facility manager when there is a problem with AC charger. |
Charging indicator of the charging port flashes and charging cannot be carried out.
| Likely cause | Correction procedure |
|
When charging indicator of the charging port flashes normally*: Charging schedule is registered |
When you wish to charge according to the charging schedule, wait until the set time.
To start charging, set “Charge Now” to on. |
| When charging indicator of the charging port rapidly flashes*: Mal- function occurred in an external power source or the vehicle | A message will be displayed on the multi-information display when the power switch is off. Follow the instructions displayed on the multi- information display. |
When DC charging cannot be performed normally
DC charging does not start
| Likely cause | Correction procedure |
|
The DC charging connector is not properly connected to the vehicle. |
Check the connection status of the DC charging connector and be sure that it is locked.
If the DC charging does not start, even though the DC charging con- nector is securely connected, there may be a malfunction with the DC charger or charging system. • If there is a malfunction with the DC charger, contact the charging station manager. • If there is not a malfunction with the DC charger, there may be a malfunction in the system. Contact your Toyota dealer. |
|
The DC charging connector is not securely locked. |
| Likely cause | Correction procedure |
|
Error is detected by the DC charger or vehicle’s system check. |
There may be a malfunction with the DC charger or charging system. • If there is a malfunction with the DC charger, contact the facility manager. • If there is not a malfunction with the DC charger, there may be a malfunction in the system. Contact your Toyota dealer. • If the EV system can not be started, contact your Toyota dealer. |
| The DC charger power goes off. | Contact the charging station man- ager and check the power status. |
| Traction battery is already fully charged | When the traction battery is fully charged, DC charging cannot be per- formed. |
| AC charging connector is also con- nected. | DC charging and AC charging can not be performed together. |
| The EV system is started. |
When the EV system is started, DC charging cannot be started.
Also, if the shift position is not in P, DC charging cannot be performed. |
When DC charging is interrupted
| Likely cause | Correction procedure |
| The timer for the DC charger oper- ates. |
Depending on the type of the DC charger, the timer may be set to stop charging after a certain time.
Check with the charging station man- ager. |
|
The power for the DC charger is off. |
Check the power status of the DC charger. If there are uncertainties with the power status, contact the charging station manager. |
| Likely cause | Correction procedure |
|
The temperature of the traction bat- tery is extremely high or low. |
DC charging may not be performed in extremely high or extremely low temperature environments. Charge the traction battery after the tem- perature has been stabilized. |
|
Error is detected by the DC charger or vehicle’s system check. |
There may be a malfunction with the DC charger or charging system.
• If there is a malfunction with the DC charger, contact the facility manager. • If there is not a malfunction with the DC charger, there may be a malfunction in the system. Contact your Toyota dealer. • If the EV system can not be started, contact your Toyota dealer. |
|
High temperature of charging related parts |
If the temperature of charging related parts is high, DC charging may not be possible. Wait for a while and then charge again. |
| The electrical components such as the air conditioning system stop operating while the traction battery is approximately fully charged. | Keep the electrical components such as the air conditioning system in the OFF state, and then perform the charging procedure again. |
EV system does not start after DC charging
| Likely cause | Correction procedure |
|
The system check is not completed properly after charging. |
Do a system check following the procedures on If the system check can not be completed properly even after these procedures are per- formed, contact your Toyota dealer. |
When the charging schedule function does not operate normally
Cannot charge at the desired time
| Likely cause | Correction procedure |
| The vehicle calendar and clock are not set correctly. | Check the calendar setting and set it to the correct date. |
| AC charging connector is not con- nected to vehicle | Before using the charging schedule, connect the AC charging connector. |
|
AC charging connector was connected after a set time |
Connect the AC charging connector before the time set in “Start”.
When the charging mode is set to “Start-Stop”, the traction battery will charge even if the start time has passed, if the AC charging connector is connected before the stop time. |
Charging starts, even though the charging schedule is registered
| Likely cause | Correction procedure |
|
“Charge Now” is set to on |
When charging according to the charging schedule, set “Charge Now” to off. 128) |
| Charging schedule is set to off | Check that the charging schedule is not set to off. |
|
AC charging connector was removed and reinserted while charging indicator of the charging port was flashing |
If the AC charging connector is removed and reinserted while the charging indicator is flashing, the charging schedule is canceled. temporarily remove the AC charging connector, and then reconnect it. |
|
The Remote Air Conditioning System was operated |
When the Remote Air Conditioning System is operated, the system will start charging, even if the charging schedule is registered. To carry out charging using the charging schedule, stop the Remote Air Conditioning System, and then reconnect the AC charging connector. |
|
Outside temperature is low and trac- tion battery warming control operated |
· When traction battery warming control operates, the charging schedules are ignored and charging starts. In order to protect the traction battery, allow charging to continue. · After removing and installing the 12-volt battery, the charging schedule setting may become invalid due to the initial setting of the traction battery warming control system even when the outside temperature is not low. In this case, after a few runs, the system’s initial settings will be completed and the charging schedule settings will take effect when the outside temperature is not low. |
When charging related message is displayed
When a door is opened with the power switch off, after charging, a message is displayed in the multi-information display. When this occurs, follow the instructions displayed on the screen
If “Charging Stopped Due to Pulled Charging Connector” is shown
| Likely cause | Correction procedure |
| AC charging connector is removed while AC charging |
When the AC charging connector is removed while AC charging, charging stops. If you want to fully charge the traction battery, reconnect the AC charging connector. |
| After the traction battery is fully charged, the AC charging connector is removed while the traction battery is being recharged again because electricity-consuming functions* have been used and the remaining charge is now reduced. |
| Likely cause | Correction procedure |
|
AC charging connector is not securely connected |
Check the connection status of the AC charging connector.
• When connecting the AC charging connector, make sure not to touch the latch release button. Insert the AC charging connector securely until you hear a click. The AC charging connector may not be connected correctly if the latch release button is pressed while inserting. • After connecting the AC charging connector, check that the latch release button is not pressed and the charging indicator of the charging port is turned on. If charging cannot be carried out, even though the proper procedures were followed, have the vehicle inspected by your Toyota dealer. |
| The latch release button of AC charging connector was pressed while AC charging | When the latch release button is pressed while AC is charging, charging stops. To continue charging, reconnect the AC charging connector. |
If “Charging Complete Limited Charge Due to Battery Temp” is shown
| Likely cause | Correction procedure |
| Charging was stopped to protect the traction battery as it continued to remain hot for a certain period of time. | Allow the traction battery to cool down and perform charging again if the charging amount has not reached the desired amount. |
If “Charging Stopped Check Charging Source” is shown
| Likely cause | Correction procedure |
|
The problem in power supply from the external power source |
Check the following items.
• The plug is securely inserted. • Extension cord is not used and outlet is not overloaded. • The remote switch is not off. • Connected to a dedicated power line. • Power outage has occurred or not. • The power indicator on the CCID (Charging Circuit Interrupting Device) is illuminated. • The circuit breakers have not tripped. If all of the above conditions are met, the outlet may be malfunction. Contact an electrician and request an inspection. Furthermore, if the error warning indicator on the CCID (Charging Circuit Interrupting Device) is flashing, there may be electrical leakage. Contact your Toyota dealer. If charging cannot be performed, even though there is no problem with the power source path, there may be a malfunction in the system. Has the vehicle been inspected by your Toyota dealer? |
|
Charging is stopped by AC charger |
Depending on the specifications of the charger, charging may be canceled by an interruption of the power supply. Charging may be stopped by the following. Refer to charger handling methods. • The charging stop button of the charger is pressed. • Charger with off timer function canceled charging • Charger that is not compatible with the charging schedule function of the vehicle • Check if it is possible to charge with the AC charging cable equipped with the vehicle. If charging cannot be carried out even when using the genuine AC charging cable, contact your Toyota dealer. |
| Likely cause | Correction procedure |
|
The AC charger is not compatible with the vehicle |
Check if it is possible to charge with the AC charging cable equipped with the vehicle.
If charging cannot be carried out even when using the genuine AC charging cable, contact your Toyota dealer. |
| The DC charger is malfunctioning. | If the message above is displayed when DC charging has not stopped operations, the DC charger may be damaged, so do not use that DC charger. Check if it is possible to charge with another DC charger. |
| The DC charger is not compatible with the vehicle. |
If “Charging Stopped High Energy Use See Owner’s Manual” is shown
| Likely cause | Correction procedure |
|
Power is being consumed by electrical components of the vehicle |
Check the following items, and then carry out charging again.
• If the headlights and audio are turned on, turn them off. • Turn the power switch off. If charging cannot be carried out, even after performing the above, the 12-volt battery may not be sufficiently charged. Operate the EV system and wait for approximately 15 minutes or more to charge the 12-volt battery. |
If “Charging System Malfunction See Owner’s Manual” is shown
| Likely cause | Correction procedure |
| A malfunction occurred in the charging system | Has the vehicle been inspected by your Toyota dealer? |
If “The Traction Battery Temp is low System put priority on charging to preserve battery condition” is shown
| Likely cause | Correction procedure |
|
The traction battery warming control is operated |
When the traction battery warming control operates, the charging schedule is not used and charging is performed.
This is a control to protect the traction battery and not a malfunction. |
If “Check Charging System Close Charging Port Lid See Owner’s Manual” is shown
| Likely cause | Correction procedure |
|
System check is not completed prop- erly after DC charging. |
The EV system can not be started until the system check is completed properly. |
If “Charging Stopped Time Limit Reached” is shown
| Likely cause | Correction procedure |
|
The DC charging is not completed within the restricted time with DC charger. |
• Depending on the type of DC charger, the timer may be set to stop charging after a certain time. Check with the charging station manager.
Depending on the condition of the vehicle, the charging time may become longer than normal, and the DC charging may not be completed within the restricted time. • When the A/C, headlights, audio system, etc., are turned on, the electricity consumption of the vehicle will be increased. Perform the DC charging after turning off all of the above. • The temperature of the traction battery may be low. Perform the DC charging after warming up the traction battery. |
If “Charging Stopped Check Charging Source or Vehicle” is shown
| Likely cause | Correction procedure |
| A malfunction occurred in the connector locking system. | Have the vehicle been inspected by your Toyota dealer? |
FAQ
The Toyota BZ4X 2023 is powered exclusively by electricity and does not have a conventional internal combustion engine.
The Toyota BZ4X 2023 is likely to use a Type 2 charging connector for AC charging and a CCS Combo connector for DC fast charging.
Modern electric vehicles are designed with safeguards to prevent overcharging, and the charging process is managed by the vehicle’s onboard systems.
Regularly charging your BZ4X when needed and keeping the battery within a moderate state of charge is recommended for optimal battery health.
Useful Links
View Full PDF: 2023 Toyota BZ4X User Guide | Auto User Guide
2023 toyota BZ4x Specs, Price, Features and Mileage (Brochure)